Scotch Eggs

Go ahead. Eat like a Welsh rugby player.
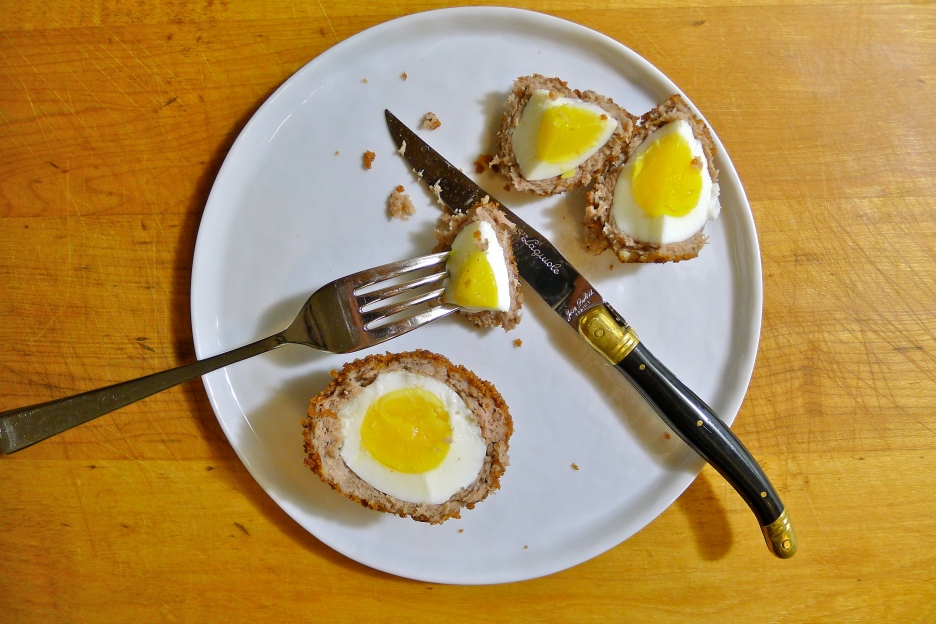
The first really, truly mind-blowing Scotch egg that I ever had was at The Breslin. The breading was shatteringly crisp, the sausage was moist and savory, and the yolk . . . oh the yolk! Just liquid enough, it oozed and spread over the plate like runny gold. I may have moaned. I most certainly peppered the server with questions: “But HOW???? How do they get the egg so PERFECT????? How do they possibly PEEL it so that the egg stays so intact????? The whites must be barely set! DO THEY HAVE THE DELICATE FINGERS OF ANGELS BACK THERE????” In response, I only got a coy smile.

Sous vide!” my friend Jason hissed, “It must be sous vide!

Possible, but doubtful. It was hard to imagine anyone going through the trouble of sous-videing the quantity of eggs that a restaurant would require every night. As we pondered and chewed, and pondered another round of Scotch eggs because anything good should always be ordered twice, I thought that this would be my deep-frying project. I will make this at home, I thought, and all the Scotch eggs will be mine!

As I must be the world’s worst egg peeler, I let the eggs boil until the yolks were firmer — about 5 minutes. Next time, I’ll let them be a little runnier as I found out that a layer of sausage hides a multitude of fingernail gouges and fingertip-sized divots.  The most important thing is that the oil remains hot — between 350-375° F — and the layer of sausage must remain reasonably thin.

All in all, it’s a pretty decadent affair for such a simple preparation. Deep-frying is messy business, but the final result is unbelievably satisfying.

Ingredients:

6 eggs + 2 eggs, beaten

1 pound of breakfast sausage

2 cups of panko bread crumbs

Vegetable oil (for frying)

To prepare:

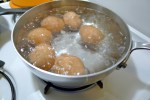
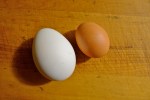
1. Place 6 eggs in the bottom of a medium saucepan and add enough cold water to cover them. Over medium-high heat, bring the water to a boil. When the water begins to boil, cover the pan, remove it from the burner, and let it stand for 3.5-5 minutes, depending on how set you like to have your yolks (3.5 minutes for runny yolks, 4 minutes for just set yolks, 5 for perfectly set yolks) .

2. While the eggs are cooking, prepare an ice water bath. Carefully drain the water and gently roll the eggs around in the pan to crack the shells. Plunge the eggs into the ice water bath and let them sit there until they are cool enough to handle and peel. Once peeled, very gently pat them dry with paper towels.

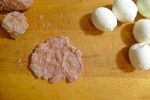
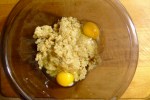
3. Divide the sausage into six equal portions. Flatten and shape each portion into a thin disc about 1/4 of an inch thick.  Lay the patty in the palm of your hand and gently rest a soft-boiled egg in the center of it. Wrap and mold the sausage around the egg, pinching and sealing the seams shut as you go. Make sure that the sausage layer is no thicker than 1/4 of an inch, otherwise the sausage will not cook through before the outside of the Scotch egg begins to burn. Repeat with the remaining sausage and eggs.

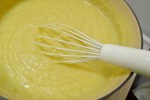
4. In a large, heavy pot, pour in enough oil so that you have a depth of about 2-2.5 inches. Insert the deep-fry thermometer and bring the oil up to 375°. While the oil is heating up, whisk the remaining 2 eggs in a shallow bowl. Keep the panko crumbs another shallow bowl.

5. Right before the oil reaches the right temperature, work quickly and dip each sausage ball in the beaten egg and roll it in the panko crumbs. While keeping an eye on the temperature, carefully place each Scotch egg in the hot oil. You will need to work in batches and the temperature should never drop below 350° F.

6. Turn the Scotch eggs occasionally so that they cook evenly. When they are golden and crisp — about 5-6 minutes — use a slotted spoon to remove them from the oil. Let them drain on a paper towel lined plate. Serve immediately.

Advertisement

Cherry Clafoutis


Clafoutis is the classic dessert of the Limousin, the northwestern part of the Massif Central in the middle of France. Traditionally, it is baked in a buttered dish and is more or less a flan with ripe black cherries. Sometimes, other red fruits like prune plums, red plums or blackberries are used. Done correctly, it is lovely.

When I was doing my internship, the chef taught me a great recipe for clafoutis that was simple and foolproof. We would schedule it for days when we had cooking students who had little or no experience in the kitchen. Not to be trusted with knives, we knew that we could put cherry pitters in their sweaty little hands without fear of accidents. Better yet, since clafoutis tastes best when you leave the cherries unpitted (a little more onerous to eat, but worth it), sometimes the students wouldn’t even get cherry pitters, just whisks!

Try to take an eye out with those!

At home, I reliably depended on that recipe any time I needed to deliver a perfect clafoutis. It worked every time — even when I was a little short or too generous with the cherries, and even when I ran low on sugar, flour, milk or all three.

Then I moved back to New York. Suddenly, the recipe that worked so marvelously in Paris became a total dud. I can’t tell you how many heavy, lumpy, pathetic clafoutis I turned out. I was making clafoutis that tasted more like lightly sugared cherry omelets — every bit as unpleasant as it sounds.

I even inflicted them on friends, like poor Tomoko who had to pick her way around my rubbery pâte and gray (yes, gray) cherries last summer.

“What did you do to them?” she asked.

I had no idea. I could only think of something a friend in Paris repeated to me, something that she had overheard at a dinner party. Faced with the prospect of ingesting one more morsel of clafoutis after a lengthy and generous meal, one of the guests declared himself cla-foutu — a French play on words that roughly means cla-f***ked.

Well, my New York clafoutis were definitely their own kind of cla-foutus.

You always hear people who say that the definition of crazy is doing the same thing over and over again and expecting a different result. When I saw gorgeous cherries at the Greenmarket this week, I decided to get off the Crazy Train and stop trying to make my Parisian recipe. It was time to get back to Julia.

Julia Child, that is 🙂

Compared to what I was making, I think this clafoutis is a beauty. Sure, it rose much higher on one side than the other (I should have turned it halfway through cooking. Stupid un-calibrated oven). Yeah, it cracked (I over-cooked it. I should have taken it out of the oven sooner).

But I feel like I am getting my clafoutis-groove back on.

This recipe is adapted from Mastering the Art of French Cooking, Volume I. Julia calls for three cups of cherries, and if I had three cups, I would have used them 🙂

For the original recipe, click here.

Special equipment:

A stick immersion blender

Ingredients:

Butter

2-3 cups of ripe cherries, pitted . . . or not!

1/3 cup of sugar

1 and 1/4 cup of whole milk

5 pullet eggs or 3 large eggs

1 tablespoon of vanilla extract

A pinch of salt

2/3 cup of all-purpose flour

Powdered sugar

How to prepare:

1. Preheat the oven to 350°.

2. Butter a baking dish and arrange the cherries in a single layer on the bottom.

3. In a large bowl, use the immersion blender to blend together the milk, the eggs, the vanilla extract, the salt and the flour for 1 minute. The batter should be nice and frothy.

4. Set the baking dish on a baking sheet. Use a ladle to carefully pour the batter over the cherries. Bake for about an hour. The clafoutis will be done when the sides are puffed and golden, and when a knife or a skewer inserted in the center comes out clean. The clafoutis will be like a souffle when you remove it from the oven. Let it settle completely — it will sink down as it cools — before serving. Dust the clafoutis with powdered sugar right before cutting it into wedges.

Orecchiette Carbonara with Freshly-Shelled Peas


On a hot and sticky mid-August night several years ago, I boarded an overnight train from Paris to Milan. The cabin was filled with two sets of bunk-beds that were meant to accommodate four people. Instead, we were five because the couple sharing the cabin with us had a toddler.

The family asked if they could have the bottom bunks, which was fine by me because I wanted to bunk closest to the itty bitty window that cracked open at a woefully insufficient angle.

Insufficient because the father had removed his shoes and the smell was horrific.

It was so bad that I couldn’t sleep. I was finally forced to look in my Italian phrasebook and scan the pages by moonlight for something appropriate to say that would make the man put his darn shoes back on!

Unfortunately, my phrase book had nothing related to shoes, or putting on shoes or telling people that the smell of their feet was intolerable. However, I did manage this:

“Per fevore, signore. I vostri piedi, è violazione dei miei diritti umani!”

Which worked out roughly to mean, “Excuse me, sir. Your feet, this is a violation of my human rights!”

No response. So I tried these other phrases:

I vostri piedi, sto svenendo . . . Non riesco a respirare . . . !”

Which means: “Your feet, I’m passing out . . . I cannot breathe . . . !”

Then I repeated, “I vostri piedi,” pointed to his feet, crossed my eyes and pretended to die.

Nothing. Nada. Zilch.

He must have understood me because he refused to acknowledge my existence. I tried not to take it personally, even though I hated him more and more as we crawled south to Italy. Maybe, I thought, he was trying to incapacitate his over-active son. Or maybe he was angry at his wife and was trying to suffocate her with the smell of his feet.

Seriously. If that smell could be weaponized, the war on terror would be over.

So what does this have to do with carbonara, that amazing Italian dish that uses the residual heat of freshly boiled pasta to transform bacon, beaten eggs and Parmesan into a creamy sauce?

In that very same Italian phrase book was a recipe for spaghetti alla carbonara, a recipe that I still rely on to this day.

The idea to use orecchiette and peas actually comes from Suzanne Goin‘s Sunday Suppers at Lucques. Her description of how orecchiette are perfectly shaped to cup small bits of bacon and peas was irresistible to me, but I prefer to stick with my old phrasebook’s way of making carbonara because it only uses one pan — and who doesn’t prefer that?

These proportions will make enough for two, but can easily be adjusted for more. For something richer, you could add about a 1/3 of a cup of caramelized chopped onions to the mix. This recipe was also a great way to start using the wonderful shell peas that are at the market right now, as well as the bacon and pullet eggs from my CSA.

Pullet eggs are small eggs from young hens that have just started laying. They say that two pullet eggs are the equivalent of one regular chicken egg, but I find that it’s really more like 3 pullet eggs = 2 regular chicken eggs. Pullet eggs are wonderfully rich in both flavor and mouthfeel, just perfect for carbonara if you can get a hold of some.

I also used up the last of my CSA bacon ends to make my bacon bits, but you can use crumbled cooked bacon strips in this if bacon ends are not handy.

Ingredients:

1/3 pound of dried orecchiette

1/3 cup of bacon bits or crumbled cooked bacon

1/3 cup of freshly shucked green peas or frozen peas

5 pullet eggs or three regular eggs

1/2 cup of freshly grated Parmesan

Freshly grated black pepper

Olive oil

How to prepare:

1. Bring a medium saucepan of salted water to a boil. When the water has reached a rolling boil, add the pasta. While the pasta is cooking, set up the other ingredients. This recipe moves quickly near the end, so it is a good idea to have everything ready to go.

2. Combine the Parmesan and eggs in a small bowl with freshly ground black pepper.

3. When the pasta is not quite al dente, add the peas to the boiling water. Let the pasta and peas finish cooking together. Drain and pour the pasta and peas back into the saucepan. Add the bacon along with a quick drizzle of olive oil. Pour the beaten egg mixture over the pasta and begin stirring everything together quickly. When you add the eggs, the pasta should be warm enough to barely cook them. You want the sauce to be just thick enough to coat the pasta with a glossy sheen. If the sauce seems soupy instead of creamy, put the pan over a very low flame and continue to stir and toss the pasta quickly until the sauce turns smooth and creamy.

Don’t worry if you accidentally overcook the eggs and they scramble a little bit. It will still be delicious.

Spicy Braised Kale and Mushroom-Topped Polenta with Poached Goose Egg


In a fit of health consciousness, I went a little crazy at the market and bought several large bunches of local kale. When washed, it amounted to more than 30 cups. Yes, you heard that right: 30 packed cups of kale!

I love kale, but this was a little much even for me. Kale has been going into everything lately from eggs to potatoes, from soup to salad. But no matter how much kale I use, the pile doesn’t seem to diminish much. It’s the neverending pile o’ kale!

I took advantage of this kale-pportunity to try out another way to make polenta. Polenta is one of those things that is just elemental, like roast chicken or omelets. There are a million ways to make polenta. You can make it in the oven, the slow-cooker, the microwave or on the stove. You can cook it for 15 minutes or hours. You can spread it out onto a sheet pan and cut the hardened polenta into squares. You can deep-fry leftover polenta. The smallest amount of corn meal seems to make mountains of polenta. It’s a polenta-palooza!

Great to pair with the neverending pile o’ kale, no?

This polenta-making technique is from those fiddly folks at Cook’s Illustrated. It only takes 30 minutes of minimal whisking to achieve creamy polenta perfection.

And, as you can see, my CSA has goose eggs! Which are big honking suckers 😉 The equivalent, more or less, of two chicken eggs. There are a million ways to poach eggs too, but lately I have been liking Food52’s Control-Freak Poaching Method.

Ingredients:

For the polenta:

6 cups of water or stock

Salt

1 1/2 cups of yellow corn meal

4 tablespoons of butter

1/3 – 1/2 of a cup of grated Pecorino Romano or Parmesan

For the Spicy Braised Kale and Mushrooms:

2 tablespoons of butter

Olive oil

2 garlic cloves, finely minced

8 ounces of white button mushrooms, sliced

Salt and pepper

Red chili pepper flakes

1/4 cup of dry white wine

6 cups of roughly chopped kale

For the poached eggs:

Water

Salt

1 goose egg per person

How to prepare:

1. In a large, heavy Dutch oven, bring the 6 cups of water or stock almost to a boil with the lid on. Uncover the pot and season the water or stock with salt. Vigorously whisk the corn meal into the liquid a little bit at a time. As you whisk, be sure to get in all the corners and edges of the pot with the whisk to ensure that there are no lumps. When all the corn meal has been added to the water, cover the pot again and reduce the heat to low. Let the polenta simmer, stirring every 5 minutes, for 30 minutes total.

2. In the meanwhile, melt 2 tablespoons of butter with a little bit of olive oil in a large skillet set over medium heat. When the butter begins to foam, add the minced garlic and the mushrooms. Sauté the mushrooms until they give up most of their liquid and begin to turn golden. Add the white wine and as many red chili pepper flakes as you like. Season the mushrooms with salt and pepper. When the liquid has reduced to almost a glaze, add the kale to the pan and cover the skillet. Let the leaves wilt completely before stirring the kale and mushrooms together. Adjust the seasoning for a final time and remove the pan from the heat.

3. After 30 minutes, your polenta should be done. Move the pot away from the burner and vigorously whisk in the butter, one tablespoon at a time, until it has all been well-incorporated and the polenta is creamy. Stir in the Pecorino or Parmesan and adjust the seasoning.

4. In a medium-sized saucepan, bring about 4 to 5 inches of salted water to a near simmer. Carefully crack a goose egg into a small fine-mesh strainer. You want to separate the yolk and the more solid part of the white from the more watery part of the white. Carefully pour the egg into a large, shallow spoon. Gently lower the spoon into the water. Use another spoon to catch any bits of white that try to escape. When the egg is perfectly poached, the white should be opaque and when you gently move the egg back and forth, the white and the yolk should move in sync. When the egg is done, lift it out of the water and very carefully roll it onto a paper towel-lined plate.

5. To assemble the dish, spoon out about half a cup of polenta into a large, shallow bowl. Top the polenta with about a third of a cup of the spicy braised kale and mushrooms. Carefully position the poached egg on top of the braised kale and drizzle everything with good olive oil. Serve immediately.

Asparagus with Fried Egg and Parmesan


It’s asparagus season! Which means it’s time for my favorite fast lunch: sweet local asparagus topped with a fried egg and sprinkled with Parmesan. To anyone who thinks that making yourself lunch takes too much time, I challenge them to find something quicker than this meal.

But, Daisy, don’t you have to steam asparagus? Or boil it? That takes time!

Oh no no, young Padawan. You can . . . microwave it!

This idea comes from Andrew Carmellini‘s Urban Italian. In the book, he recommends microwaving asparagus as a quick and terrific way to perfectly cook it without sullying up another pot. I just have to quote him on this:

“Asparagus in the microwave is awesome. Yup. You read that right. I’m sure some food snob somewhere is recoiling in horror and throwing this book across the room, but I don’t care.”

I don’t care either. I love Carmellini’s food. He’s got a Michelin star and two James Beard Awards. If microwaving asparagus is good enough for him, it’s good enough for me.

This is one of those no recipe-recipes that can be multiplied by as much as you need. I give you the recipe for one but obviously, if you are cooking for more people, you will need to punch an extra minute or two into the microwave.

Ingredients:

6-7 asparagus spears, rinsed clean and trimmed of their woody ends

Olive oil

1 egg

Butter

Salt and freshly ground black pepper

Grated Parmesan cheese

How to prepare:

1. Spread out the asparagus in a single layer on a microwave-safe plate. Season the asparagus with salt and sprinkle on a little bit of water. Drizzle it with some olive oil. Cover the plate tightly with plastic wrap and nuke it for 1 minute and 30 seconds.

2. In the meanwhile, fry up an egg in butter.

3. Carefully remove the plastic wrap from the plate and arrange the asparagus spears on a clean plate. Top the asparagus with the fried egg. Season everything with salt and black pepper. Sprinkle on as much grated Parmesan as you like.

Serve with a good, crusty bread.

Kimchi Fried Rice


“I never see you eat rice,” Laura said, “Ever.”

“That’s not true! I eat risotto! and paella! and biryani . . .”

But despite my protestations, it is true though: I am not a fan of plain, steamed white rice.

I am so un-Asian.

When people find out I don’t really like plain white rice, I generally get two reactions:

• From non-Asian people, they look at me as if I just told them I was born with six fingers on one hand and the extra digit was removed at birth. At this point, they usually tell me how much they love rice.

• From Asian people, they just ignore me. I don’t even think they hear the “don’t,” they just hear the “like white rice.” Because what Asian doesn’t like white rice? Inconceivable!

Plain white rice was the bane of my young existence. As a child, it was always just giant piles of tasteless filler stacked in sticky, unswallowable heaps in front of me. My parents used to make me finish all of my rice before I was allowed to leave the dinner table. I used to drive them crazy by eating my rice grain-by-grain until they finally gave up and sent me to my room — which is all I really wanted in the first place.

As I have gotten older, I have learned to eat it. Partly because it gives me something to chew on as I contemplate all the dishes spinning around the Lazy Susan. After really strong flavors, I have come to appreciate white rice as a palate cleanser. Also, a Chinese meal just feels incomplete without rice on the table, regardless whether I eat any or not.

There is one way to always get me to eat my rice: fry it.

But let’s be honest, I’ll eat just about anything so long as it’s fried 😉

Kimchi fried rice is a particularly good way to get me to eat rice because not only is it fried, it’s so far removed from bland, steamed white rice that I will happily accept it on my plate. For this, I threw in some amazing all-beef hotdogs from my CSA. I know that there are a lot of people who don’t like hotdogs, but I never wonder what is in the ones that I get from my farmer. If you are a vegetarian, or just don’t like hotdogs, you can leave them out. Or replace them with Spam 😉

It’s also traditionally topped with a fried egg, and who can resist fried food topped with more fried food?!

Kimchi fried rice calls for a nice dollop of Korean red pepper paste, or gochujangGochujang is one of the most common condiments/ingredients in Korean cooking and as such, is fairly easy to find in Asian supermarkets. I think the problem is that there are so many brands of commercially-made gochujang that it can be a little overwhelming as to which one to pick. This is why I love this post from One Fork, One Spoon. As Diane and Grace point out, it’s hard to shop for Korean ingredients if you don’t speak Korean! I certainly don’t, and really appreciated their tasting notes and photographs of labels and brand logos.

Ingredients:

1 tablespoon of butter

1 tablespoon of vegetable oil

2-3 hot dogs, cut into pieces

2-3 green onions, chopped

2 cups of cooked (preferably day old) rice, japonica variety preferred

1 tablespoon of sesame oil

2 cups of napa cabbage kimchi, roughly chopped

1 tablespoon of gochujang

Salt

1 egg per person

How to prepare:

1. In a large skillet, heat the butter and oil over medium-high heat until the oil begins to shimmer. Add the sliced hot dogs and the green onions. Cook the hot dogs until they are heated through and the green onions have softened.

2. Add the rice to the pan, breaking up any clumps with the side of a wooden spoon or a spatula. Evenly drizzle the sesame oil over the top of the rice and let it cook undisturbed for about a minute before stirring it.

3. Add the chopped kimchi and the gochujang to the skillet. Stir everything together until red pepper paste has been well-incorporated and the kimchi has been evenly distributed throughout the rice.  Adjust the seasoning. Lower the heat and spread the rice and kimchi out in an even layer over the bottom of the pan. Let it cook for a few minutes until the rice has become nice and crispy on the bottom. Stir the pan again, scraping the browned rice off the bottom of the skillet. Adjust the seasoning for a final time and divide the fried rice into bowls.

4. In a separate pan, fry up one egg per person. Top each bowl of kimchi fried rice with an egg. Scatter some chopped green onions on top and serve.

Fried Egg with Sautéed Ramps and Garlic-Rubbed Toast


Ramps. Just the thought of them at the Greenmarket makes me really excited. Ramps taste like the essence of spring given that they are the first greens to come up after a long winter of tubers and root vegetables.

I’m not the only one with ramp-mania either. Unfortunately, the dramatic rise in their popularity over the past few years has been raising concerns that foragers are over-harvesting to meet demand.

Ramps are notoriously difficult to cultivate. For the most part, they are a foraged food that is found and plucked in the wild. To ensure that the plant keeps growing requires foragers to leave their bulbs intact — problematic since most ramps are sold with their bulbs and roots attached.

So what do you do if you love them like I do? Should you stop eating them all together?

You don’t have to give up ramps as long as you stay committed to being a responsible consumer. If you forage for them, take no more than you can reasonably eat. If you can, just take the leaves and leave the bulbs in the ground. If you buy them, try to buy them from a farmer you trust. Talk to your farmer and make sure that their ramps are coming to you in a sensible and sustainable way. The Greenmarket NYC closely monitors and regulates foraged food to ensure that things like ramps will continue to be around in the future.

Celebrate their scarcity because that is what makes them special!

Once you get your hands on some sensibly-foraged ramps, this is a great way to prepare them for lunch or for a light supper. I hesitate to even call this a recipe since it is such a simple way to prepare them, but simple preparations are oftentimes the best way to showcase especially great ingredients.

Ingredients:

Thickly-sliced bread, as many pieces per person as you like

1 garlic clove

4 ramps per person, cleaned and bulbs split in half if they are on the large side

1 egg per person

Olive oil

Butter

Salt and black pepper

How to prepare:

1. Generously brush both sides of your bread with olive oil. Broil the pieces until they are golden brown. Rub a garlic clove on both sides of the bread, including the edges.

2. In a large skillet, heat some olive oil over medium heat. Add the ramps to the pan when the oil begins to shimmer. When the leaves have wilted and the bulbs have begun to turn translucent, shape the ramps into a circle and crack an egg into the center. Add a knob of butter to the pan. When the butter has melted, begin spooning the hot fat over the egg yolk as it cooks. When the whites have set, use a spatula to gently remove the egg and the ramps from the pan to a plate. Season the egg and ramps with salt and freshly ground black pepper.

Serve with the garlic-rubbed toast.

High Point Farms Buyers Choice CSA! Sign Up Now!


As many of you know, one of the major inspirations for this blog was High Point Farm’s Meat CSA — my very first CSA ever.

CSA stands for Community Supported Agriculture. The basic CSA model is that you become a member of the farm, pay for a certain amount of food up front and come to pick up your “shares” at designated times throughout the season. CSA’s have all kinds of benefits. First of all, you support local agriculture, sustainable and environmentally- sound farming practices, and small farms. Second of all, you are able to form a relationship directly with your farmer. You learn about how your food is raised, how it is harvested, how your food gets to your table.

Most importantly, you get the best quality food for your money.

The meat is from our CSA absolutely amazing. All the beef is grass-finished, which means that the cows are fattened by grass — hay and baleage in the winter — not grain. The flavor is deep, rich and incredible.

I actually can’t have steak in restaurants now because it just doesn’t taste like meat!

I had always wanted to do a CSA. However, the only kind of CSA that I ever knew of before hearing about High Point Farms was either a vegetable or a fruit CSA. As someone who hates to waste food, I feared having to throw out more food than I could prepare or eat at any given moment — which is precisely what made a meat CSA so appealing.

Our farmer gives us our meat frozen. It is vacuum-packed in super thick plastic so that it keeps in the freezer really well. For anyone who claims that fresh meat is superior to frozen, I would say that this is really spoken from a place of ignorance as so much of the “fresh” meat sold in markets (even high-end butcher chops) was frozen — it just got defrosted by the shop or the butcher instead of by you!

You can go on the farm’s facebook page and see what a happy and wonderful life the animals have. If you are going to eat meat, wouldn’t you want the animals to be raised with love and care, and humanely slaughtered with deep respect and appreciation? To the argument that eating animals is “unhealthy,” I have to say that what is really unhealthy is eating pesticide-covered vegetables imported from Chile or some other South American country with horribly lax labor and safety practices — not to mention the carbon-footprint!

Some other vegetable CSA’s in the City offer meat through partnerships with other farms. However, I have to say that though I found High Point Farms almost by accident two years ago, getting involved with them has been one of the best and most rewarding things that I have ever done in New York City.

As I live close to the pick-up site in Manhattan, I am able to help the farm out on the distribution end by helping to coordinate the CSA’s bi-monthly pick-ups. Thanks to Tina and Bob MacCheyne, the farmer-owners of High Point Farms, I have learned so much. Not only have I discovered new cuts of meat and how to cook them, I have learned so much about being a better eater, consumer, and food advocate.

High Point Farms will be starting its next CSA season next week. There are still membership spaces available. The farm will be moving to a new model for this time around called a Buyers Choice.

This is how it works: there are different share options, beginning with a Trial Membership at $225 and going up to a Gourmet Share for $1000. That money goes directly to the farm, and is also your credit at the farm store for the season. Every two weeks, you go to the online store and load up your shopping cart with what you want: steaks, osso buco, oxtails, ground beef, roasts, chickens, eggs, cheese, pork chops, sausages, bacon. You can order as much or as little as you want. You can even skip that pick-up and wait for the next one. If you run out of credit, you can add more to your account. You come, you pick up your meat, you go home and cook it. And then you shiver with delight because it tastes soooo good.

And look, you just supported local agriculture and not evil giant agro-business.

The Deets:

• Our CSA season will run from March to December. You do not have to pick up something every pick-up., only on the days when you have ordered meat for pick-up.

In New York City, we have three pick-up locations this season:

East Village: Jimmy’s 43 (on East 7th Street, between 2nd and 3rd Avenues)
Williamsburg: Crossfit Virtuosity (221 North 8th St, between Driggs and Roebling)
Brooklyn Heights: Sweet Pea CSA (you must be a member of Sweet Pea Vegetable CSA to join this group)

• For the season’s delivery dates, click here.

• Membership Share Prices:

Trial Share: $225.00 (buys $225.00 of Farm Store Credit)

Single Share: $350.00 (buys $350.00 of Farm Store Credit)

Medium Share: $500.00 (buys $515.00 of Farm Store Credit + priority on limited items)

Large Share: $700 (buys $735.00 of Farm Store Credit + priority on limited items)

Gourmet Share: $1000.00 (b $1050.00 of Farm Store Credit + first priority on limited items)

There is a $25.00 Membership fee at sign up. ne time charge per CSA Season to offset the farm’s administrative and shipping costs.

For more information and to sign up, click here!

PS. See all that nice food pictured at the top of this blog post? You too can make all that awesomeness with High Point Farm’s meat!

Crustless Mini-Quiches


I love quiche because I love the four basic components of classic quiche: pork, cheese, custard, and butter crust.

Quiche is one of those things that can be easily pulled together, but it can also be amazingly time-consuming and complicated. The last time that I made quiche, I decided on Thomas Keller’s Quiche Lorraine from the Bouchon Cookbook (a modified version of which appeared in Food and Wine).

The Bouchon quiche may rank up there as one of the most challenging things that I have ever cooked. First of all, at a super deep 2-inches, getting the center to set perfectly is not easy. Secondly, Keller’s recipe instructs you to aerate the egg mixture to the consistency of a sloshy, frothy broth before pouring it into your delicate parbaked crust in 2 stages. And you must do this without the quiche leaking at all.

Tricky. Very tricky.

And I have to admit that I wasn’t entirely successful.

What I am successful at is the standard quiche, perfected over years and years of repetition. Even though I can whip up a butter crust with my eyes shut, it always seems like a big affair because equipment always needs to be pulled out of tight spaces, and countertops need to be cleared to roll out the crust.

And let’s not even talk about the clean-up!

So what to do when you want to get your French on, but find yourself pressed for time, space and energy à l’américaine?

You make a crustless quiche, Silly 😉

Now before you scoff at a crustless quiche, let me just say that I love butter crust. As I might love butter crust even more than the average bear, I thought that I would really miss it in crustless quiches. However, I still thought these were wonderful.

Think of them less as quiches, and more like ham-custard poppers! Or quiche shooters!

The idea to use bread crumbs as a quick and easy base on which to build a crustless quiche comes from Gourmet Magazine. I changed the ratio of eggs to cream to milk so that the quiches would hold together a little better when you remove them from the muffin pan (the original recipe makes just one big quiche).

I used ham and Gruyère, but you can very easily use anything you like: cheddar, broccoli, mushrooms, feta, bacon. The possibilities are endless.

Special Equipment:

A 12-cup muffin pan, preferably non-stick (thanks, Laura! You’re never getting your pan back! Bwahahahaha!)

Ingredients:

1 cup of Panko breadcrumbs (or any other kind of plain breadcrumbs)

1 cup of ham, diced (you could also use a cup of chopped, cooked bacon)

1 cup of Gruyère, shredded

2/3 of a cup of whole milk

2/3 of a cup of heavy cream

4 large eggs

1/4 teaspoon of freshly grated nutmeg

Salt and white pepper

How to prepare:

1. Preheat the oven to 425°.

2. If you don’t have a non-stick muffin pan, be sure to butter each individual cup well. Cover the bottom of each muffin cup with a layer of bread crumbs.

3. Evenly divide the shredded cheese among all the muffin cups.

4. Do the same with the ham or bacon.

5. In a large bowl, whisk together the milk, the cream, the eggs, the nutmeg, and salt and white pepper to taste. Carefully pour the mixture into each muffin cup (this is easier with a spouted bowl or measuring cup). Leave about a 1/4-inch between the top of the egg mixture and the rim of each cup.

6. Bake the quiches until they are set and the tops are golden, about 20 minutes. They will be puffy like a soufflé when you remove them from the oven. Let them settle and cool slightly before removing them from the pan and serving with a nice green salad.

The Daring Kitchen February Cooks’ Challenge: Patties


Last month, when I opened up the Daring Kitchen‘s Chefs’ Challenge for February, I remember thinking, “Oh. Patties.”

As you can surmise, my initial enthusiasm was less than palpable.

It was a long PDF too, delving somewhat into the history of the patty:

“Irish chef Patrick ‘Patty’ Seedhouse is said to have come up with the original concept and term as we know it today with his first production of burgers utilizing steamed meat pattys – the pattys were ‘packed and patted down,’ and called pattys for short, in order to shape a flattened disc that would enflame with juices once steamed.”

And offering a somewhat of a basic definition:

“Technically patties are flattened discs of ingredients held together by (added) binders (usually eggs, flour or breadcrumbs) usually coated in breadcrumbs (or flour) then fried (and sometime baked).”

I would hesitate to say that anyone “invented” the patty. Flattened discs of pan-fried food seem to be commonly found everywhere, and I imagine that the technique goes as far back to when humans started smushing things together to eat. Maybe it didn’t get codified until much later, but I’m not sure that really matters much as this is the case for a lot of foods.

What kept my attention was that the hosts of this month’s challenge, Lisa and Audax, went into great detail about the technical aspects of patties, providing a kind of matrix for making them:

Main ingredient(s): some kind of ground protein (meat, poultry, seafood, beans or nuts) and/or vegetables.

Binders: eggs, flour, breadcrumbs (fresh or packaged), bran, tofu, mashed potatoes or any kind of mashed vegetable or legume.

Moisteners: water, milk, sour cream, mayonnaise, sauces, mustard, chopped spinach, shredded carrots or zucchini, shredded apples, anything that would add extra moisture if needed.

Technique: shallow pan-frying or baking.

Frying fat: butter, rice bran oil, canola, olive oil, ghee, or any other kind of oil with a relatively high smoking point.

Can you believe that I am such a food nerd that it was actually the 3.5 single-spaced pages of technical patty construction talk that sold me on the idea?

And as tempting (and easy) it would have been to have come up with a recipe on my own — ideas that I had? shrimp, chili pepper, and cilantro patties with some kind of scotch bonnet relish, or something Cantonese-ish like shrimp, corn, and egg whites — the fact is that I have been so overwhelmed with work and school lately that I haven’t had much time to devote to fun things like cooking challenges.

So, dear Readers, please do forgive my inability to milk any extra creative juice out of my brain right now!

These wonderful little quinoa patties are from Heidi Swanson‘s Super Natural Everyday cookbook. They are great for lunch or a light supper. I only made half of the recipe because I just had a cup and a half of leftover quinoa, but you should certainly make the full recipe by doubling the amounts that I list below. The patties keep exceptionally well, and reheat easily in the oven.

One thing I learned from the challenge? My strong suspicion that my stove sits on uneven flooring is once and for all confirmed: all the oil slid to one side of the cast-iron pan while cooking, resulting in patties that were darker on one side than the other.

As soon as I get the time, I’m going to get in there and stick some little wooden wedges under the stove to even it out.

Thank you again Lis and Audax for the technical exercise and great challenge.

And isn’t Audax just the best name ever?

Mandatory blog-checking lines: 

The Daring Cooks’ February 2012 challenge was hosted by Audax & Lis and they chose to present Patties for their ease of construction, ingredients and deliciousness! We were given several recipes, and learned the different types of binders and cooking methods to produce our own tasty patties!

Ingredients for Heidi Swanson’s Little Quinoa Patties:

1 1/2 cups of cooked quinoa (you might also use leftover cooked bulgur wheat, millet, rice, or lentils)

2 eggs

Salt

2 tablespoons of chives, chopped

1 small onion, finely chopped

3 tablespoons of freshly grated Parmesan

1 fat garlic clove, very finely chopped

About 1/2 cup of Panko breadcrumbs, plus more if needed

1-2 tablespoons of olive oil or clarified butter

Special equipment:

A 3-inch ring mold

A cast-iron skillet

A lid to fit the skillet

How to prepare:

1. In a large bowl, combine the quinoa and the eggs together with a good pinch of salt. Add the chives, the onion, the Parmesan, and the garlic. Stir in the Panko, and let the mixture sit for a few minutes so that the breadcrumbs can absorb some of the moisture.

2. After a few minutes, you should be able to easily shape the mixture. If it seems a little wet, you can add more Panko to firm up the mixture. Conversely, if you find the mixture too dry, you can add a little water to loosen it up.

Swanson recommends erring on the moist side so that the patties won’t be overly dry — which is what I would recommend as well. As I left the quinoa mixture on the moist side, I found that it was easier to use a ring mold to make the patties instead of using my hands to shape them.

Set a ring mold on a plate and fill it with about three heaping spoonfuls of the quinoa mixture. Spread the mixture out evenly in the mold. Lightly compress each one by pressing on the top of the patty with the bottom of a spoon. Carefully remove the mold. Continue until you have used up all of the quinoa mixture. You should have about 6-7 patties total (or about 12 if you make the full recipe).

3. Heat the olive oil in a large cast-iron skillet over medium-low heat until it begins to shimmer slightly. Using a thin, flexible spatula, carefully transfer the patties to the skillet. You should be able to fit in all six with a little room in-between each one. Cover the skillet and let the patties cook for about 7-10 minutes. The bottoms should be deeply browned, but not burnt. Carefully flip the patties and cook them on the other side for about 7 more minutes. When both side are evenly colored, transfer the patties to a paper towel-lined plate.

Serve warm with a nice green salad.