Texas-Style Cottage Pie with Roasted Sweet Potatoes and A.1. Compound Butter

Flavors are bolder in Texas.
Considering the extent of my bacon advocacy, most people are surprised to find out that I used to be a vegetarian. That was not a choice based on any kind of moral imperative. Instead, it was the best way that my 14-year-old self think of to annoy my mother. Now you would think that vegetarianism would have gotten old after a couple of weeks, but I was stubborn teenager and persisted in my gastronomic rebellion for twelve long and meatless years.

I didn’t just annoy my mother, I baffled my relatives who had never heard of Tofurkys until they were forced to procure them. My friends would collectively roll their eyeballs heavenward each time that I complained about the lack of vegetarian options on a restaurant menu. I irritated significant others to no end because it frankly sucks to not share food that you are really enjoying.

So it stands to reason that on the night before my undergraduate commencement ceremony, I would have my vegetarian graduation celebration at a barbecue restaurant.

Yes, you read that correctly.

What prompted such a paradoxical decision? You see, one of the last classes that I took at my alma mater was a cultural anthropology course on food — which ended up being a prescient choice since many of the books on that syllabus found their way into the bibliography of my dissertation. I had an amazing professor who had a number of terrific guest speakers come to talk to the class, one of first of which was Chris Schlesinger who was still at the East Coast Grill (he has since sold it to the former head chef, now chef/co-owner Jason Heard).

Until that class, I had never really thought that much about food apart from how much I liked to eat it. It never occurred to me that you could craft an approach to food that could be just as thoughtful, complicated, and elegant as any in literature, or that taste — both sensory and esthetic — could be a marker of identity, a beginning of a journey, or an end to one.

In any case, Schlesinger’s passion, dedication, and approach to big, bold American flavors made quite the impression. I also remember how he wasn’t adverse to vegetables being on a barbecue menu, which is how my friends and my family ended up at his restaurant graduation eve.

I don’t remember exactly what I ate that night (probably macaroni and cheese), but I do remember that the food was good and my dad was happy that he wasn’t forced to eat another avocado burrito in a New Age-y bookstore that smelled like patchouli, incense, and beans.

This recipe is adapted from Schlesinger’s How to Cook Meat, published the same year that I graduated. I bought the book to remember that night despite not cooking nor eating meat at the time. Who would have known how useful it would turn out to be a few years later when I was no longer a vegetarian and really did want to know how to cook meat!

I must admit that the first time that I made this dish, I wasn’t impressed; I found it too sweet and the flavors a little too weird. However, after years of vegetarianism, I probably just had no idea what I was doing. Now things are different (or back to “normal,” depending how you think about it). I find the combination of flavors to be complex, rich, and deeply satisfying on cold nights like the ones that we have been having here on the East Coast.

I’ve tinkered with the recipe over the years, making it a little less sweet (tomato paste substituted for ketchup; blackstrap for plain old molasses), and deepening the flavors a little more (roasting instead of boiling the sweet potatoes). The recipe easily doubles as the one given below is the proportions of the original halved.

Like any recipe that you have made your own, its evolution is indicative of where you come from and where you are going. In essence, that is the wonderful thing about recipes in general: they all tell a story and this is one of mine.
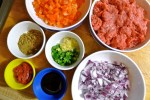
Ingredients:

For the compound butter:

1 stick of unsalted butter at room temperature

1 tablespoon of A.1. Steak Sauce

1 tablespoon of fresh parsley, finely chopped

Flaky salt and freshly ground pepper to taste

For the cottage pie:

2 large sweet potatoes

1/2-2/3 of a cup of half-and-half

1 tablespoon of butter

2 tablespoons of olive oil

1 large red onion, chopped

1 red bell pepper, cored, seeded, and diced small

2-3 garlic cloves, minced

1 small jalapeño pepper, seeded and minced

1/2 a tablespoon of ground cumin

1/2 a tablespoon of ground coriander

A scant pinch of ground cinnamon

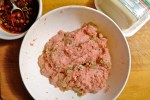
1 pound of ground beef

1 tablespoon of tomato paste

1 tablespoon of blackstrap molasses

How to prepare:

1. Preheat the oven to 400°.

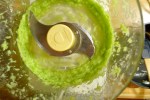
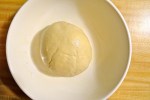
2. To make the A.1. compound butter, combine the room temperature butter, the steak sauce, and the chopped parsley in a small bowl. Season the butter with flaky salt and freshly ground pepper to taste. Spoon the butter onto a piece of parchment or waxed paper, roll it into a cylinder, and refrigerate it until firm.

3. Prick the sweet potatoes all over with a fork. Place them directly on the wire racks of your oven and roast them until they can be easily pierced with a knife, about 40 minutes.

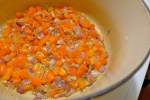
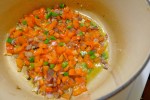
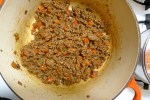
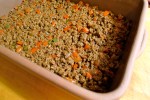
4. While the sweet potatoes are roasting, heat the olive oil in a large sauté pan or Dutch oven set over medium heat. Sauté the onions and diced bell pepper until the onions begin to turn golden, about 8 minutes. Add the garlic, the minced jalapeño, and the spices. Let them sizzle them for about 1 minute before adding the ground beef. Cook the ground beef until it is browned, crumbly, and no longer pink. Pour off any excess fat in the pan before stirring in the tomato paste and the blackstrap molasses. Adjust the seasoning.

5. When the sweet potatoes are cooked through, remove them from the oven and let them rest. Lower the temperature of the oven to 350°.

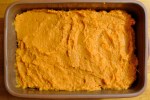
6. When the sweet potatoes are cool enough to handle, peel them and discard the skins. Mash them with a tablespoon of butter and 2/3 of a cup of half-and-half. As the mixture should be on the loose side, add more half-and-half if needed. Season with salt and pepper.

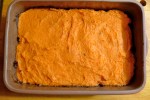
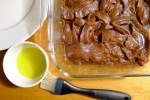
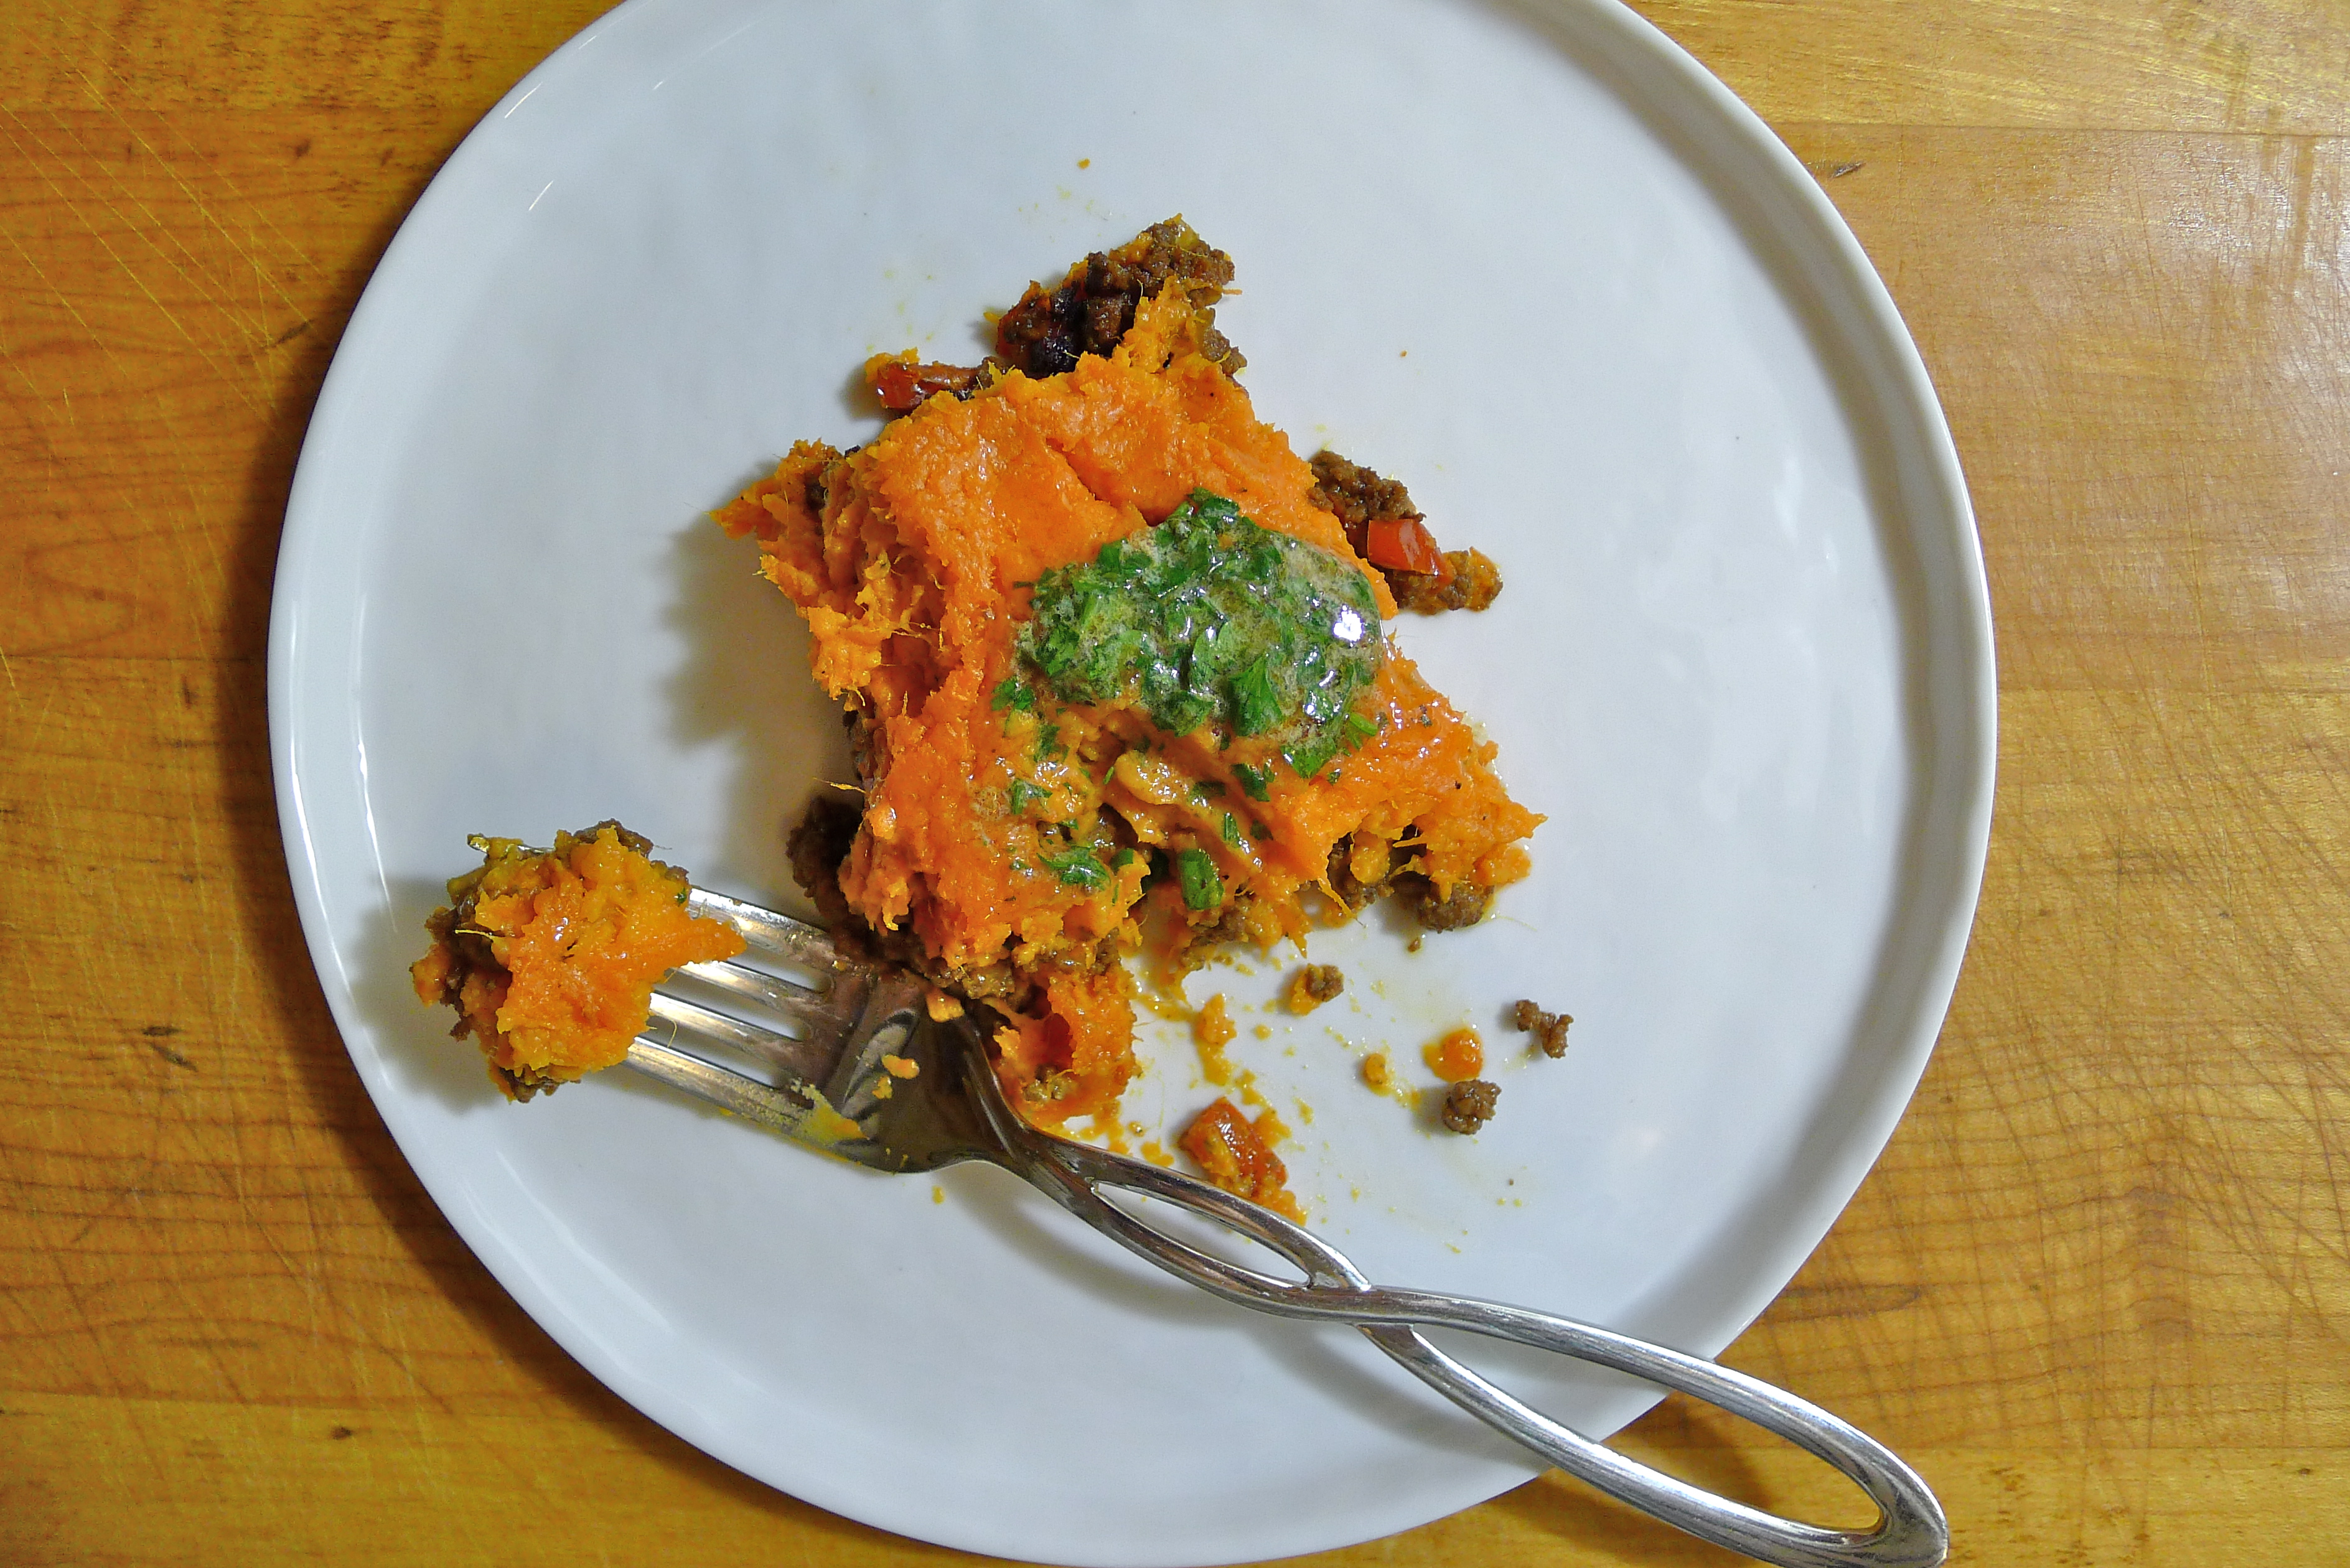
7. Spread an even layer of the ground beef mixture over the bottom of a casserole or baking dish. Gently top the ground beef mixture with the mashed sweet potatoes. Bake until the filling is bubbly, about 40 minutes.

8. Remove the casserole dish from the oven and let it rest for about 5-10 minutes. To serve, you can either dot the top of the casserole with the compound butter before dividing it into portions, or you can top each individual serving with a slice of the compound butter.

Advertisement

I Made the Ratatouille from Ratatouille for My Students

Rémy's ratatouille!
Another semester has come and gone. At the end of each one, regardless what happens during the term, I am always overcome with wanting to hug each of my students and send them out into the world with a macaron. Maybe two.

This class was no exception. Despite a rough and rocky start, I finally learned to relax around them after Spring Break. The change was very welcome. I started spending less time freaking out planning my lessons and more time enjoying talking about some of the topics that interest me the most: history and process, food and memory, taste and identity, sustainability and individual responsibility,  inspiration and experimentation.

The first time that I taught a class on French food, it was the summer that the movie Ratatouille came out. I saw the movie by myself before accompanying two separate groups of students to the theater. Maybe it was the summer heat, or maybe my brain was addled from having seen the movie three times in a row, but I remember standing on the subway platform and cooing at a big, fat rat. “Oooooooh!!!” I squealed, “Look at the cutie pie! He’s got a . . . Subway sandwich!!!! Awwwwwww!!!”

Is it surprising to hear that people moved away from me?

For those of you who haven’t seen it, Ratatouille is a marvel of a movie, a treasure trove of tidbits that you can use to teach French food and culture. Want to explain a brigade by showing a kitchen hierarchy? Want to show the importance of technique and apprentissage? Want to begin a discussion about whether or not cuisine is an art form? Want to perfectly represent archetypal figures of French gastronomy like the stubborn chef, the restaurant critic, or the gastronome? Want to kick off a conversation about Proust? Want it in French and English?

Ratatouille is the movie for you!

As some of you might know, Thomas Keller was the consulting chef for the film. His reinterpretation of the classic ratatouille was also a re-imagining of a popular Turkish dish called İmam bayıldı, which literally means “the imam fainted (because it was so darn good).” Keller’s ratatouille was first published in The French Laundry Cookbook as an accompaniment to guinea fowl. This “crêpinette de byaldi” subsequently morphed into the confit byaldi featured in the film.

Unlike the traditional ratatouille for which all the vegetables are either stewed together or layered in the same pot and simmered until soft, Keller’s version has you make a simple pipérade over which you artfully layer very thin slices of eggplant, yellow squash, zucchini, and tomato. It takes a little bit more work, but the result is something much more elegant.

I deviated from the original recipe in order to keep the dish’s preparation more in line with the one seen in the movie. The recipe from The French Laundry Cookbook has you cover the confit with aluminum foil and tightly crimp it around the dish. However, I didn’t want a watery ratatouille, so I cut parchment paper to fit and laid it on top of the confit —  just like Rémy.

This single dish probably has the greatest carbon-footprint out of any that I have made this year. None of the vegetables are in season. All of them were grown in Peru, with the exception of the tomatoes which came from Holland. However, I wanted to serve my students something that they have been seeing and talking about all semester.

Unfortunately, they polished it off before I could even get a taste of the finished product. I assume it was good, but I have also seen students eat all kinds of weird stuff! In any case, I look forward to revisiting this recipe later in the summer when local eggplants, tomatoes, peppers, and squash are around.

Ingredients:

For the pipérade

Olive oil

1 large white onion, chopped

1 yellow bell pepper, cored, seeded and diced

1 orange bell pepper, cored, seeded and diced

1 herb sachet made from a sprig of fresh parsley, a sprig of fresh thyme, a sprig of rosemary, and a bay leaf tied up in a cheesecloth bundle.

Salt and freshly-ground white pepper

To assemble the final dish

4 Roma tomatoes, thinly-sliced

1 small eggplant, thinly-sliced

1 yellow squash, thinly-sliced into rounds

1 zucchini, thinly-sliced into rounds

3-4 cloves of garlic, finely minced

1 teaspoon of fresh thyme, minced

2-3 tablespoons of olive oil

Salt and freshly-ground white pepper

How to prepare:

1. Pre-heat the oven to 325°.

2. To prepare the pipérade, heat about 1-2 tablespoons of olive oil in a medium-sized sauté pan over medium heat. When the oil is hot, add the onions. Sauté them until they just begin to soften. Add the diced yellow bell peppers and the herb sachet. Continue to cook the vegetables until they are soft, but not browned. Remove and discard the sachet. Adjust the seasoning.

3. Spread the pipérade in an even layer in the bottom of an oven-proof baking dish. Begin arranging the sliced vegetables over it. You can either do this in rows like I did, or you can create a circular pattern by starting at the edges of the dish and moving towards the center. In any case, you want to alternate and overlap the vegetable slices so that they create a pleasing design.

4. Mix together the garlic, thyme, olive oil, and salt and pepper to taste in a small dish. sprinkle this mixture over the vegetables.

5. Cut a piece of parchment paper to lay on top of the confit. Press it down gently to adhere. Roast the confit until the vegetables have cooked through (the eggplant will take the longest). This should take between 45 minutes to an hour. It might even take over an hour. In all honesty, I can’t really remember since I was a couple of beers in by then. Just start checking it around the 45 minute mark!

6. Remove from the oven and let it cool. The confit can be served hot, warm, or cold.

Sichuanese Pork Wontons in Chili-Soy Sauce

Plump dumplings rule!
I have inherited a lot from my mother. In addition to her dry sense of humor, her sarcasm, and her sly potty mouth, I am also the beneficiary of her glossy hair and poreless, flawless skin — which she reminds me, while comparing the four zits that I have had in my entire life to her NONE EVER, is actually less flawless than her own.

What I did not get from my mother was my taste for fiery, hot spice, gamy meat, and my willingness to put my overly-trusting ethnically Chinese-self in the hands of white people.

“Who is Fuchsia Dunlop?” my mother asked, “Is she Chinese?”

“Um, no. She’s British.”

“Like British-Chinese?”

“No . . . um, just British.”

Silence.

Asian-child fail!

But it’s really not my fault! My mother is an amazing cook, who has basically decided that she will be taking all her secrets to her grave so I will miss her more when she’s gone. In her kitchen, I am not even sous chef. I am relegated to the status of line-cook. Or bus-person.

Basically she lets me wrap things like egg rolls, dumplings, or leftovers with cling film.

These dumplings are not anything my mother would ever cook. First of all, they are spicy as heck! Secondly, the root of their spice comes from a nice, thick, orange slick of delicious grease! Finally, the recipe is from a white person.

But. They. Are. Delicious.

To the unintiated, Fuchsia Dunlop (who never seems to be known as just Fuchsia or just Dunlop) is a Chinese food phenomenon. Author of the best-selling Shark’s Fin and Sichuan Pepper: A Sweet-Sour Memoir of Eating in China, the book outlines her deep love for Chinese cookery which began as a student at Cambridge, culminated in a move to Chengdu and enrollment in a professional chef’s training course at the Sichuan Institute of Higher Cuisine — the first Westerner to ever do so.

Friends, both Asian and not, swear by her books and her recipes, both of which translate Sichuanese and Hunanese cuisine into something effortless, accessible, and authentic-feeling.

I adapted this recipe from one that appeared on Epicurious from Every Grain of Rice: Simple Chinese Home Cooking. I didn’t change parts of it because I had any kind of personal reference — apart from eating similar dumplings in restaurants, I don’t. Instead, I altered the recipe because I am apparently lazier than your average Chinese home cook 🙂

However, the results are still divine. Heritage schmeritage! These dumplings tick every single box in terms of a deeply soul-satisfying food experience. Did I mention that they are ridiculously easy to make too? 🙂

Ingredients:

For the sauce

3-4 tablespoons of dark Chinese soy sauce

1 1/2 teaspoons of sugar

3 cloves of garlic, finely minced

3 scallions, finely chopped

3 tablespoons of sesame chili oil with sediment

For the dumplings

1 knob of fresh ginger

1 pound of ground pork

1 egg, beaten

2 teaspoons of Shaoxing wine (a useful buying guide can be found here)

1 teaspoon of toasted sesame oil

3 scallions, finely chopped

Freshly ground white pepper

1 package of wonton wrappers

For garnish

2 tablespoons of roasted peanuts, chopped (Fuchsia Dunlop’s recipe does not call for them, but I think they would be an terrific addition. I would have added if I had them on hand!)

How to prepare:

1. First, prepare the sauce. In a small bowl, whisk together the soy sauce and the sugar. Let the mixture sit for about 5 minutes until all the sugar crystals have dissolved. Once the sugar has dissolved, add the finely minced garlic, the chili oil with sediment, and the finely chopped scallions.

2. Using a rolling pin or the bottom of a heavy coffee mug, crush the knob of unpeeled ginger. Place it in a small dish and cover it with about 2 tablespoons of water.

3. In a large bowl, combine the pork with one beaten egg, 2 teaspoons of Shaoxing wine, 1 teaspoon of roasted sesame oil, and 3 teaspoons of the ginger water. Mix well with your hands. Add the scallions and season the meat with white pepper to taste.

As the sauce is relatively salty, I opted to not salt the meat, but you can do so if you prefer.

4. Fill a small dish with cold water. Take one wonton wrapper and lay it on a flat surface. Place about a teaspoon of pork filling into the center of the wrapper. Dip a finger in the cold water and run it around the edges. Fold the wrapper in half diagonally and continue until all the pork filling is gone. You should use up about half of the package of wrappers, which you can save and freeze for another time. Lay the wontons out on a large cookie sheet to avoid crowding them onto a plate like I did.

5. While you are wrapping, set a large pot of water to boil. When the water has reached a rolling boil, salt it as if you would for pasta (wontons are essentially ravioli after all). Carefully drop the wontons in one-at-a-time. I only cooked 8-10 at once to ensure that they wouldn’t stick together. When the water has come back up to a boil, add another cup of cold water to the pot. When the water has come up to a boil again, gently scoop up each wonton with a slotted spoon and drain each well. Divide the wontons among however many bowls you want and generously spoon over the chili-soy sauce.

Sprinkle with crushed peanuts, put on a bib, and dive in.

♥ Happy Valentine’s Day ♥: Grilled Beef Heart with Celeriac Slaw

I Heart You!
The first time that I ever had beef heart was at St. John’s Bread and Wine in London. It was two summers ago and I was wandering around Spitalfields on a single-origin chocolate bar search. Suddenly, the skies opened up and down came the deluge. Soaked and woefully unprepared, I ducked into the empty restaurant right in the middle of the family meal.

Although I’m sure that the last thing the staff wanted to deal with was another guest, they were extraordinarily gracious as they served me a late-afternoon snack of oysters, Sauternes, grilled beef heart and celeriac slaw.

Sauternes and oysters, you say? Yes, the server was intrigued as well. I had ordered them together because I had just read an article about how the original pairing for oysters was Sauternes, not Champagne.

In any case, I assure you that the combination is divine.

So was the beef heart. Flavorful and surprising tender, it had a robust beefiness and was the perfect antidote to the grey, oily weather outside. As I enjoyed the last dregs of my wine, I remembered that I had a copy of Fergus Henderson’s Nose to Tail Eating: A Kind of British Cooking collecting dust at home.

When my CSA (shares are still available, by the way) began offering beef heart, I decided that I was going to bite the bullet and try to recreate that terrific snack.

The recipe is such that no actual measurements are necessary. Follow your instinct and taste as you go along. You will be fine.

(and a very belated thank you to the staff at St. John’s for making sure that I didn’t go back out in the storm without a large umbrella)

Happy Valentine’s Day!

Ingredients:

1 beef or calf’s heart

Coarse salt

Freshly ground pepper

Balsamic Vinegar

Olive oil

Thyme sprigs

1 celery root

Crème fraîche

Dijon mustard

How to prepare:

1. The first thing you will need to do is trim the heart. You basically want to remove all the fat, the membranes, and any and all vessels including the aorta. It may be a little disheartening (no pun intended) to have to discard all those trimmings, but you really only want the tasty bits. For this, you will need a very sharp knife.

When you finish, you should be left with a pile of very lean beef slices that no longer resemble a heart at all. For an instructional video, I refer you to Michael Ruhlman here.

2. In a dish large enough to fit all the beef slices comfortably, drizzle them with olive oil. Add a healthy slug of balsamic vinegar. Sprinkle it generously with coarse salt and freshly ground pepper. Add a few sprigs of fresh thyme. Toss, cover, and let marinate in the fridge for 8-24 hours.

3. Before grilling the beef heart slices, set up the celeriac slaw. The first thing you will need to do is trim the root. You could use a vegetable peeler . . . if you want to have an accident! Or you could use a very sharp knife and be safer. You will have a lot of trimmings to discard as well, but trust me: you don’t want these trimmings either. If you must, you can put them in a bag and toss them in your freezer to use for stock.

First, slice off the top of the root and level off its bottom. This will ensure that it won’t rock around while you are trimming it. Holding your knife perpendicular to the root, shave or slice off the outer gnarled surface. You should be left with a clean, peeled root.

For another helpful video, I refer you to Gourmet Magazine.

Now you need to julienne the celery root. This can be accomplished most effectively by using a mandoline. If you don’t have one, or do have one but are too lazy to look for it like me, you can use a sharp knife again for the job. To julienne the celery root, cut very thin slices of it, stack the slices up and cut them into matchsticks.

Melissa Clark demos this here.

For the dressing, gently stir together 4 tablespoons of crème fraîche for every one tablespoon of Dijon mustard. That’s the ratio that I used, but you can increase the amount of mustard if you want your dressing to have more of a kick. Adjust the seasoning if necessary.

Using your hands, toss the julienned slices of celery root with the dressing.

5. Prepare the grill. Brush it with oil and get it nice and hot. Cook the beef heart slices until they are medium. Henderson says about 3 minutes per side, but mine cooked faster than that. I would say to just watch them and pull them off the grill when they are ready.

To serve, plate a few slices with a nice mound of celery root slaw.

Mission Chinese Food New York


I have to admit to having something of a double standard when it comes to snapping pics of restaurant food and posting them on my blog.

On vacation, I will happily — nay, gleefully — take pictures of food. I will obnoxiously angle for the perfect shot, shoo away the anxious fingers of my dining companions, and blatantly ignore the wide-eyed stares of other patrons. The staff is generally stoic about my behavior. I find that they tolerate it even though I wonder if, when they talk among themselves, they wish that I wouldn’t do it.

I don’t care. I’m on vacation, gosh darn it!

However, I do care when it is in my own backyard. Taking photos of food in NYC turns shameless vacation-me into sheepish, overly apologetic local-me. When I take pictures of what I eat in New York, I always cringe a little inside.

Oh the hypocrisy!

Maybe the double standard comes from the fact that I will probably return to these restaurants. Or that wait staff seem to appear at one restaurant, and then they magically pop up at other ones, so that you end up seeing the same faces again and again. Or maybe it is because New York City is a mecca for photo-snapping foodies and like every other snooty local, I don’t want to be associated with a bunch of Yelpers.

What is it that they say about not peeing in the pool you swim in? Or not pooping where you eat? Something like that feeling.

However, I do make two exceptions. Like when friends are in town. “Take a picture!!!!” I will squeal. “I’ll take one for you!!!!! Let’s get the server to take a picture of us!!!!!!”

I just get so excited about their visit that I want to immortalize the moment in digital form, food included.

And sometimes, I just can’t resist taking pictures of what I eat when the food is exceptional. Really, truly exceptional.

Like it was at the newly opened Mission Chinese Food New York. This eagerly anticipated restaurant took over the cursed space left by Bia Garden, Michael “Bao” Huyn’s ill-conceived Vietnamese beer garden (note to prospective restaurant investors: don’t open a beer garden dedicated to a country that has no craft beer).

Mission Chinese New York is the first branch of Danny Bowien‘s famed and acclaimed San Francisco food destination Mission Chinese Food.

He was also in the house the day that I had lunch with my friend Kelly.

That lunch? Phenomenal. Just wow. Wow. It was . . . oh, man. It was good. Really, really good.

It was so good that I broke my no-photos-in-NYC rule.

In the words of the Mouse over at the blog, Live2EatEat2Live, the socks came off 😉

And for Mike over at testerfoodblog, this post is for you!

What we ate:

Szechuan pepper corn Micheladas

Fresh tofu poached in soy milk with broad bean paste, soy beans and sesame leaves

Thrice-cooked bacon with Shanghainese rice cakes, tofu skin, bitter melon and chili oil

Kung-Pao pastrami with peanuts, celery, potato and explosive chili

Wild pepper leaves with pressed tofu and pumpkin in salted chili broth

Where we ate:

Mission Chinese Food New York, 154 Orchard Street (between Rivington and Stanton), New York, NY 10002

* Mission Chinese Food also donates $0.75 of every main course to the Food Bank of New York City. So not only is Mission Chinese super good for getting your om noms on, but it’s good for the community too!

** Just a quick note to my dear readers, the dissertation has been a little overwhelming lately, so I might not be posting or commenting as frequently! Many apologies!

Cherry Clafoutis


Clafoutis is the classic dessert of the Limousin, the northwestern part of the Massif Central in the middle of France. Traditionally, it is baked in a buttered dish and is more or less a flan with ripe black cherries. Sometimes, other red fruits like prune plums, red plums or blackberries are used. Done correctly, it is lovely.

When I was doing my internship, the chef taught me a great recipe for clafoutis that was simple and foolproof. We would schedule it for days when we had cooking students who had little or no experience in the kitchen. Not to be trusted with knives, we knew that we could put cherry pitters in their sweaty little hands without fear of accidents. Better yet, since clafoutis tastes best when you leave the cherries unpitted (a little more onerous to eat, but worth it), sometimes the students wouldn’t even get cherry pitters, just whisks!

Try to take an eye out with those!

At home, I reliably depended on that recipe any time I needed to deliver a perfect clafoutis. It worked every time — even when I was a little short or too generous with the cherries, and even when I ran low on sugar, flour, milk or all three.

Then I moved back to New York. Suddenly, the recipe that worked so marvelously in Paris became a total dud. I can’t tell you how many heavy, lumpy, pathetic clafoutis I turned out. I was making clafoutis that tasted more like lightly sugared cherry omelets — every bit as unpleasant as it sounds.

I even inflicted them on friends, like poor Tomoko who had to pick her way around my rubbery pâte and gray (yes, gray) cherries last summer.

“What did you do to them?” she asked.

I had no idea. I could only think of something a friend in Paris repeated to me, something that she had overheard at a dinner party. Faced with the prospect of ingesting one more morsel of clafoutis after a lengthy and generous meal, one of the guests declared himself cla-foutu — a French play on words that roughly means cla-f***ked.

Well, my New York clafoutis were definitely their own kind of cla-foutus.

You always hear people who say that the definition of crazy is doing the same thing over and over again and expecting a different result. When I saw gorgeous cherries at the Greenmarket this week, I decided to get off the Crazy Train and stop trying to make my Parisian recipe. It was time to get back to Julia.

Julia Child, that is 🙂

Compared to what I was making, I think this clafoutis is a beauty. Sure, it rose much higher on one side than the other (I should have turned it halfway through cooking. Stupid un-calibrated oven). Yeah, it cracked (I over-cooked it. I should have taken it out of the oven sooner).

But I feel like I am getting my clafoutis-groove back on.

This recipe is adapted from Mastering the Art of French Cooking, Volume I. Julia calls for three cups of cherries, and if I had three cups, I would have used them 🙂

For the original recipe, click here.

Special equipment:

A stick immersion blender

Ingredients:

Butter

2-3 cups of ripe cherries, pitted . . . or not!

1/3 cup of sugar

1 and 1/4 cup of whole milk

5 pullet eggs or 3 large eggs

1 tablespoon of vanilla extract

A pinch of salt

2/3 cup of all-purpose flour

Powdered sugar

How to prepare:

1. Preheat the oven to 350°.

2. Butter a baking dish and arrange the cherries in a single layer on the bottom.

3. In a large bowl, use the immersion blender to blend together the milk, the eggs, the vanilla extract, the salt and the flour for 1 minute. The batter should be nice and frothy.

4. Set the baking dish on a baking sheet. Use a ladle to carefully pour the batter over the cherries. Bake for about an hour. The clafoutis will be done when the sides are puffed and golden, and when a knife or a skewer inserted in the center comes out clean. The clafoutis will be like a souffle when you remove it from the oven. Let it settle completely — it will sink down as it cools — before serving. Dust the clafoutis with powdered sugar right before cutting it into wedges.

Orecchiette Carbonara with Freshly-Shelled Peas


On a hot and sticky mid-August night several years ago, I boarded an overnight train from Paris to Milan. The cabin was filled with two sets of bunk-beds that were meant to accommodate four people. Instead, we were five because the couple sharing the cabin with us had a toddler.

The family asked if they could have the bottom bunks, which was fine by me because I wanted to bunk closest to the itty bitty window that cracked open at a woefully insufficient angle.

Insufficient because the father had removed his shoes and the smell was horrific.

It was so bad that I couldn’t sleep. I was finally forced to look in my Italian phrasebook and scan the pages by moonlight for something appropriate to say that would make the man put his darn shoes back on!

Unfortunately, my phrase book had nothing related to shoes, or putting on shoes or telling people that the smell of their feet was intolerable. However, I did manage this:

“Per fevore, signore. I vostri piedi, è violazione dei miei diritti umani!”

Which worked out roughly to mean, “Excuse me, sir. Your feet, this is a violation of my human rights!”

No response. So I tried these other phrases:

I vostri piedi, sto svenendo . . . Non riesco a respirare . . . !”

Which means: “Your feet, I’m passing out . . . I cannot breathe . . . !”

Then I repeated, “I vostri piedi,” pointed to his feet, crossed my eyes and pretended to die.

Nothing. Nada. Zilch.

He must have understood me because he refused to acknowledge my existence. I tried not to take it personally, even though I hated him more and more as we crawled south to Italy. Maybe, I thought, he was trying to incapacitate his over-active son. Or maybe he was angry at his wife and was trying to suffocate her with the smell of his feet.

Seriously. If that smell could be weaponized, the war on terror would be over.

So what does this have to do with carbonara, that amazing Italian dish that uses the residual heat of freshly boiled pasta to transform bacon, beaten eggs and Parmesan into a creamy sauce?

In that very same Italian phrase book was a recipe for spaghetti alla carbonara, a recipe that I still rely on to this day.

The idea to use orecchiette and peas actually comes from Suzanne Goin‘s Sunday Suppers at Lucques. Her description of how orecchiette are perfectly shaped to cup small bits of bacon and peas was irresistible to me, but I prefer to stick with my old phrasebook’s way of making carbonara because it only uses one pan — and who doesn’t prefer that?

These proportions will make enough for two, but can easily be adjusted for more. For something richer, you could add about a 1/3 of a cup of caramelized chopped onions to the mix. This recipe was also a great way to start using the wonderful shell peas that are at the market right now, as well as the bacon and pullet eggs from my CSA.

Pullet eggs are small eggs from young hens that have just started laying. They say that two pullet eggs are the equivalent of one regular chicken egg, but I find that it’s really more like 3 pullet eggs = 2 regular chicken eggs. Pullet eggs are wonderfully rich in both flavor and mouthfeel, just perfect for carbonara if you can get a hold of some.

I also used up the last of my CSA bacon ends to make my bacon bits, but you can use crumbled cooked bacon strips in this if bacon ends are not handy.

Ingredients:

1/3 pound of dried orecchiette

1/3 cup of bacon bits or crumbled cooked bacon

1/3 cup of freshly shucked green peas or frozen peas

5 pullet eggs or three regular eggs

1/2 cup of freshly grated Parmesan

Freshly grated black pepper

Olive oil

How to prepare:

1. Bring a medium saucepan of salted water to a boil. When the water has reached a rolling boil, add the pasta. While the pasta is cooking, set up the other ingredients. This recipe moves quickly near the end, so it is a good idea to have everything ready to go.

2. Combine the Parmesan and eggs in a small bowl with freshly ground black pepper.

3. When the pasta is not quite al dente, add the peas to the boiling water. Let the pasta and peas finish cooking together. Drain and pour the pasta and peas back into the saucepan. Add the bacon along with a quick drizzle of olive oil. Pour the beaten egg mixture over the pasta and begin stirring everything together quickly. When you add the eggs, the pasta should be warm enough to barely cook them. You want the sauce to be just thick enough to coat the pasta with a glossy sheen. If the sauce seems soupy instead of creamy, put the pan over a very low flame and continue to stir and toss the pasta quickly until the sauce turns smooth and creamy.

Don’t worry if you accidentally overcook the eggs and they scramble a little bit. It will still be delicious.

Asparagus with Fried Egg and Parmesan


It’s asparagus season! Which means it’s time for my favorite fast lunch: sweet local asparagus topped with a fried egg and sprinkled with Parmesan. To anyone who thinks that making yourself lunch takes too much time, I challenge them to find something quicker than this meal.

But, Daisy, don’t you have to steam asparagus? Or boil it? That takes time!

Oh no no, young Padawan. You can . . . microwave it!

This idea comes from Andrew Carmellini‘s Urban Italian. In the book, he recommends microwaving asparagus as a quick and terrific way to perfectly cook it without sullying up another pot. I just have to quote him on this:

“Asparagus in the microwave is awesome. Yup. You read that right. I’m sure some food snob somewhere is recoiling in horror and throwing this book across the room, but I don’t care.”

I don’t care either. I love Carmellini’s food. He’s got a Michelin star and two James Beard Awards. If microwaving asparagus is good enough for him, it’s good enough for me.

This is one of those no recipe-recipes that can be multiplied by as much as you need. I give you the recipe for one but obviously, if you are cooking for more people, you will need to punch an extra minute or two into the microwave.

Ingredients:

6-7 asparagus spears, rinsed clean and trimmed of their woody ends

Olive oil

1 egg

Butter

Salt and freshly ground black pepper

Grated Parmesan cheese

How to prepare:

1. Spread out the asparagus in a single layer on a microwave-safe plate. Season the asparagus with salt and sprinkle on a little bit of water. Drizzle it with some olive oil. Cover the plate tightly with plastic wrap and nuke it for 1 minute and 30 seconds.

2. In the meanwhile, fry up an egg in butter.

3. Carefully remove the plastic wrap from the plate and arrange the asparagus spears on a clean plate. Top the asparagus with the fried egg. Season everything with salt and black pepper. Sprinkle on as much grated Parmesan as you like.

Serve with a good, crusty bread.

Young, Green Garlic Knots with Parmesan and Marinara Sauce


Well, I did it. I broke my oven.

After a week of intense pizza-making, my oven decided that it was having no more of this high-heat nonsense and promptly decided that it was going to go on strike.

The stovetop still works, but the oven just makes a clicking noise and stays as cold as my hopes and dreams for weekend baking 😦

If my landlord doesn’t fix it in the next day or so, this will certainly throw a wrench into my plan for this month’s Daring Kitchen challenge. It is strongly looking like I am going to have to get creative fast.

Thankfully, before my oven decided that it had lived through enough, I was able to crank out these awesome garlic knots using Patricia Wells‘ basic pizza dough recipe.

Since I used the rest of the green garlic I got at the Greenmarket, the garlic butter turned out to be more like a garlic spread. No matter, the results were still sloppily delicious. I inhaled about four in a row while standing in my kitchen. They were just so soft, pillowy and slathered with green garlicky goodness that I couldn’t eat just one or two . . . or, erm, three!

On another note, I passed that darned Spanish exam! Tequila para todos!!!

Ingredients:

For Patricia Wells’ Basic Pizza Dough:

1 teaspoon of active dry yeast

1 teaspoon of sugar

1 1/3 cups of lukewarm water (between 105°-115°)

2 tablespoons of olive oil

2 teaspoons of salt

3 3/4 cups of bread flour (thank you RubyandWheaky!) or all-purpose flour

For the Marinara Sauce:

2 tablespoons of olive oil

1 28-ounce can of crushed tomatoes (if you don’t live in the Tri-State area, you can order Jersey Fresh tomatoes here, or use the best San Marzano tomatoes that you can find)

Salt

For the Young, Green Garlic Spread:

2 bulbs of young, green garlic, white and green parts trimmed and thinly sliced

2 tablespoons of olive oil

2 tablespoons of butter

1 teaspoon of salt

Freshly grated Parmesan cheese for sprinkling

How to prepare:

1. In a large bowl, mix together the yeast, the warm water and the sugar. Let it stand for about 5 minutes before stirring in the olive oil and the salt.

2. Using a wooden spoon, stir in the flour, a little bit at a time, until most of the flour has been absorbed and the dough begins to pull together. Turn the dough out onto a lightly floured countertop and knead it until it is smooth and elastic, about 5 to 6 minutes. Shape the dough into a ball and transfer it to a large lightly oiled bowl. Cover the bowl tightly with plastic wrap and let the dough rise between 8-12 hours in the refrigerator, or until it has doubled or tripled in size.

3. When the dough has risen, remove it from the refrigerator and punch it down. Let the dough rise again until it has doubled in size.

4. While the dough is rising, heat two tablespoons of olive oil in a heavy-bottomed saucepan over medium heat. Add the tomatoes. Reduce the heat to medium-low and simmer the tomatoes, stirring frequently, until all the oil has been incorporated and the sauce has thickened. Adjust the seasoning.

5. Preheat the oven to 400°.

6. Divide the dough into 15 2-ounce portions. Use your hands to roll and stretch each portion into a 6-8 inch-long strip. Make a knot, and tuck the ends under the bottom of the knot. Arrange the knots on a parchment paper-lined sheet pan so that they are evenly spaced apart. Bake the knots for about 20-25 minutes, or until they are browned and golden.

7. While the knots are baking, soften the green garlic in the olive oil and butter over medium heat. When the garlic is soft, season it with about a teaspoon of salt. Transfer everything to a food processor and process it until you have a smooth purée.

8. When the knots are done, remove them from the oven and let them sit until they are just cool enough to handle. Spread the green garlic purée over the top of each knot. Let the knots cool and absorb the the melted butter and olive oil in the purée. Sprinkle each knot with Parmesan cheese and serve with marinara sauce on the side.

Young, Green Garlic Pizza


Have you seen Jim Lahey‘s new book? The one all about pizza? I have been a big fan of Lahey ever since I lived up the street from the Sullivan Street Bakery in Soho. Back then, I used to go over there almost daily for shots of Illy coffee and square slices of pizza, available in four varieties: Bianca, Potato and Rosemary, Tomato Sauce, and Mushroom and Thyme.

Since those years, Lahey has expanded the Sullivan Street Bakery and opened a pizza joint called Co. Co. is just about one of my favorite places for a pizza pie in the city. The dough is imperfectly perfect: lumpy, irregular, charred, crispy and toothsome, with just the right amount of salt and olive oil. When I saw that Lahey had published a book all about pizza, I got really, really excited.

Because I thought it would be really, really easy.

See, Lahey’s other book contained the über-recipe for no-knead bread. As long as you were willing to let the dough do its thing and rise overnight, you could have amazing bread with just about zero effort. You didn’t need a fancy oven, or a special starter, or a wooden paddle. You just needed a bowl and an oven-safe pot with a lid.

So of course, I assumed that his pizza would be just as simple.

In many ways, it is. You mix the ingredients, you let it rise overnight, you stretch it, you top it . . . and then you pull out your pizza stone, pizza paddle or pizza peel.

Insert screeching wheel sound here.

Lahey wants you to heat your pizza stone by positioning it about 8 inches from the broiler element before using your pizza paddle to slide your pie onto its hot surface. I have three problems with this:

A) I live in a tiny studio apartment and I don’t have any space left for any more pieces of specialized cooking equipment, no matter how “inexpensive” Lahey says they are.
B) My broiler has exactly three inches worth of clearance because the broiler unit is positioned underneath the actual oven. If I put a pizza stone in there, there will be no room for a pizza. If I do manage to wedge a pizza in there, chances are that I will set my apartment on fire.
C) I live in a rental.

I have no problem with letting dough proof overnight. Delayed gratification doesn’t bother me, but if there is one thing I abhor in terms of cooking it is being told that I can’t make X if I don’t have Y.

Especially when Y is a piece of equipment.

Pizza is pizza. It’s not molecular gastronomy, it’s peasant food — albeit very wonderful peasant food that has a cult following and official Italian government recognition.

Nevertheless, I refuse to be precious about pizza.

If you have a pizza stone, by all means use it. If you have a pizza peel, good for you. You are likely a more serious pizza aficionado than myself. If you have neither, you can still make a perfectly serviceable— and even an amazing pizza — without them.

I’ll worry about authenticity when I have the money, time and space to build a outdoor wood-burning oven just like they have in old Napoli.

Pizza dough is really easy to make at home. Generally, it consists of five ingredients: flour, yeast, olive oil, salt and water. Every time that I make pizza dough, I end up using a different recipe than I did before because I forgot to scribble down the proportions that I used. However, there is one dough that I keep coming back to consistently: Amy Scherber‘s “Push Button” Pizza Crust, published in The Chefs of the Times. Scherber’s dough is super easy to pull together; you just whizz all the ingredients together in a food processor for about 60 seconds total, and then let the dough rest for 60 minutes. You don’t have to toss it to stretch it, just use your fingertips to “press, prod, push and poke” the dough into place on a plain old cookie sheet. The crust gets wonderfully crispy in the oven, but it still has a little bit of give to it. It also has great flavor even though it has the same ingredients that every pizza dough has.

If you don’t have a food processor, you can just stir the ingredients together with a spoon, and then knead it until the dough feels elastic.

For the sauce, I make the simplest marinara ever using Jersey Fresh Crushed Tomatoes — which are amazing straight out of the can. All I do is heat about two tablespoons of olive oil in a heavy-bottomed saucepan, add the 28 ounces of crushed tomatoes, and simmer everything over low heat until the oil has been incorporated and the sauce has thickened. I love it. If the canned tomatoes are really good, it’s just the purest taste of tomato that you can imagine.

The #1 most important trick to perfect pizza at home is to go easy on the sauce and the toppings.

I know it’s hard to resist the urge to slather your dough with tons of sauce and cheese, but the more you pile on, the spongier your dough will be because all those toppings carry moisture. The more toppings you add, the less chance you will have of achieving a crispy crust.

And pizza really is all about the crust. So remember, less is more!

This is also the first post this year to feature spring vegetables. Green garlic is in! Whoo-hoo!!!

Ingredients:

For Amy Scherber’s “Push Button” Crust:

Olive oil

3/4 cup + 1 tablespoon of warm water (between 105-115°)

1 1/2 teaspoons of active dry yeast

2 cups of all-purpose flour

2 tablespoons of coarse cornmeal

2 1/2 teaspoons of salt

For the pizza sauce:

2 tablespoons of olive oil

1 28-ounce can of crushed tomatoes (if you don’t live in the Tri-State area, you can order Jersey Fresh tomatoes here, or use the best San Marzano tomatoes that you can find)

Salt

For the toppings:

1 ball of buffalo mozzarella

1 bulb of young, green garlic, thinly sliced on the bias along with some of the tender green stem

Special equipment:

1 half-sheet pan or a plain old cookie sheet

How to prepare:

For the dough:

1. Whizz together the water, the yeast and 2 teaspoons of olive oil in the food processor. Add the flour, the cornmeal and 2 1/2 teaspoons of salt. Process everything together until the dough comes together, about 10 seconds. Process the dough for about 5 seconds more before turning it out onto a lightly floured countertop. Knead the dough briefly for about 30 seconds. Shape the dough into a ball and place it in an oiled bowl. Cover it with plastic wrap and let it rest for about an hour.

If you don’t have a food processor, you can mix the water, the yeast and the olive oil together with your fingers, and then incorporate the dry ingredients a little bit at a time with a wooden spoon. Turn the dough out onto a lightly floured countertop, and knead the dough until it becomes elastic. Shape the dough into a ball and place it in an oiled bowl. Cover it with plastic wrap and let it rest for about an hour.

2. While the dough is rising, heat two tablespoons of olive oil in a heavy-bottomed saucepan over medium heat. Add the tomatoes. Reduce the heat to medium-low and simmer the tomatoes, stirring frequently, until all the oil has been incorporated and the sauce has thickened. Adjust the seasoning.

3. Preheat the oven to 450-475°.

4. When the dough has risen, divide it in half if you want to make two round personal pizzas, or leave it as one ball of dough if you want to make one big rectangular pizza. Line your sheet pan with a parchment paper. Lift the dough out the bowl and stretch it out slightly. Place it in the center of the sheet pan. Using lightly oiled fingertips, press the dough out from its middle to its edges. Continue to pat it out until it is thin and evenly covers the pan.

5. Spoon just enough sauce over the dough so that there is a thin, even layer. Hand tear the mozzarella over the top, half a ball per round if you are making two round pizzas instead of one large rectangular pizza. Scatter the thinly sliced green garlic evenly over the top. Bake the pizza until the crust is golden and the top is bubbly, about 10-15 minutes.