Chicken Pot Pie


This is one of my favorite recipes of all time, originally taken from The Dean and Deluca Cookbook. This recipe has been tinkered with many times over the years — so much so that the glue-bound spine of the cookbook has cracked, making it fall open to pages 496 and 497 every time I pick it up. Now when I look at those scribbled-on, stained, dog-eared and water-wrinkled pages, I feel that this version here is very much my own.

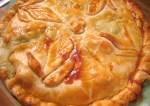
Though some might consider it not quite a pot pie — there is no bottom crust, only a top — the pastry blanketing the heavenly rosemary-scented filling is so flaky and satisfying that to quibble over nomenclature seems silly.

Lately I have been adapting the recipe slightly as a way to cook up tasty bits of Thanksgiving turkey leftovers. I do love getting my fingers into the turkey carcass, stripping and pulling away every moist morsel left on the bones. This recipe makes the most of those wonderful little bits and pieces, but is also amazing as is with its freshly browned chunks of juicy chicken breast.

Ingredients:

For the pastry crust:

1 1/2 cups of flour

1/2 teaspoon of salt

1/2 cup of unsalted butter (1 stick), chilled and cubed

About 1/4 cup of iced water

For the filling:

1-1 1/2 pounds of boneless, skinless chicken breast cut into 1-inch pieces*

2-3 tablespoons of olive oil, divided

2 teaspoons of finely minced garlic

2 celery ribs cut into 1/4 inch dice

2 medium carrots cut into 1/4 inch dice

1/2 cup of frozen peas

6 pearl onions, peeled

3 tablespoons of butter

1/4 cup of flour

1 1/2 cups of chicken stock

1/2 cup of milk

1/3 cup of heavy cream

2 1/2 tablespoons of freshly chopped rosemary

For the egg wash:

1 beaten egg

How to prepare:

For the pastry crust:

1. Put the flour, salt, and butter in a food processor and pulse until the mixture resembles coarse crumbs. Do not overprices as the chunks of butter cut into the flour is what makes the crust tender and flaky. While the food processor is running, add the water, a little bit at a time, until the dough begins to pull away from the side (do not let it form a ball). You might use less water than 1/4 cup, but probably not more.

2. Turn the dough out onto a lightly floured work surface. Working quickly and lightly, knead the dough with the ball of your hand until it comes together. Shape the dough into a ball and flatten it out into a disk. Wrap the disk in plastic wrap and refrigerate for at least 30 minutes, but no longer than an hour.

For the filling:

1. Season the chicken with salt and pepper. Heat 1- 1 1/2 tablespoons of olive oil in a heavy-bottomed pan over moderate heat. Add the chicken in batches, making sure all the sides are nicely browned. Set the chicken aside.

2. Add the remaining oil to the same pan along with the garlic, celery, and carrots. Sauté the vegetables until they are tender, about 6 minutes. Set the vegetable mixture aside.

3. In a small saucepan about halfway with water and bring the water to boil. Add the peeled pearl onions. Cook for about 5 minutes. Add the frozen peas to the boiling water and continue to cook for about 4 minutes more. Drain the vegetable and set them aside.

4. In a medium-sized saucepan, melt the butter over moderate heat. When melted, add the flour and mix quickly. Brown the flour lightly before adding about 1/2 cup of the stock. Whisk the stock into the flour, smoothing out any lumps before adding the rest of the stock, the milk, and the cream. Continue whisking while the mixture is brought up to a boil. Reduce the heat to low and continue to whisk while the sauce thickens to the right consistency. Turn off the heat and stir in the chopped rosemary. Adjust the seasoning.

To assemble:

1. Preheat the oven to 375°.

2. In a large casserole or deep pie dish, spread the chicken out over the bottom. Spread the vegetable evenly out over the chicken and then pour the sauce evenly over everything.

3. On a lightly floured surface, roll the dough out until you have a round that will hang about 1 to 1 1/2 inches off the side of the dish. Place the dough gently over the pie and slightly tuck it in around the edges of the dish. Trim off any excess that falls more than 1 to 1 1/2 inches over the edge. Pinch or crimp the edges to make a decorative border. Using a knife, make a few slashes on the top of the pastry. If you have some leftover dough, you can also make some decorative leaves to go on top.

4. Brush the beaten egg on top of the dough. Bake in the oven until the crust is golden brown, about 45 minutes. Let rest at least 5 minutes (or even better, 10) before serving.

Note:

For the filling, if you have any leftover roasted chicken or turkey, you could use that instead.

Jonathan Waxman’s Roast Chicken with Melted Herb Butter


Recently, I had dinner at Jonathan Waxman’s Barbuto — home to “supposedly” one of the best roast chickens in the city. I say “supposedly” because there are a lot of good chickens to be had in this town — including, ahem, my own.

Needless to say, I was skeptical. I just had to order it to see if it deserved its reputation.

From the first bite, nay from the first whiff, I was a goner. Juicy dribble slopped down my chin. My fingers were sticky and slick from the luscious melted compound butter dotting the surface. The skin itself was thin and crispy, popping in my mouth as I chewed.

Oh, swoon.

Before I realized it, half a chicken’s worth of bones lay in clean pile on the side of my plate. I knew I had to try to make this at home.

Waxman’s recipe has been easily available for a while. When I first looked it over, the old skepticism resurfaced: A warm water bath for the raw chicken? Cooked only under the broiler? Olive oil, no butter?

This negative thinking persisted as I fished slimy, raw chicken pieces out of warm, greasy water, trying with seemingly no success to dry them off with an excessive amount of paper towels. Due to my East Village broiler’s inadequacy, I could only start the chicken under the broiler and had to finish the pieces in the oven.

How did it turn out? The flesh was amazingly tender, juicy, and flavorful. The seasoned skin sang with succulence. Oh, swoon once more.

It was really, really fantastic.

Jonathan Waxman, I will never doubt you again.

Ingredients:

1 3-4 pound chicken (preferably free-range, naturally raised, no antibiotics, no hormone, possibly kosher), cut into 8 pieces

2 tablespoons olive oil

Kosher salt and freshly ground black pepper

4 tablespoons unsalted butter

4 tablespoon chopped fresh herbs, such as rosemary, thyme, and parsley — whatever you have available

How to prepare:

1. Preheat your oven to 425°.

2. Relax the flesh by soaking the chicken for 5 minutes in a large bowl filled with enough warm water to cover it. Drain and dry the pieces thoroughly with paper towels.

3. Heat the broiler. Arrange the chicken pieces in a single layer in a large cast-iron pan, skin side up. Rub the chicken with olive oil, season well with salt and pepper

4. Place the pan under the broiler, about 2 inches from the heat source, and cook until the skin is perfectly golden brown. Move the pan to the oven and continue to cook, roasting the chicken until the skin is really crispy and an instant-read thermometer inserted in the thickest part of the thigh registers 165 degrees. Remove the pan from the oven and let the chicken rest while you make the herb butter sauce.

5. While the chicken is resting, melt the butter in a small skillet over low heat. When melted, stir in the chopped herbs, along with a little salt and pepper. Continue to slowly and gently heat the herbs until the butter has become infused with their flavors.

6. To serve, drizzle a spoonful of broken herb butter sauce over each piece of chicken. Serve right away.

Tuscan Kale “Caesar” Salad


I have a cook’s confession to make: I don’t really like small, salty, oily fish, particularly when there are a lot of little bones to contend with. Mackerel has always made me feel slightly ill. Herring, sardines, or any other fish needing to be either canned or pickled before eating leaves me a little bit nauseous.

And let’s not even talk about anchovies.

I know. What kind of self-proclaimed gourmand doesn’t like anchovies? But I just can’t do it. It’s those little needle-like skeletons that so many people claim “dissolve,” but really don’t. And it is that persistent fishiness that sticks and clings, making me swear that I can smell it on my hands, clothes, and in my hair for hours afterwards.

So it is very ironic that I love Caesar salad.

It is just about the only dish with anchovies that I can abide by, so long as someone else does the dressing dirty work.

An abundance of lovely kale in the markets has had me thinking about kale salads. Kale is the kind of leafy green that cries out for strong flavors and tastes. Because it is so fibrous, you can dress it about an hour before dinner and let the acids in the dressing soften and relax the leaves into luscious, cruciferous ribbons.

Ever since reading about this Tuscan kale “Caesar” salad in the New York Times, I have been anxious to try it. Of course, some changes were made to suit my mood and what I had in the kitchen. For Pecorino, we were lucky and fortunate to have a fabulously savory and sharp wedge of Locatelli. Instead of croutons for crunch, I substituted some of Andrew Carmellini’s “Crumbs Yo!” One last Meyer lemon too. The result? A salad that was both tangy and delicate, mouthwateringly delectable and incredibly flavorful. I just want to eat it every day.

No anchovies required.

Ingredients:

1 bunch of Tuscan kale, stems removed and leaves cut into 1/2-wide ribbons

1/2 cup of “Crumbs Yo!” (1/2 cup of Panko bread crumbs, 1 tablespoon of olive oil, and salt and pepper to taste)

1 fat, minced clove of garlic

1/3 cup of freshly grated Pecorino Romano, plus more for serving

3 1/2 tablespoons of extra virgin olive oil

The freshly squeezed juice of one lemon

1/8 of a teaspoon of red pepper flakes

Salt and pepper to taste

Special Equipment:

A hand-held immersion blender

How to prepare:

1. In a small bowl, combine the garlic, Pecorino, olive oil, lemon juice, red pepper flakes, and salt and pepper. Using a hand-held immersion blender, whizz everything together until it forms a nice emulsion, just about 15 seconds or so. Let stand for 5 minutes or more to let the flavors meld together.

2. Meanwhile, make the “Crumbs Yo!” In a small sauté pan, heat the olive oil over medium heat. Add the bread crumbs, salt, and pepper to the warmed oil, tossing gently to evenly coat all of the crumbs. Continue to toast the bread crumbs until they are golden brown, about 3 to 4 minutes. Remove the bread crumbs from the heat, and transfer them to a cool plate or bowl. Let them cool for about 4-5 minutes.

3. Using your hands, toss the kale with the dressing in a large salad bowl until all the leaves are evenly coated. Let sit for at least 5 minutes (but you can let it sit for longer) before adding the bread crumbs and tossing again. By adding the bread crumbs near the end, you can preserve their crunch. Shower the salad with some more freshly grated Pecorino right before serving.

Macaroni and Cheese


Home for the holidays a few years ago, I decided to make macaroni and cheese from scratch: roux, béchamel, freshly-grated nutmeg, 5 kinds of cheeses (smoked and unsmoked), 3 different pasta shapes, bread crumbs, the whole shebang.

The reception? After poking the golden pile and perfectly crunchy top with suspicion, my brother declared that he preferred the stuff out of the box.

My heart immediately sank. It was like someone telling you that they liked Tang more than fresh-squeezed. My inner cook shook her useless, cheese-stinking fists at the sky and wailed, “Why?!”

Looking back, I shouldn’t have been so surprised. Mac and cheese is the ultimate comfort food, and as comfort food it should be instantly familiar, recognizable, and convenient. Warm, soothing, and uncomplicated.

For myself, my first “real” mac and cheese was a revelation. Having grown up with the boxed stuff, I found the fussier version so much more satisfying and have never gone back — even if it means I eat it at home a lot less frequently.

In truth, to make it from scratch really isn’t so much fussier; like anything else we cook, there are complex ways to make something as well as simpler ways. My absolute favorite macaroni and cheese recipe comes from Deborah Madison’s cookbook The Savory Way. That recipe is decidedly a lot of work, but it is so worth it. This recipe from sadly defunct Gourmet Magazine is not nearly as complicated, but it is still delicious. Four cups of whole milk from Milk Thistle Dairy made the sauce exceptionally rich and creamy. For the cheese, we had one last scrumptious wedge of Bier Meck from our CSA that we shredded along with a good chunk of raw milk Colby.

Ingredients:

8 tablespoons of unsalted butter

1/4 cup, plus 2 tablespoons of all-purpose flour

4 cups of whole milk

1 1/2 teaspoons of dry mustard

1/8 teaspoon of cayenne

1 pound rotini

3 cups coarsely grated “melty” cheese (about 12 ounces of different cheeses is always best)

1 1/3 cups freshly grated Parmesan cheese (about 4 ounces)

1 cup bread crumbs

How to prepare:

1. Preheat the oven to 350°F. Butter a 3- to 4-quart gratin dish or another shallow baking dish.

2. In a kettle of salted boiling water, cook macaroni until just al dente. Drain well.

3. In a heavy saucepan, melt just 6 tablespoons butter over moderately low heat. Add the flour and cook the roux, whisking, for about 3 minutes. Add the milk in a stream, whisking while bringing to a boil. Continue to whisk the sauce. Add the mustard powder, cayenne, and salt and pepper to taste. Simmer sauce, whisking occasionally, until thickened, about 2 minutes.

4. In a large bowl, stir together the macaroni, the sauce, the grated cheeses, and one cup of Parmesan. Transfer the macaroni mixture to the prepared dish and spread it out evenly.

5. Melt the remaining two tablespoons of butter in the microwave. In a small bowl, stir together the bread crumbs, the remaining 1/3 cup Parmesan, and the melted butter. Sprinkle the mixture evenly over the macaroni.

6. Bake the macaroni in the middle of oven for 25 to 30 minutes, or until golden and bubbling.

Spaghetti and Meatballs


In general, the restaurants that are nearest and dearest to my heart are the one’s that are the least complicated. Just straightforward, quality food. Beautifully sourced and expertly prepared. No foams, no fuss.

For this reason, I have always been a big fan of Frankies Spuntino. In the years since opening their doors — first in Carroll Gardens and then on Clinton Street — Frank Falcinelli and Frank Castronov’s food has never failed to put a big smile on my face. This is good, solid, tasty cooking at its best.

In June, the gastronomic duo released their first cookbook, The Frankies Spuntino Kitchen Companion & Cooking Manual. It’s a beautiful tome to own, filled with charming fine-line drawings and direct prose. Like their food, it is exceptionally accessible.

This meatball recipe is mostly theirs, though the basic tomato sauce is my own. While making them at home, I forgot to add the eggs, but did not find that the flavor suffered. Maybe my meatballs were a little springier as a result. If I had to do it again, I think that I would do something to make the raisins and the pine nuts not so obtrusive by either substituting golden raisins for dark. Even better still, I think I would use currants. The pine nuts I might think about coarsely chopping too.

Ingredients:

2 slices white bread (about 1 packed cup’s worth)

1 pounds lean ground beef (from High Point Farms if you have it!)

2 finely minced cloves garlic

1/4 cup finely chopped flat-leaf parsley

1/4 cup grated Pecorino Romano, plus about 1 cup for serving

1/4 cup raisins

1/4 cup pine nuts

1 1/2 teaspoons fine sea salt

7 turns white pepper

1/2 cup Panko bread crumbs

Basic tomato sauce

Spaghetti

How to prepare:

1. Heat the oven to 325°F. Put the fresh bread in a bowl, cover it with water, and let it soak for a minute or so. Pour off the water and squeeze the excess out the bread as best as you can. Tear it into tiny pieces.

2. In a mixing bowl, combine the bread with all the remaining ingredients except the tomato sauce and the spaghetti. The mixture should be moist-wet, not sloppy-wet. If the mixture is too moist, you can adjust it by adding more Panko.

3. Gently shape the meat mixture into handball-sized balls. Space them evenly on a baking sheet or arrange them evenly in a large cast-iron pan. Bake for 25 to 30 minutes. The meatballs will be firm, but still juicy and gently yielding when they’re cooked through.

4. Meanwhile, reheat the tomato sauce in a deep-sided pan that is large enough to accommodate the meatballs and sauce comfortably.

5. Put the meatballs into the pan of sauce and turn the heat up a little. Simmer the meatballs for no more than half an hour so they can soak up some sauce. Any longer that 30 minutes, and they start to disintegrate.

6. Meanwhile, prepare the spaghetti according to directions.

7. Top each serving of spaghetti with 3-4 meatballs and a healthy helping of the sauce. Shower the bowl with the freshly-grated Pecorino and a little finely chopped parsley. Serve immediately.

Roast Chicken with Russian Banana Fingerling Potatoes


If I had to choose a last meal on Earth, it would be a beautifully roasted chicken.

This is hands-down one of my most-adored dishes. I love the smell of a chicken in the oven, the warm and cozy aroma filling the apartment with comfort and contentment. I love how luscious a browned bird looks, gleaming and golden. I love the heavenly juxtaposition of crisp, crackling skin and moist, delicious meat.

This is not a recipe per se, but more like a set of guidelines that I have developed over the years for cooking perfect poultry.

1. Buy the best. We have been fortunate to have stowed a wonderfully flavorful High Point Farms chicken in the back of the freezer for these first few brisk days of fall. Barring that, aim for organic, free-range, no hormones or antibiotics, humanely-raised and processed. Heirloom if you can get it.

3. Pre-heat that oven to 425-450°.

4. Dry your bird throughly. The dryer the skin, the crispier the chicken.

5. No stuffing. This is the secret to perfect chicken. I find that by the time the stuffing is done cooking, you have overcooked your lovely bird. I like just three things in my chicken: one lemon (cut into wedges if your chicken is small), one onion, and fresh thyme. If it’s Meyer lemon season, please do use one of those.

6. Use the best butter or olive oil. In Nigella Lawson’s cookbook, How to be a Domestic Goddess, she writes that when roasting chickens, you should anoint your chicken with the highest quality butter or olive oil the same way you might apply very expensive hand cream. I always liked that image.

7. Truss your bird tight. Like a compact little football.

8. Season liberally. In his Bouchon cookbook, Thomas Keller writes that he never butters his bird because the moisture in the butter creates steam that will ruin the integrity of the skin’s crispiness.

I’ve never found that to be the case.

I did once try Keller’s approach sans butter and found the skin to still be tasty, but less glossy and appealing overall. I do like his salting technique though: “I like to rain the salt over the bird so that it has a nice uniform coating that will result in a crisp, salty, flavorful skin (about 1 tablespoon). When it’s cooked, you should still be able to make out the salt baked onto the crisp skin. Season to taste with pepper.”

So by all means, hold your hand high and shower that bird with seasoning!

9. 20-20-20-15. I don’t always follow this but when I do, I find that I have a truly superior bird. Inspired by Patricia Wells’s Roast Lemon Chicken recipe in her Paris Cookbook, I start the bird in a super hot oven on one side. After twenty minutes, I turn it on the other side for another twenty. I turn it breast-side up for yet another twenty — a total of 1 hour. After that, I drop the oven temperature to 375° and continue roasting until the internal temperature reaches 165°, give or take about 15 more minutes .

Sometimes when roasting atop potatoes, I will just put the chicken in breast-side up at 450° for about half and hour before dropping the temperature to 375° for the remainder of the time. I find the results almost as good.

10. Remove from oven and let rest for 10-30 minutes before carving. Such an important step and essential for serving a juicy bird. Plus, you don’t risk burning your fingers!

Tips:

No basting.

A top-knotch carving knife is always an asset in the kitchen.

Keep the carcass and the juices! They are worth their weight in gold.