I Made the Ratatouille from Ratatouille for My Students

Rémy's ratatouille!
Another semester has come and gone. At the end of each one, regardless what happens during the term, I am always overcome with wanting to hug each of my students and send them out into the world with a macaron. Maybe two.

This class was no exception. Despite a rough and rocky start, I finally learned to relax around them after Spring Break. The change was very welcome. I started spending less time freaking out planning my lessons and more time enjoying talking about some of the topics that interest me the most: history and process, food and memory, taste and identity, sustainability and individual responsibility,  inspiration and experimentation.

The first time that I taught a class on French food, it was the summer that the movie Ratatouille came out. I saw the movie by myself before accompanying two separate groups of students to the theater. Maybe it was the summer heat, or maybe my brain was addled from having seen the movie three times in a row, but I remember standing on the subway platform and cooing at a big, fat rat. “Oooooooh!!!” I squealed, “Look at the cutie pie! He’s got a . . . Subway sandwich!!!! Awwwwwww!!!”

Is it surprising to hear that people moved away from me?

For those of you who haven’t seen it, Ratatouille is a marvel of a movie, a treasure trove of tidbits that you can use to teach French food and culture. Want to explain a brigade by showing a kitchen hierarchy? Want to show the importance of technique and apprentissage? Want to begin a discussion about whether or not cuisine is an art form? Want to perfectly represent archetypal figures of French gastronomy like the stubborn chef, the restaurant critic, or the gastronome? Want to kick off a conversation about Proust? Want it in French and English?

Ratatouille is the movie for you!

As some of you might know, Thomas Keller was the consulting chef for the film. His reinterpretation of the classic ratatouille was also a re-imagining of a popular Turkish dish called İmam bayıldı, which literally means “the imam fainted (because it was so darn good).” Keller’s ratatouille was first published in The French Laundry Cookbook as an accompaniment to guinea fowl. This “crêpinette de byaldi” subsequently morphed into the confit byaldi featured in the film.

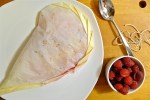
Unlike the traditional ratatouille for which all the vegetables are either stewed together or layered in the same pot and simmered until soft, Keller’s version has you make a simple pipérade over which you artfully layer very thin slices of eggplant, yellow squash, zucchini, and tomato. It takes a little bit more work, but the result is something much more elegant.

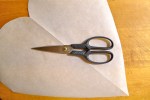
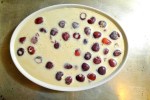
I deviated from the original recipe in order to keep the dish’s preparation more in line with the one seen in the movie. The recipe from The French Laundry Cookbook has you cover the confit with aluminum foil and tightly crimp it around the dish. However, I didn’t want a watery ratatouille, so I cut parchment paper to fit and laid it on top of the confit —  just like Rémy.

This single dish probably has the greatest carbon-footprint out of any that I have made this year. None of the vegetables are in season. All of them were grown in Peru, with the exception of the tomatoes which came from Holland. However, I wanted to serve my students something that they have been seeing and talking about all semester.

Unfortunately, they polished it off before I could even get a taste of the finished product. I assume it was good, but I have also seen students eat all kinds of weird stuff! In any case, I look forward to revisiting this recipe later in the summer when local eggplants, tomatoes, peppers, and squash are around.

Ingredients:

For the pipérade

Olive oil

1 large white onion, chopped

1 yellow bell pepper, cored, seeded and diced

1 orange bell pepper, cored, seeded and diced

1 herb sachet made from a sprig of fresh parsley, a sprig of fresh thyme, a sprig of rosemary, and a bay leaf tied up in a cheesecloth bundle.

Salt and freshly-ground white pepper

To assemble the final dish

4 Roma tomatoes, thinly-sliced

1 small eggplant, thinly-sliced

1 yellow squash, thinly-sliced into rounds

1 zucchini, thinly-sliced into rounds

3-4 cloves of garlic, finely minced

1 teaspoon of fresh thyme, minced

2-3 tablespoons of olive oil

Salt and freshly-ground white pepper

How to prepare:

1. Pre-heat the oven to 325°.

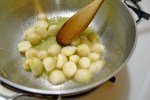
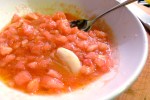
2. To prepare the pipérade, heat about 1-2 tablespoons of olive oil in a medium-sized sauté pan over medium heat. When the oil is hot, add the onions. Sauté them until they just begin to soften. Add the diced yellow bell peppers and the herb sachet. Continue to cook the vegetables until they are soft, but not browned. Remove and discard the sachet. Adjust the seasoning.

3. Spread the pipérade in an even layer in the bottom of an oven-proof baking dish. Begin arranging the sliced vegetables over it. You can either do this in rows like I did, or you can create a circular pattern by starting at the edges of the dish and moving towards the center. In any case, you want to alternate and overlap the vegetable slices so that they create a pleasing design.

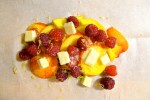
4. Mix together the garlic, thyme, olive oil, and salt and pepper to taste in a small dish. sprinkle this mixture over the vegetables.

5. Cut a piece of parchment paper to lay on top of the confit. Press it down gently to adhere. Roast the confit until the vegetables have cooked through (the eggplant will take the longest). This should take between 45 minutes to an hour. It might even take over an hour. In all honesty, I can’t really remember since I was a couple of beers in by then. Just start checking it around the 45 minute mark!

6. Remove from the oven and let it cool. The confit can be served hot, warm, or cold.

The Daring Kitchen July Cooks’ Challenge: Papillotes de pêches et framboises à la vanille (Peaches and Raspberries Cooked in Parchment Paper with Vanilla Bean)


The dissertation has been pretty overwhelming lately. This is the big push before the defense so I haven’t had much time for all the things that I love like spending time with my friends, cooking, blogging, eating out and drinking.

I miss the drinking. I ran an errand the other day and saw some nice people drinking wine in the shade. I remember jealousy thinking, “I bet they don’t even appreciate that wine!” Suddenly, I was overcome with the desire to grab their glasses out of their hot little hands and go sprinting down the street.

I didn’t do it, but I sure wanted to.

No way did I think that I was going to be able to participate in the Daring Kitchen challenge this month either until I saw the challenge: cooking en papillote.

En papillote is a fancy schmancy way of saying that you cook something in a paper envelope. We’re not talking about any old paper here; we’re talking about parchment paper, also known as bakery release paper or greaseproof paper. Cooking in parchment is a terrific way to cook delicate things quickly without fear of them drying out. You can also roast food en papillote as the paper allows just enough steam to release so that potato skin, for example, gets nice and crispy while the insides gently steam to perfection.

You could use aluminum foil instead of parchment paper — also known as a hobo pack — but I find that the results lack the finesse and elegance of cooking in paper. I might also be too negatively affected by the word “hobo,” and too seduced by the phrase “en papillote“!

It’s true that this month’s Daring Kitchen assignment wasn’t really a challenge for me since cooking en papillote is one of my favorite cooking methods. On this blog, I have posted a recipe for roasted tiny potatoes en papillote and roasted salmon with mango and Bird’s Eye chiles. However, it was completely new for me to use this cooking method to make a something sweet instead of something savory.

This dessert recipe was inspired by one that I saw months ago on Elle à table, the companion cooking site of French Elle Magazine. I kept the primary components — parchment, peaches and raspberries — and changed the rest. The original recipe has you peel the peaches. However, if the peaches are nice and ripe, this step seems fussy. It also seems like it would be a big waste of precious juice. The Elle à table recipe also calls for lime zest and juice, whereas I only used the zest for fear that the extra juice would have made the dessert too watery. Instead of a lime, I used a lemon. I also swapped out the cinnamon for vanilla bean, and shortened the cooking time so that the fruit would stay more intact.

Just like there is more than one way to roast a chicken, there is more than one way to make a parchment paper packet. Traditionally, you take a large piece of parchment paper, fold it in half, and cut out a heart — just like how you did as a child. After you position your food on the paper, you seal up the packet by folding or crimping the edges shut. To give you an example of how to seal up a parchment paper packet, here is a video with Chef Paul Prudhomme — who can pronounce papillote any dang ol’ way he pleases in Cajun country.

Alternatively, you can arrange your food in the center of a square of parchment paper, pull two of the sides up, fold them down, and then tie off the ends with cooking string. For some more examples of parchment paper packets, I direct you to this month’s Daring Cooks’ Challenge PDF.

In the end, it doesn’t really matter how you seal up the parchment paper as long as you make sure that your packets are snug, but not too tight around your food.

I made two different kinds of packets for this challenge. You can see them both in the photo gallery below. This challenge didn’t take up too much of my time since I had the fruit already (it’s high peach season here). Most importantly, it reminded me of how valuable it is to not give up those things in life that give you pleasure at those moments in life when you feel most stressed out.

A big thank you to Sarah from All Our Fingers in the Pie for the terrific challenge 🙂 In terms of mandatory items, you only asked that we cook in parchment. As suggestions, you gave us some amazing savory ones like beef, lamb or rabbit. I chose a gourmand take on cooking en papillote, which I hope still keeps with the spirit of the challenge even though it might not have been as challenging!

Mandatory blog checking lines: Our July 2012 Daring Cooks’ host was Sarah from All Our Fingers in the Pie! Sarah challenges us to learn a new cooking technique called “Cooking En Papillote” which is French and translates to “cooking in parchment”.

* The reveal date for this month’s French cooking challenge happens to fall on Bastille Day: le 14 juillet 🙂 Bonne fête, tout le monde!

Ingredients:

4 beautifully ripe yellow peaches

1 vanilla bean pod, split into four pieces

1 punnet of raspberries*

Cane sugar

The zest of 1 lemon

Cold butter

How to prepare:

1. Pre-heat your oven to 400° F.

2. Defuzz the peaches by very gently rubbing as much of the peach fuzz off as you can under cold running water. Cut the peaches into slices that are a little more than a quarter-inch thick.

3. Evenly divide the peach slices between 4 parchment paper sheets. You will use about one peach’s worth of slices per packet. Tuck one split vanilla bean pod in-between the peach slices. The vanilla should perfume the fruit, but not overwhelm it. Arrange a small handful of raspberries over the peaches. Sprinkle the fruit with cane sugar. Grate a little lemon zest over the top. Dot the fruit with about a 1/2 tablespoon of cold butter cut into small pieces

4. Crimp or tie off your parchment paper parcels and arrange them on a large baking sheet. Bake them between 8-10 minutes. Remove them from the oven and carefully open them (they will be steamy). Find and discard the vanilla bean pods.

You can serve the peaches and raspberries straight from the paper, or you can transfer the fruit to a small bowl to top with a scoop of vanilla ice cream or gelato.

* Although punnet is a Britishism, but it’s a pretty useful word for those little plastic or molded paper baskets intended for berries. We don’t seem to have any equivalent in American English (the closest approximation is a pint basket). Furthermore, punnets for raspberries are generally smaller than the containers used for pints of strawberries . . .

Kolpona Cuisine’s Muttar Paneer with Freshly-Shelled Peas


When Tahmina over at Kolpona Cuisine posted her recipe for muttar paneer, I knew that the minute shell peas came into season, I was going to make it. Before I started reading her blog, I always felt so intimidated by South Asian cooking. Long lists of spices — some ground, some whole — would freak me out so much that I would end up making something French or Italian-inspired instead.

But what I love about Tahmina is how accessible she makes Bengali, Indian and South Asian cooking. Don’t have a spice grinder for garam masala? No problem. Garam masala is better with whole spices anyway — just count how many of each thing you put in, and fish them out with your fingers while you eat. Don’t have paneer? Take that 2% milk you have lying around the house and make cheese!

This is the second recipe from Tahmina that I have cooked (the first being kale paneer), and I loved the results. The serrano peppers and chopped cilantro added near the end of cooking give the dish a wonderful freshness. The peas are also such a pretty contrast to the sunny yellow sauce. It’s really, really good.

I think that by the end of the summer, I will have succeeded in making everything that she posts!

I hardly changed Tahmina’s recipe with the exceptions of using freshly shelled peas, substituting ginger-garlic paste for actual ginger (I didn’t have any) and garlic, and using store-bought paneer. Tahmina recommends making your own paneer  something that I would totally do if I didn’t keep forgetting to watch the clock. I never seem to be able to factor in enough time to let the cheese drain! She also advocates making your own ghee, which is also on my cooking to-do list. I keep forgetting the fenugreek leaves too . . . I need to replace that Post-it pad in the kitchen!

I did have to French up this recipe a little bit by using some fancy crème fraîche in the place of heavy cream 🙂 Oh la la!

And the absolute best part about cooking from a friend’s blog? You feel like they are right in the kitchen with you, even when they are hundreds of miles away 🙂

For the her recipe, click here.

Ingredients:

For the tomato-onion base:

2 tablespoons of ghee or vegetable oil

1/4 cup of raw cashews

1 medium onion, chopped

1/2 teaspoon of ground turmeric

1/2 teaspoon of red chili powder

1 teaspoon of ground cumin

1 teaspoon of ground coriander

2 tablespoons of ginger-garlic paste

2 Roma tomatoes, chopped

Salt

For the Garam masala:

Ghee or vegetable oil

1/2 teaspoon of cumin seeds

5 green cardamom pods

5 whole cloves

2 bay leaves

1 cinnamon stick

For the final dish:

1 cup of freshly shelled peas

2 serrano peppers, chopped

8 ounces (about 1 1/2 cups) of paneer, cubed

1/2 cup of cilantro leaves, chopped

1/4 cup of crème fraîche

Salt

How to prepare:

1. In a large saucepan, toast the raw cashews in about two tablespoons of ghee or oil over medium heat. When the cashews begin to color, add the onion and sauté everything together until the onion begins to turn golden around the edges. Add the ground spices and fry them until they are nice and fragrant. Be sure to stir the onion mixture frequently so that the spices don’t burn. Add the ginger paste and the chopped tomatoes. Cook them until the tomatoes begin to break down. Adjust the seasoning.

2. Purée the tomato-onion mixture in a food processor or blender.

3. Using the same saucepan, heat the whole garam masala spices in about a tablespoon of ghee or vegetable oil over medium heat. When the spices are fragrant and the cumin seeds begin to pop, add the puréed tomato-onion base back to the pan. Let the it simmer for a few minutes so that the garam masala spices infuse the tomato-onion mixture. Add chili peppers and the peas and cook them until the peas are just start to become tender, about 4 minutes. Add the paneer, the chopped cilantro leaves and the crème fraîche. Continue to simmer everything together for 3-4 minutes more. Adjust the seasoning for a final time.

Serve with rice or, as Tahmina recommends, chapatis.

Japanese Baby Turnips Sautéed in Butter and Soy Sauce


I have a confession which really isn’t a confession since it’s pretty obvious : When it comes to Asian cooking, I haven’t a clue most of the time.

To this, I might add something possibly incendiary: although there are many people out there who are progressive, there are a lot of people who aren’t and it happens fairly often that I meet people who think that as someone of Asian descent, I eat rice like it’s going out of style, am quiet, reserved and demure, and have relatively little body hair.

Imagine their faces when they find out that I swear like a sailor, have no filter and can hold my liquor like a white divorcée.

The body hair part is true though 😉

In regards to the swearing, now that I’m older, I have made a concerted effort to swear less. Mostly because it makes the times when I do swear even better! Just kidding 😉 In all honesty, I think that I swore so much in my youth that I used up all of my swear words. I just don’t want to swear anymore. Can believe it? I can’t!

As for the filter? Visualize some big rusty grate with giant holes in it. The kind that lets almost everything through except for large, plastic soda bottles and shoes. I have worked hard on that too since I realized that speaking without thinking is best way to get misunderstood. I still think of my filter as that grate, but now it’s jerry-rigged with an intricate network of fishing line and wire. Some stuff still gets through, but much, much less than before. Thank goodness!

In terms of Asian food, I am not completely ignorant because I happen to know plenty about eating it. I have never met a sliced jellyfish, deep-fried octopus ball, bowl of noodles, dumpling (oooooh, dumplings), taro puff, sweet red bean fritter, bao, roll (spring and summer), lotus bean paste-stuffed pastry, chicken adobo, preserved egg, roast duck, suckling pig, hot-pot, under-cooked chicken meatball, wad of natto, head-on shrimp, whole fish, chili crab or Spam musubi that didn’t make my motor run.

However, when it comes to the nitty gritty of cooking, I am a babe in the woods.

The amount of times that I have stir-fried can be counted on one hand with fingers to spare. I did attempt a stir-fry about a week ago and it was an epic fail. I actually asked my mom right before I did it too.

“Mom, how do you stir-fry?”

Silence.

I pictured her putting the phone down and walking away in shame. Or maybe it wasn’t shame, but just a refusal to tolerate such a dumb question.

So after mangling that stir-fried chicken and bok choy dish (I wilted that poor bunch of greens into a pathetic nothing), I have decided that this summer, I am going to get in touch with my yellow-ness and make a good-hearted attempt to become a little more educated about how to cook some of that food over there. I know it’s kind of wrong to lump all the Southeastern and Far Eastern cultures together, but isn’t it much more efficient to refer to all peoples who use sticks as utensils as one group rather than many? I want to learn to cook a little Chinese, some Japanese, some Korean, some Filipino, some Indonesian, some Vietnamese, some Thai and more.

I’m going to try it all.

I’m almost completely new at this, so if I stick two things together that really don’t go, like using a sauce meant for fish on cheese, please do let me know. I bet you can all stir-fry circles around me, so I’m counting on you for help.

Because my mom won’t 😦

I’m also illiterate, so please make all comments or suggestions in English or in another Latinate language 🙂

Ingredients:

1 bunch of Japanese baby turnips (or regular baby turnips) and their greens, thoroughly washed

Butter

Sesame oil

Japanese soy sauce

Crushed Aleppo pepper or shichimi

How to prepare:

1. Separate the leaves from the baby turnips. Trim the turnips and cut them in half if they are too big. You want all the turnips and turnip pieces to be roughly the same size so that they cook evenly. Roughly chop the greens into 2-inch pieces.

2. In a large saucepan, heat a knob of  butter and about a teaspoon of sesame oil together over medium heat. When the butter begins to foam, toss in the baby turnips. Carefully add a splash of soy sauce to the pan along with some Aleppo pepper or shichimi to taste. Sauté the turnips until they begin to lose their opacity and turn translucent. Add the greens and continue to cook everything until the greens are wilted and the turnips are cooked through. Adjust the seasoning and serve.

Cherry Clafoutis


Clafoutis is the classic dessert of the Limousin, the northwestern part of the Massif Central in the middle of France. Traditionally, it is baked in a buttered dish and is more or less a flan with ripe black cherries. Sometimes, other red fruits like prune plums, red plums or blackberries are used. Done correctly, it is lovely.

When I was doing my internship, the chef taught me a great recipe for clafoutis that was simple and foolproof. We would schedule it for days when we had cooking students who had little or no experience in the kitchen. Not to be trusted with knives, we knew that we could put cherry pitters in their sweaty little hands without fear of accidents. Better yet, since clafoutis tastes best when you leave the cherries unpitted (a little more onerous to eat, but worth it), sometimes the students wouldn’t even get cherry pitters, just whisks!

Try to take an eye out with those!

At home, I reliably depended on that recipe any time I needed to deliver a perfect clafoutis. It worked every time — even when I was a little short or too generous with the cherries, and even when I ran low on sugar, flour, milk or all three.

Then I moved back to New York. Suddenly, the recipe that worked so marvelously in Paris became a total dud. I can’t tell you how many heavy, lumpy, pathetic clafoutis I turned out. I was making clafoutis that tasted more like lightly sugared cherry omelets — every bit as unpleasant as it sounds.

I even inflicted them on friends, like poor Tomoko who had to pick her way around my rubbery pâte and gray (yes, gray) cherries last summer.

“What did you do to them?” she asked.

I had no idea. I could only think of something a friend in Paris repeated to me, something that she had overheard at a dinner party. Faced with the prospect of ingesting one more morsel of clafoutis after a lengthy and generous meal, one of the guests declared himself cla-foutu — a French play on words that roughly means cla-f***ked.

Well, my New York clafoutis were definitely their own kind of cla-foutus.

You always hear people who say that the definition of crazy is doing the same thing over and over again and expecting a different result. When I saw gorgeous cherries at the Greenmarket this week, I decided to get off the Crazy Train and stop trying to make my Parisian recipe. It was time to get back to Julia.

Julia Child, that is 🙂

Compared to what I was making, I think this clafoutis is a beauty. Sure, it rose much higher on one side than the other (I should have turned it halfway through cooking. Stupid un-calibrated oven). Yeah, it cracked (I over-cooked it. I should have taken it out of the oven sooner).

But I feel like I am getting my clafoutis-groove back on.

This recipe is adapted from Mastering the Art of French Cooking, Volume I. Julia calls for three cups of cherries, and if I had three cups, I would have used them 🙂

For the original recipe, click here.

Special equipment:

A stick immersion blender

Ingredients:

Butter

2-3 cups of ripe cherries, pitted . . . or not!

1/3 cup of sugar

1 and 1/4 cup of whole milk

5 pullet eggs or 3 large eggs

1 tablespoon of vanilla extract

A pinch of salt

2/3 cup of all-purpose flour

Powdered sugar

How to prepare:

1. Preheat the oven to 350°.

2. Butter a baking dish and arrange the cherries in a single layer on the bottom.

3. In a large bowl, use the immersion blender to blend together the milk, the eggs, the vanilla extract, the salt and the flour for 1 minute. The batter should be nice and frothy.

4. Set the baking dish on a baking sheet. Use a ladle to carefully pour the batter over the cherries. Bake for about an hour. The clafoutis will be done when the sides are puffed and golden, and when a knife or a skewer inserted in the center comes out clean. The clafoutis will be like a souffle when you remove it from the oven. Let it settle completely — it will sink down as it cools — before serving. Dust the clafoutis with powdered sugar right before cutting it into wedges.

Black Bean Salad with Oven-Roasted Tomatoes, Corn, Almonds, and Lemon Zest


This is another great recipe adapted from Heidi Swanson’s Super Natural Every Day. Swanson, whose blog 101 Cookbooks is an amazing source of ideas and inspiration, makes food that is healthy, wholesome, a little quirky, always delicious, and never preachy.

The great thing about her vegetarian recipes is how amenable they are to your tastes. You can substitute chicken for tofu, or add shrimp, or beef, or pork, and the dishes will still be great.

For this recipe, I added local corn and the farfalle. Since Hurricane Irene, our farmers need all the help we can give them. Though NYC was mostly spared, many of the farmers and growers who bring the literal fruits of their labor every week to us were not. Almost no farm was left untouched by the flooding.

Support local and please make a donation here.

Ingredients:

1 pint of Sun Gold tomatoes (cherry or grape tomatoes work too), halved

Salt and pepper

Granulated cane sugar

Olive oil

3/4 cup of raw almonds, halved width-wise

1 cup of corn kernels (about two ears)

2 15-ounce cans of black beans, rinsed and drained

1/3 pound of farfalle, prepared according to package directions

The grated zest of one lemon

The juice of one lemon

1/4 pound of French feta, crumbled

How to prepare:

1. Preheat your oven to 350°.

2. Line a rimmed baking sheet with parchment paper. Spread the tomato halves over the sheet and sprinkle them liberally with salt and sugar. Drizzle the halves with olive oil. Toss everything together so that the tomatoes are evenly coated in the oil, salt, and sugar. Arrange the tomatoes cut-side up. Roast them until they have shrunken, and have begun to caramelize around their edges, about 45 minutes. Remove them from the oven, and when they are cool, scrape them into a large bowl along with all their caramelized juices.

3. Meanwhile, heat the almonds in a single layer in a large cast-iron skillet set over medium heat. Toss them around every couple of minutes until they are fragrant and toasty. Be sure to monitor the nuts closely; they can burn in a minute! When the almond halves are toasted, add them to the same large bowl as the tomatoes.

4. Wipe out the skillet and add about 1 tablespoon of olive oil. Heat the pan over medium-high heat until the oil begins to shimmer. Add the corn, and toss the kernels in the hot oil until they begin to brown. Add the corn to the same large bowl as the almonds and tomatoes.

5. Add the remaining ingredients to the bowl and drizzle everything with olive oil. Toss everything together well. Adjust the seasoning and serve.

Penne al Pomodoro Crudo (Penne with Raw Tomato Sauce)


Indian summer, that strange spike in temperature and humidity that occurs following the first frost. Okay, so maybe we haven’t had a first frost yet, but the weather in the Mid-Atlantic has been so screwy lately that it makes me feel like anything goes.

I just know that it has been pretty warm out, warm enough to make me still crave food that minimally requires use of my stove.

Pomodoro crudo is the simplest of sauces, and an excellent way to savor the very last of this season’s tomatoes. I used a big, fat heirloom tomato, the jolie-laide of summer fruit. A little gnarly, very misshapen, but incredibly full, flavorful, and delicious.

And it goes without saying that the better your core ingredients, the better the sauce will be.

Ingredients:

About 1 to 1 1/2 pounds of very good, very ripe tomatoes

1 clove of garlic, lightly crushed

About 2 tablespoons of excellent extra-virgin olive oil

Salt and pepper

Fresh basil

About 1/3 pound of dried penne

How to prepare:

1. Bring a large pot of water to boil.

2. Set up a large ice water bath.

3. When the water begins to boil, score an X on the bottom of each tomato. Drop the tomatoes gently into the boiling water and leave them in for about 20-30 seconds, depending on how big your tomatoes are. Remove them carefully from the boiling water, and slip them into the ice water bath. You should now be able to easily remove the skin of each tomato.

4. Once all the tomatoes are peeled, cut them in half and remove the seeds. Chop each tomato, and transfer everything to a medium-sized bowl. Season the tomatoes with salt and pepper to taste (you can salt liberally). Add the olive oil and the crushed clove of garlic. Stir everything together, and let the sauce sit covered and undisturbed on the counter for about 30 minutes.

5. Bring a large pot of salted water to boil. Add the penne and cook it until it is just slightly under-al dente. Drain the pasta and add it to the sauce. Toss everything together, and remove the garlic clove.

The pasta should begin to absorb some of the excess liquid in the sauce.

Hand-tear a handful of basil and add it to pasta. Toss again, and serve.

Congratulations to London’s Pitt Cue Co.


Congratulations to London’s Pitt Cue Co. crew on a wildly successful summer run! I hear that there are officially no more pigs in England because you smoked and sold them all!

Thank you for warmly welcoming a Yank into your ranks for your final weekend. It was a genuine pleasure to meet you all, and to be briefly be a part of the wonderful community that you have created.

And a special thanks to Jamie Berger, restauranteur extraordinaire, London mover-and-shaker, excellent host, and dear friend. I can’t tell you enough how proud I am of what you and Tom have accomplished, and how much I am looking forward to hearing about all the great things that await you in the future.

Good luck in KC!

London Calling: Pitt Cue Co.’s Last Four Days to Play

Am I allowed to shamelessly plug my friends’ food ventures?

Yes.

Especially when the reviews are as good as this, and this, and this.

If you’re in London and haven’t already been, the time to check it out is now. Go early, follow them on twitter.

And if you are Stateside, well, it is Labor Day Weekend, and London is only 7 hours away!

Insalata Caprese (Tomato, Mozzarella, and Basil)

 
The whole summer has been building up to this moment.

Tomatoes.

Shiver.

It’s true that tomatoes, thanks to globalization and hothouse farming, are available year-round. But those tomatoes are wan in comparison to real, ripe field tomatoes. I’m talking about local tomatoes. Tomatoes that are juicy and complex, almost ambrosial. Not thin and mealy tomatoes.

With tomatoes this good, only the simplest preparation will do them justice.

Slice them into rounds. Top them with thick slices of mozzarella di bufala, if you can. Sprinkle them with flaky Maldon salt. Hand-tear heady leaves of basil, and scatter them over the top. Dribble the best extra-virgin olive oil that you have over everything. Have some good crusty bread ready to sop up the juices left on the plate in after the tomatoes are gone. A pleasant wake.

Balsamic vinegar, though trendy, does not belong in insalata caprese; it’s strong flavor overwhelms the delicate acidity of good, late summer tomatoes.