The Daring Kitchen December Cooks’ Challenge: Pâté Chinois

Looks good, eh?
As some of you know, I have been participating in The Daring Kitchen’s Challenges for about a year now. For those of you unfamiliar with the name, The Daring Kitchen is an online community of cooks and bakers who commit to making one dish — the month’s challenge — and posting their results on their blogs on the same day.

I took a hiatus from the Daring Cooks (there is a corresponding Daring Bakers group) during and following my dissertation. In the interim, I missed out on some pretty great challenges. I especially regretted missing the Brazilian Feijoada and the Paella challenges. In addition, there were many more that passed me by as I just watched and salivated on the sidelines. This month, after a period of decompression and relaxation, I finally felt ready to jump back in and cook something new.

So imagine my reaction when I pulled up December’s challenge PDF for a mysteriously named dish called Pâté chinois and saw that . . .

Pâté chinois is essentially shepherd’s pie with a layer of canned creamed corn in-between the meat and the mashed potatoes.

That’s it.

And its traditional accompaniment is ketchup.

Yes. That’s it.

As Pâté chinois generally calls for ground beef, it is perhaps more accurate to say that it is a variation of cottage pie not shepherd’s pie. However, the more pressing question is why is it called Pâté chinois considering there is not much in it that can be either construed as pâté (ground meat alone does not a pâté make) or Chinese.

According to Wikipedia, the origins of Pâté chinois are rooted in the assumption that the name refers to Chinese cooks who came to Canada to serve the workers who built the North American railroad system in the late 19th century. These cooks were instructed by their railway bosses to prepare and serve something that was not only inexpensive, but that the railway workers would recognize and therefore eat As wood ear fungus and black chicken soup was probably out of the question, the Chinese cooks put together a version of cottage pie using canned creamed corn in place of the more expensive gravy.

Of course, this is all anecdotal. Alternatively, the name Pâté chinois might also refer to a variation of hachis Parmentier, which is basically cottage pie too. This is a dish that French-speaking families in Maine would refer to as Pâté chinois in reference to the towns where they ate it: China and South China, Maine.

I also read somewhere that Pâté chinois could also be an allusion to the dish’s preparation. When I read about the possible connection to Chinese immigrants, this was actually my first thought. Much like how chop suey is inauthentically Chinese and refers instead to the chopped items in the dish, I imagined that Pâté chinois got its name from the chopped meat and corn kernels that could be commonly found in Chinese stir-fry.

Regardless of when, where, and how Pâte chinois came to be, it is one of those quintessential Québecois comfort foods that everyone is familiar with, yet it is unknown to outsiders as it is hardly ever served outside of the home.

If you understand French (or even if you don’t), this is an truly awesome Youtube clip about Pâté chinois in Québec. It is narrated by a man with the dang coolest Québecois accent ever.

Given that I have made cottage pie numerous times (and even blogged about it here), I thought this challenge would be a easy one.

Wrong! Can you believe it, dear Readers? My first attempt at Pâté chinois was a dismal failure!

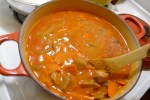
First of all, my fancy schmancy neighborhood supermarket does not carry canned creamed corn. Oh the class warfare! Consequently, I was forced to improvise with frozen corn and fresh heavy cream. Although my homemade version of creamed corn looked and tasted superior, it completely separated while cooking. To my horror, my cottage pie had morphed into a cream of potato soup with little bits of hamburger floating in it.

In my defense, it tasted amazing, but anything that is more than 50% heavy cream is almost always guaranteed to taste amazing.

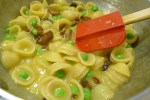
Back to the drawing board! Still no creamed corn in a can. This time, instead of blending the corn with heavy cream, I put some corn kernels with a little bit of milk in the food processor. Once puréed, I folded in more corn kernels for better texture. The result was a mass of corn about the same consistency of my mashed potatoes.

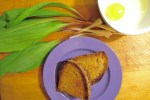
The final result yielded three distinct and yummy layers. Pâté chinois is still a fairly bland dish, which explains the predominant use of ketchup to kick it up a notch. However, since I find ketchup generally too sweet for my tastes, I substituted a healthy squeeze of Sriracha. Can’t go wrong with that 🙂

Many thanks to this month’s host, Andy of Today’s the Day and Today’s the Day I Cook!, for the challenge. I had a so much fun learning about Canadian comfort food. Your challenge was also a great reminder that it doesn’t matter how many times you make something, there is always something more to learn!

Blog-checking lines:

Our Daring Cooks’ December 2012 Hostess is Andy of Today’s the Day and Today’s the Day I Cook! Andy is sharing with us a traditional French Canadian classic the Paté Chinois, also known as Shepherd’s pie for many of us, and if one dish says comfort food.. this one is it!

Ingredients:

4 Yukon Gold potatoes (5 if they are small), peeled and cut into 1-inch cubes

2 tablespoons of butter

Milk

Salt and pepper

1 pound of frozen corn kernels, thawed and divided in half

Milk or heavy cream

One medium onion, finely chopped

1 pound of lean ground beef

1 teaspoon of paprika

1 pinch of cayenne pepper

Worcestershire sauce

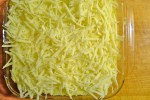
1 cup of shredded Gruyère or Comté cheese

Sriracha or ketchup

How to prepare:

1. Preheat the oven to 350°.

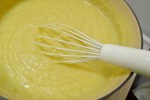
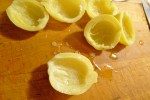
2. Put the potatoes in a large saucepan and cover them with water. Generously add salt. Bring the water to a boil and cook the potatoes until they are tender. You will know that they are ready to mash when you can crush a potato piece easily against the side of the pan with a wooden spoon. Drain the potatoes. In the same pan, mash them with the butter. Add the milk a 1/4 cup at a time until you get the right consistency. You don’t want the potatoes to be dry, but you don’t want them to be soupy either. Aim for a texture that is loose enough to spoon out, but not so loose that the potatoes add a lot of excess water to your dish. Adjust the seasoning.

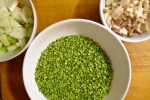
3. While the potatoes are cooking, purée half of the corn kernels in a food processor with about a quarter cup of milk. Add more milk if the mixture looks too dry, but not so much that you end up with a corn slurry. The texture of the puréed corn should match that of the mashed potatoes. Turn the puréed corn out into a large bowl and fold in the remaining whole kernels. Adjust the seasoning.

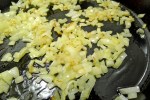
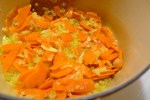
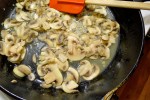
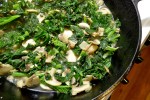
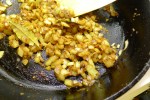
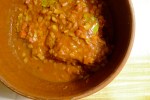
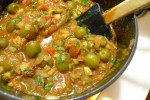
4. Heat some olive oil in a large skillet over medium-high heat. Sauté the onions until they are translucent and begin to brown. Add the ground beef to the pan, breaking up bigger chunks of ground beef with your wooden spoon as it cooks. Continue to cook the beef until there is no longer any visible pink. Sprinkle it with the paprika, cayenne pepper, Worcestershire sauce to taste. Cook everything until the sauce has thickened, about another two to three minutes.

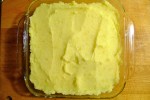
5. In an oven-proof dish, spread the ground beef out in an even layer on the bottom. Carefully spread the corn mixture on top of the beef. Gently spoon the potatoes on top of the corn. Sprinkle the shredded cheese evenly over the top and bake until bubbly, about 20-30 minutes.

6. Let it rest for about 20 minutes before serving with Sriracha or ketchup.

Smoky Chorizo and Chickpea Soup


Have you ever looked outside your window at the overcast sky and realized that the weather has officially turned chilly? That’s how I felt today when the cold morning light began filtering through my shades.

I always think that this kind of weather inspires a taste for spices and hot liquids. This soup, adapted from Food & Wine, certainly satisfies those cravings.

There is something about Spanish food that feels perfect for this season. Maybe it’s the colors, or the strong flavors of garlic and sherry. Maybe it’s the liberal use of pimentón, whose rich and smoky heat seems to combat the gloom of gray skies.

Pimentón is basically the Spanish version of paprika and comes in three varieties of varying heat: dulce (sweet), agridulce (bittersweet), and picante (hot). For general cooking purposes, I find agridulce to be just perfect, neither too mild nor too bitter.

For this recipe, I used chorizo from my CSA. Given that most of the sausages from my CSA are fairly lean, I didn’t cook the chorizo beforehand. However, if you have particularly fatty links, you might wish to sauté the chorizo pieces and drain them before adding them to the soup.

I also love how the recipe uses puréed chickpeas as a thickener. Sometimes I find that using flour to thicken soups, stews, stocks, and gravies can lead to slightly gluey results, and using tapioca is just weird.

Ingredients:

Olive oil

1 large yellow onion, finely chopped

2 large carrots, peeled, halved lengthwise and thinly sliced

2 fat garlic cloves, thinly sliced

3 teaspoons of pimentón or smoked paprika

1/4 teaspoon of cayenne pepper

4 tablespoons of tomato paste

1 pound of fresh chorizo, cut into 1/2-inch pieces

3 cans of chickpeas, drained, rinsed, and divided into two equal portions

4 cups of beef broth

Lemon wedges

Fresh parsley sprigs

How to prepare:

1. Purée the half of the chickpeas in a food processor until they are smooth. They will act as a thickener in the soup and give the broth a wonderful nuttiness.

2. In a large Dutch oven, heat about two tablespoons of olive oil over medium heat. When the oil begins to shimmer, add the onions and cook them until they just start to turn translucent. Toss in the carrots and the garlic. When the garlic becomes fragrant, add the pimentón, cayenne pepper, and tomato paste to the vegetables. Combine everything together, taking care not to burn the spices. Once the vegetables are evenly coated with the tomato paste and the spices, add the chorizo, the puréed chickpeas, the remaining whole chickpeas, and the beef broth. Adjust the seasoning.

3. Simmer the soup until the whole chickpeas are nice and tender. You will want to skim the surface of the soup periodically. Adjust the seasoning for a final time. Serve the soup in warm bowls, topped with fresh sprigs of parsley and lemon wedges on the side.

Orecchiette Carbonara with Freshly-Shelled Peas


On a hot and sticky mid-August night several years ago, I boarded an overnight train from Paris to Milan. The cabin was filled with two sets of bunk-beds that were meant to accommodate four people. Instead, we were five because the couple sharing the cabin with us had a toddler.

The family asked if they could have the bottom bunks, which was fine by me because I wanted to bunk closest to the itty bitty window that cracked open at a woefully insufficient angle.

Insufficient because the father had removed his shoes and the smell was horrific.

It was so bad that I couldn’t sleep. I was finally forced to look in my Italian phrasebook and scan the pages by moonlight for something appropriate to say that would make the man put his darn shoes back on!

Unfortunately, my phrase book had nothing related to shoes, or putting on shoes or telling people that the smell of their feet was intolerable. However, I did manage this:

“Per fevore, signore. I vostri piedi, è violazione dei miei diritti umani!”

Which worked out roughly to mean, “Excuse me, sir. Your feet, this is a violation of my human rights!”

No response. So I tried these other phrases:

I vostri piedi, sto svenendo . . . Non riesco a respirare . . . !”

Which means: “Your feet, I’m passing out . . . I cannot breathe . . . !”

Then I repeated, “I vostri piedi,” pointed to his feet, crossed my eyes and pretended to die.

Nothing. Nada. Zilch.

He must have understood me because he refused to acknowledge my existence. I tried not to take it personally, even though I hated him more and more as we crawled south to Italy. Maybe, I thought, he was trying to incapacitate his over-active son. Or maybe he was angry at his wife and was trying to suffocate her with the smell of his feet.

Seriously. If that smell could be weaponized, the war on terror would be over.

So what does this have to do with carbonara, that amazing Italian dish that uses the residual heat of freshly boiled pasta to transform bacon, beaten eggs and Parmesan into a creamy sauce?

In that very same Italian phrase book was a recipe for spaghetti alla carbonara, a recipe that I still rely on to this day.

The idea to use orecchiette and peas actually comes from Suzanne Goin‘s Sunday Suppers at Lucques. Her description of how orecchiette are perfectly shaped to cup small bits of bacon and peas was irresistible to me, but I prefer to stick with my old phrasebook’s way of making carbonara because it only uses one pan — and who doesn’t prefer that?

These proportions will make enough for two, but can easily be adjusted for more. For something richer, you could add about a 1/3 of a cup of caramelized chopped onions to the mix. This recipe was also a great way to start using the wonderful shell peas that are at the market right now, as well as the bacon and pullet eggs from my CSA.

Pullet eggs are small eggs from young hens that have just started laying. They say that two pullet eggs are the equivalent of one regular chicken egg, but I find that it’s really more like 3 pullet eggs = 2 regular chicken eggs. Pullet eggs are wonderfully rich in both flavor and mouthfeel, just perfect for carbonara if you can get a hold of some.

I also used up the last of my CSA bacon ends to make my bacon bits, but you can use crumbled cooked bacon strips in this if bacon ends are not handy.

Ingredients:

1/3 pound of dried orecchiette

1/3 cup of bacon bits or crumbled cooked bacon

1/3 cup of freshly shucked green peas or frozen peas

5 pullet eggs or three regular eggs

1/2 cup of freshly grated Parmesan

Freshly grated black pepper

Olive oil

How to prepare:

1. Bring a medium saucepan of salted water to a boil. When the water has reached a rolling boil, add the pasta. While the pasta is cooking, set up the other ingredients. This recipe moves quickly near the end, so it is a good idea to have everything ready to go.

2. Combine the Parmesan and eggs in a small bowl with freshly ground black pepper.

3. When the pasta is not quite al dente, add the peas to the boiling water. Let the pasta and peas finish cooking together. Drain and pour the pasta and peas back into the saucepan. Add the bacon along with a quick drizzle of olive oil. Pour the beaten egg mixture over the pasta and begin stirring everything together quickly. When you add the eggs, the pasta should be warm enough to barely cook them. You want the sauce to be just thick enough to coat the pasta with a glossy sheen. If the sauce seems soupy instead of creamy, put the pan over a very low flame and continue to stir and toss the pasta quickly until the sauce turns smooth and creamy.

Don’t worry if you accidentally overcook the eggs and they scramble a little bit. It will still be delicious.

Spicy Braised Kale and Mushroom-Topped Polenta with Poached Goose Egg


In a fit of health consciousness, I went a little crazy at the market and bought several large bunches of local kale. When washed, it amounted to more than 30 cups. Yes, you heard that right: 30 packed cups of kale!

I love kale, but this was a little much even for me. Kale has been going into everything lately from eggs to potatoes, from soup to salad. But no matter how much kale I use, the pile doesn’t seem to diminish much. It’s the neverending pile o’ kale!

I took advantage of this kale-pportunity to try out another way to make polenta. Polenta is one of those things that is just elemental, like roast chicken or omelets. There are a million ways to make polenta. You can make it in the oven, the slow-cooker, the microwave or on the stove. You can cook it for 15 minutes or hours. You can spread it out onto a sheet pan and cut the hardened polenta into squares. You can deep-fry leftover polenta. The smallest amount of corn meal seems to make mountains of polenta. It’s a polenta-palooza!

Great to pair with the neverending pile o’ kale, no?

This polenta-making technique is from those fiddly folks at Cook’s Illustrated. It only takes 30 minutes of minimal whisking to achieve creamy polenta perfection.

And, as you can see, my CSA has goose eggs! Which are big honking suckers 😉 The equivalent, more or less, of two chicken eggs. There are a million ways to poach eggs too, but lately I have been liking Food52’s Control-Freak Poaching Method.

Ingredients:

For the polenta:

6 cups of water or stock

Salt

1 1/2 cups of yellow corn meal

4 tablespoons of butter

1/3 – 1/2 of a cup of grated Pecorino Romano or Parmesan

For the Spicy Braised Kale and Mushrooms:

2 tablespoons of butter

Olive oil

2 garlic cloves, finely minced

8 ounces of white button mushrooms, sliced

Salt and pepper

Red chili pepper flakes

1/4 cup of dry white wine

6 cups of roughly chopped kale

For the poached eggs:

Water

Salt

1 goose egg per person

How to prepare:

1. In a large, heavy Dutch oven, bring the 6 cups of water or stock almost to a boil with the lid on. Uncover the pot and season the water or stock with salt. Vigorously whisk the corn meal into the liquid a little bit at a time. As you whisk, be sure to get in all the corners and edges of the pot with the whisk to ensure that there are no lumps. When all the corn meal has been added to the water, cover the pot again and reduce the heat to low. Let the polenta simmer, stirring every 5 minutes, for 30 minutes total.

2. In the meanwhile, melt 2 tablespoons of butter with a little bit of olive oil in a large skillet set over medium heat. When the butter begins to foam, add the minced garlic and the mushrooms. Sauté the mushrooms until they give up most of their liquid and begin to turn golden. Add the white wine and as many red chili pepper flakes as you like. Season the mushrooms with salt and pepper. When the liquid has reduced to almost a glaze, add the kale to the pan and cover the skillet. Let the leaves wilt completely before stirring the kale and mushrooms together. Adjust the seasoning for a final time and remove the pan from the heat.

3. After 30 minutes, your polenta should be done. Move the pot away from the burner and vigorously whisk in the butter, one tablespoon at a time, until it has all been well-incorporated and the polenta is creamy. Stir in the Pecorino or Parmesan and adjust the seasoning.

4. In a medium-sized saucepan, bring about 4 to 5 inches of salted water to a near simmer. Carefully crack a goose egg into a small fine-mesh strainer. You want to separate the yolk and the more solid part of the white from the more watery part of the white. Carefully pour the egg into a large, shallow spoon. Gently lower the spoon into the water. Use another spoon to catch any bits of white that try to escape. When the egg is perfectly poached, the white should be opaque and when you gently move the egg back and forth, the white and the yolk should move in sync. When the egg is done, lift it out of the water and very carefully roll it onto a paper towel-lined plate.

5. To assemble the dish, spoon out about half a cup of polenta into a large, shallow bowl. Top the polenta with about a third of a cup of the spicy braised kale and mushrooms. Carefully position the poached egg on top of the braised kale and drizzle everything with good olive oil. Serve immediately.

Asparagus with Fried Egg and Parmesan


It’s asparagus season! Which means it’s time for my favorite fast lunch: sweet local asparagus topped with a fried egg and sprinkled with Parmesan. To anyone who thinks that making yourself lunch takes too much time, I challenge them to find something quicker than this meal.

But, Daisy, don’t you have to steam asparagus? Or boil it? That takes time!

Oh no no, young Padawan. You can . . . microwave it!

This idea comes from Andrew Carmellini‘s Urban Italian. In the book, he recommends microwaving asparagus as a quick and terrific way to perfectly cook it without sullying up another pot. I just have to quote him on this:

“Asparagus in the microwave is awesome. Yup. You read that right. I’m sure some food snob somewhere is recoiling in horror and throwing this book across the room, but I don’t care.”

I don’t care either. I love Carmellini’s food. He’s got a Michelin star and two James Beard Awards. If microwaving asparagus is good enough for him, it’s good enough for me.

This is one of those no recipe-recipes that can be multiplied by as much as you need. I give you the recipe for one but obviously, if you are cooking for more people, you will need to punch an extra minute or two into the microwave.

Ingredients:

6-7 asparagus spears, rinsed clean and trimmed of their woody ends

Olive oil

1 egg

Butter

Salt and freshly ground black pepper

Grated Parmesan cheese

How to prepare:

1. Spread out the asparagus in a single layer on a microwave-safe plate. Season the asparagus with salt and sprinkle on a little bit of water. Drizzle it with some olive oil. Cover the plate tightly with plastic wrap and nuke it for 1 minute and 30 seconds.

2. In the meanwhile, fry up an egg in butter.

3. Carefully remove the plastic wrap from the plate and arrange the asparagus spears on a clean plate. Top the asparagus with the fried egg. Season everything with salt and black pepper. Sprinkle on as much grated Parmesan as you like.

Serve with a good, crusty bread.

Moroccan-Style Brisket with Green Olives and Preserved Lemons


When I was an undergraduate, I had friends who could subsist on Cheerios and skim milk for the whole semester. I could never do that. First of all, I didn’t want to contract scurvy, beriberi or any other kind of disease caused by a vitamin deficiency. Secondly, the combo of cold cereal and low-fat milk remains heartbreakingly depressing and just plain unsatisfying to this day. Even after eating a big bowl of it, I still feel hungry.

Of course, those friends grew up and graduated to slightly more mature versions of “quick” meals like spaghetti and jarred sauce, or something with boneless, skinless chicken breast.

I don’t consider those to be very appealing either.

I like a meals. Real meals with real foods and real fats.

Having never been much of a snacker, I look forward to my two big square meals a day. I say two only because I still struggle to fit breakfast into my daily routine.

Believe me, if I were to have breakfast, it would be a square meal too!

What is a real meal to me? It doesn’t necessarily have to be a hot meal, but it has to be satisfying in a way beyond filling my empty stomach. I’m not looking for just the sensation of fullness. I want to feel fulfilled.

Lately, work has been overwhelming. My dissertation deadline is pretty much set for early August, which leaves me little time for much else but my good friends, weekly dim sum with my grandfather, and my parents.

But I will always make time for good food, cooking and even some blogging. Food is my passion. Cooking is how I decompress. Blogging keeps me social. Without it, I fear that I will start slinking around corners, stroking my pages and covetously purring, “MY PRECIOUS!”

Any LOTR fans out there 😉

In this period, I see nothing wrong with making something big and elaborate just for me. I can eat it for a week and feel nourished in both body and soul. This Moroccan-style brisket fit the bill this week. Preserved lemons give the brisket’s crowning sauce a distinctly delicious North African flavor. Preserved lemons can be a strong, but their strength mellows over time. This is why I would recommend that you make the sauce a day before serving the brisket. That way, the ingredients have time to meld together and their flavors can become rounder. Preserved lemons can now be found in many supermarkets and specialty stores. You can also order them online, but they are also ridiculously easy and inexpensive to make. Just remember to budget between 1-3 weeks of preservation time before they are usable. There are many recipes available online. This one and this one are good places to start.

Also, like any braised or stewed meat, brisket gets better over time. If you can resist the temptation of eating it straight out of the oven, let it cool and sit overnight in the fridge. It is also much easier to remove any fat from the surface of the sauce the next day.

This recipe is freely adapted from Joan Nathan‘s Foods of Israel Today. Her original recipe can be found more or less in its entirety here. It includes another recipe for preserved lemons.

Ingredients:

For the brisket:

1 3-3 1/2 pound beef brisket

3 cloves of garlic, thinly sliced into slivers

Salt and pepper

Olive oil

2 small onions, finely diced

1/2 teaspoon of ground turmeric

1/2 teaspoon of ground cinnamon

1 tablespoon of freshly grated ginger

2 bay leaves

1/2 cup of red vermouth

1 14.5-ounce can of crushed tomatoes

2 tablespoons of honey

1/2 cup of water

For the green olive-preserved lemon sauce:

2 small onions, finely diced

Olive oil

1 14.5-ounce can of crushed tomatoes

1/2 cup of water

6 ounces of pitted green olives

2 tablespoons of parsley, finely chopped

2 tablespoons of cilantro, finely chopped

2-3 preserved lemons, rinsed, flesh discarded, and peels finely chopped

Salt and pepper

How to prepare:

1. Blot the brisket dry with paper towels. If needed, trim the brisket of any excessive fat. Using the sharp point of a small paring knife, make shallow cuts all around the brisket and push slivers of garlic into the slits. Let the brisket sit uncovered on a wire rack for about 30 minutes.

2. Preheat the oven to 350°.

3. Season the brisket on both sides with salt and freshly ground black pepper. Heat about two tablespoons of olive oil over medium-high heat in a very large skillet. When the oil begins to shimmer, sear the brisket well on both sides. Remove the brisket to a large casserole or baking dish. Reduce the heat to medium and add the two finely diced onions to the skillet. While sautéing the onions, be sure to scrape up any tasty brown bits stuck to the bottom of the pan. When the onions begin to turn translucent, stir in the turmeric, the cinnamon, the ginger and the bay leaves. Cook the spices until they are fragrant (be careful to not let them burn). Deglaze the pan with red vermouth. Wait until most of the alcohol has cooked off before adding the tomatoes, the honey and half a cup of water. Let everything simmer together until it has thickened into a sauce. Adjust the seasoning and pour it over the brisket.

4. Cut a piece of parchment paper to just fit your casserole or baking dish. Completely cover the brisket with it and make a tight seal by pressing the paper down onto the meat and onions. Roast the brisket for about 3 hours, or until the meat is tender.

5. When your brisket is tender, remove it from the oven and let it cool completely in its sauce. If you can delay gratification, let it sit in the fridge overnight. This will make it much easier to remove any fat from its surface the next day. If that isn’t a possibility, try to skim as much fat as you can before moving forward.

6. While the brisket is cooling, make the green olive-preserved lemon sauce. In a large saucepan, heat about two tablespoons of olive oil over medium-high heat until the oil begins to shimmer. Sauté the onions until they begin to turn translucent. Add the tomatoes and half a cup of water. Reduce the heat and simmer the sauce until it has thickened. Add the olives, the chopped herbs and the preserved lemons to the sauce. Let everything simmer together until the flavors begin to come together, about 5-6 minutes. Adjust the seasoning.

7. When the brisket has cooled completely, slice it thinly on a diagonal against the grain. Return the sliced meat to its casserole or baking dish and recover it with its sauce. Before serving, heat your oven to 350°. Cover the casserole or baking dish with aluminum foil and bake the sliced brisket for about 30 minutes, or until warmed through.

Serve the brisket on couscous and topped with the green olive-preserved lemon sauce.

Kimchi Fried Rice


“I never see you eat rice,” Laura said, “Ever.”

“That’s not true! I eat risotto! and paella! and biryani . . .”

But despite my protestations, it is true though: I am not a fan of plain, steamed white rice.

I am so un-Asian.

When people find out I don’t really like plain white rice, I generally get two reactions:

• From non-Asian people, they look at me as if I just told them I was born with six fingers on one hand and the extra digit was removed at birth. At this point, they usually tell me how much they love rice.

• From Asian people, they just ignore me. I don’t even think they hear the “don’t,” they just hear the “like white rice.” Because what Asian doesn’t like white rice? Inconceivable!

Plain white rice was the bane of my young existence. As a child, it was always just giant piles of tasteless filler stacked in sticky, unswallowable heaps in front of me. My parents used to make me finish all of my rice before I was allowed to leave the dinner table. I used to drive them crazy by eating my rice grain-by-grain until they finally gave up and sent me to my room — which is all I really wanted in the first place.

As I have gotten older, I have learned to eat it. Partly because it gives me something to chew on as I contemplate all the dishes spinning around the Lazy Susan. After really strong flavors, I have come to appreciate white rice as a palate cleanser. Also, a Chinese meal just feels incomplete without rice on the table, regardless whether I eat any or not.

There is one way to always get me to eat my rice: fry it.

But let’s be honest, I’ll eat just about anything so long as it’s fried 😉

Kimchi fried rice is a particularly good way to get me to eat rice because not only is it fried, it’s so far removed from bland, steamed white rice that I will happily accept it on my plate. For this, I threw in some amazing all-beef hotdogs from my CSA. I know that there are a lot of people who don’t like hotdogs, but I never wonder what is in the ones that I get from my farmer. If you are a vegetarian, or just don’t like hotdogs, you can leave them out. Or replace them with Spam 😉

It’s also traditionally topped with a fried egg, and who can resist fried food topped with more fried food?!

Kimchi fried rice calls for a nice dollop of Korean red pepper paste, or gochujangGochujang is one of the most common condiments/ingredients in Korean cooking and as such, is fairly easy to find in Asian supermarkets. I think the problem is that there are so many brands of commercially-made gochujang that it can be a little overwhelming as to which one to pick. This is why I love this post from One Fork, One Spoon. As Diane and Grace point out, it’s hard to shop for Korean ingredients if you don’t speak Korean! I certainly don’t, and really appreciated their tasting notes and photographs of labels and brand logos.

Ingredients:

1 tablespoon of butter

1 tablespoon of vegetable oil

2-3 hot dogs, cut into pieces

2-3 green onions, chopped

2 cups of cooked (preferably day old) rice, japonica variety preferred

1 tablespoon of sesame oil

2 cups of napa cabbage kimchi, roughly chopped

1 tablespoon of gochujang

Salt

1 egg per person

How to prepare:

1. In a large skillet, heat the butter and oil over medium-high heat until the oil begins to shimmer. Add the sliced hot dogs and the green onions. Cook the hot dogs until they are heated through and the green onions have softened.

2. Add the rice to the pan, breaking up any clumps with the side of a wooden spoon or a spatula. Evenly drizzle the sesame oil over the top of the rice and let it cook undisturbed for about a minute before stirring it.

3. Add the chopped kimchi and the gochujang to the skillet. Stir everything together until red pepper paste has been well-incorporated and the kimchi has been evenly distributed throughout the rice.  Adjust the seasoning. Lower the heat and spread the rice and kimchi out in an even layer over the bottom of the pan. Let it cook for a few minutes until the rice has become nice and crispy on the bottom. Stir the pan again, scraping the browned rice off the bottom of the skillet. Adjust the seasoning for a final time and divide the fried rice into bowls.

4. In a separate pan, fry up one egg per person. Top each bowl of kimchi fried rice with an egg. Scatter some chopped green onions on top and serve.

Fried Egg with Sautéed Ramps and Garlic-Rubbed Toast


Ramps. Just the thought of them at the Greenmarket makes me really excited. Ramps taste like the essence of spring given that they are the first greens to come up after a long winter of tubers and root vegetables.

I’m not the only one with ramp-mania either. Unfortunately, the dramatic rise in their popularity over the past few years has been raising concerns that foragers are over-harvesting to meet demand.

Ramps are notoriously difficult to cultivate. For the most part, they are a foraged food that is found and plucked in the wild. To ensure that the plant keeps growing requires foragers to leave their bulbs intact — problematic since most ramps are sold with their bulbs and roots attached.

So what do you do if you love them like I do? Should you stop eating them all together?

You don’t have to give up ramps as long as you stay committed to being a responsible consumer. If you forage for them, take no more than you can reasonably eat. If you can, just take the leaves and leave the bulbs in the ground. If you buy them, try to buy them from a farmer you trust. Talk to your farmer and make sure that their ramps are coming to you in a sensible and sustainable way. The Greenmarket NYC closely monitors and regulates foraged food to ensure that things like ramps will continue to be around in the future.

Celebrate their scarcity because that is what makes them special!

Once you get your hands on some sensibly-foraged ramps, this is a great way to prepare them for lunch or for a light supper. I hesitate to even call this a recipe since it is such a simple way to prepare them, but simple preparations are oftentimes the best way to showcase especially great ingredients.

Ingredients:

Thickly-sliced bread, as many pieces per person as you like

1 garlic clove

4 ramps per person, cleaned and bulbs split in half if they are on the large side

1 egg per person

Olive oil

Butter

Salt and black pepper

How to prepare:

1. Generously brush both sides of your bread with olive oil. Broil the pieces until they are golden brown. Rub a garlic clove on both sides of the bread, including the edges.

2. In a large skillet, heat some olive oil over medium heat. Add the ramps to the pan when the oil begins to shimmer. When the leaves have wilted and the bulbs have begun to turn translucent, shape the ramps into a circle and crack an egg into the center. Add a knob of butter to the pan. When the butter has melted, begin spooning the hot fat over the egg yolk as it cooks. When the whites have set, use a spatula to gently remove the egg and the ramps from the pan to a plate. Season the egg and ramps with salt and freshly ground black pepper.

Serve with the garlic-rubbed toast.

Split Pea Soup with Bacon Ends


A while ago, I was gifted a giant tub of bacon ends from a member of a different CSA. They languished in the back of my freezer until a deep spring clean last week.

Bacon ends are a terrific thing to have in the house — even if you’re like me and fall into the “out of sight, out of mind” camp. Just make sure that you have them somewhere you can see them at all times, a visual reminder that every dish is better with bacon.

Not only are bacon ends a good thing to always have on hand, but they are also much more economical than buying bacon strips. Chopped up and slowly browned, they make wonderful bacon bits. The rendered fat can be used in the place of oil or butter, or in anything that could be enhanced by some smoky porcine flavor.

And let’s be honest, what wouldn’t benefit from added porkiness?

People can sometimes be a little skeeved out by cooking with animal fat. However, so long as the pigs are pasture-raised by a farmer who follows organic practices, there should be no fear of needing Lipitor. Bacon fat from pasture-raised pork even has the added benefit of being a good source of vitamin D, making bacon fat certainly as good as butter!

I’m not saying that you should sit around the house and chow down on scoops of it, but a little bacon fat is much healthier for you than all those omnipresent, heavily-processed vegetable oils. My rule of thumb is that the more steps in processing it takes to get the food to your mouth, the less healthy it is for you. I would even go as far as to argue that it’s not even food at that point. This is why I always shake my head at people who buy low-fat foods because in order to make up for the taste and flavor deficit, those items are generally bulked up with tons of sugar — which might be worse for you than the fat.

Plus low-fat foods taste bad.

Anyway, no more ranting. Back to the soup!

Dried split peas scream for bacon! But if animals are not your thing, you can leave the bacon out and make the soup with smoked paprika instead.

Ingredients:

About 3 or 4 ounces of bacon or bacon ends, cut into small dice

1 small onion, chopped

1 large carrot, peeled and diced

2 stalks of celery, diced

1 pound (16 ounces) of dried split peas, picked over for small stones

2 bay leaves

4 cups of chicken or vegetable stock + 1 cup of water

Salt and pepper

Smoked paprika

Special equipment:

A hand-held immersion blender (optional)

How to prepare:

1. In a large Dutch oven, cook the bacon or bacon ends over medium heat with a little bit of olive oil until most of the fat has rendered. Reserve a few bits of bacon for garnish. Spoon off all but one tablespoon of bacon fat. Keep the bacon fat in a clean container in your freezer, and use it for other things like roasting potatoes, eggs, roasting chickens, anything really.

2. Add the vegetables to the pot. Let them cook until the vegetables have softened and the onion is translucent, about 5-7 minutes. Add the split peas and toss them with the vegetables until they are evenly coated with bacon fat. Add the bay leaves, the stock and the water. Bring everything up to boil, and then reduce the heat. Let the peas simmer until they are tender, about 45 minutes to an hour. Periodically skim the top of the soup of scum and grease. If the soup seems too thick, thin it out by adding more stock or water.

3. When the peas are tender, you can leave the soup alone if you like a chunky soup. I like to partially purée the soup so that it is creamier, but still has some interesting bits of vegetables and peas in it. This is super easy to do with an immersion blender. Just insert the stick blender into the soup and blend as much as you like. You can also transfer half of the soup to a regular blender or a food processor, then add the blended soup back to the unblended half. If you use a blender, keep your hand smacked tight onto the blender lid lest it go flying off, leaving your kitchen covered in pea soup spray. Adjust the seasoning for a final time, and thin the soup with stock or water again if it seems too thick.

Serve topped with a few of the reserved bacon bits, a dusting of smoked paprika and with some good, hearty bread.

Orecchiette with Broccoli Rabe and Italian Sausage (Orecchiette con cime di rapa e salsiccia)


Have you ever had one of those weeks where you were amazed at how busy your schedule was, yet surprised at how little you seemed to get done?

That was last week for me and the blitz of activity left me little time to cook, let alone eat something good for me. Lunch was reduced to a handful of jalapeño-flavored potato chips and half a curried tofu sandwich. Dinner was an even more embarrassing affair consisting of leftover boiled potatoes drizzled with olive oil and followed by gelato straight out of its paper container.

I was starting to feel like a human garbage disposal, and was yearning for a real meal, meaning something satisfying that was also quick and easy to put together.

Orecchiette with Sausage and Broccoli Rabe fit the bill perfectly as simple, rustic Italian seems to be my go-to cuisine when my belly is rumbling and my eyes are blinkered from low blood sugar.

One of the emblematic pastas of Puglia, orecchiette are thus named because they are supposed to resemble little ears. I don’t know about that, since they only look like ears to me if we’re talking (nerd alert!!!!) Ferengi ears. I do know that they are delicious and are perfectly shaped to cup little bits and pieces of chopped vegetables. The bitterness of broccoli rabe always goes well with savory sausage, garlic and red chili pepper flakes. To make this dish vegetarian, simply omit the sausage. It is very tasty that way as well.

As this is a very simple dish, I have given you proportions for two, even though I ate the two for one.

Yep, that’s how I roll in Hungry Town 😉

Ingredients:

1/3 of a pound of orrechiette

1/2 pound of pork Italian sausage, casings removed

Olive oil

1/3 of a bunch of broccoli rabe, roughly chopped

3-4 cloves of garlic, thinly sliced

Red chili pepper flakes

Salt and pepper

How to prepare:

1. Bring a large pot of salted water to boil. Cook the pasta until it is al dente.

2. While the pasta is cooking, heat a little bit of olive oil in a heavy skillet over medium-high heat. When the oil begins to shimmer, pinch off one-inch pieces of sausage and brown them in a single layer in the pan. When the sausage pieces are browned on all sides and cooked through, remove them to a paper towel-lined plate or bowl.

3. Drain the pasta, reserving about a 1/4 to 1/3 of a cup of the pasta water. Wipe out the skillet and add about 2 tablespoons of olive oil to the pan. Set the pan over medium heat and sauté the garlic slices until they are fragrant, about a minute or two. Add as many chili pepper flakes as you like and continue to sauté for about 30 more seconds. Be careful that the chili pepper flakes don’t burn. Add the chopped broccoli rabe and a little bit of the pasta water (you can always add more water later if the dish starts to look a little dry) to the pan. Cook the rabe until it begins to wilt. Add the sausage and the pasta, along with another splash or two of pasta water if needed. Toss and let everything cook together for another minute or two. The pasta should begin to absorb some of the sauce. Adjust the seasoning if needed.

Serve in large warmed bowls with an additional drizzle of olive oil.