Balsamic-Roasted Butternut Squash and Apple Soup

This is a neat little twist on butternut squash soup. Roasting the squash concentrates its flavor. Roasting it in a buttery syrup accented with balsamic vinegar adds a little bit of bite, and a whole lot of interest.

Ingredients:

1 butternut squash, seeded, peeled and cut into 1-inch pieces

1 tablespoon of butter

1 tablespoon of olive oil

1 packed tablespoon of dark brown sugar

1 tablespoon of balsamic vinegar

2 teaspoons of salt

1 pinch of cayenne pepper

1 large shallot, minced

Olive oil

1 Gala apple, cored, peeled and cut into 1-inch pieces

3 cups of chicken stock

1 cup of apple cider

3 tablespoons of maple syrup

1/3 cup of heavy cream

Salt

crème fraîche to serve

Special equipment:

A hand-held immersion blender

How to prepare:

1. Preheat your oven to 400°.

2. In a small saucepan, heat the butter and the olive oil together over very gentle heat. When the butter has melted, add the brown sugar, balsamic vinegar, cayenne pepper and salt. Stir everything together until everything is well-incorporated. Continue to heat everything for a minute or two more. The mixture will become syrupy, and the harshness of the vinegar will soften a little bit.

3. In a large bowl, toss the butternut squash and the butter mixture together. Spread the squash out evenly on a parchment paper-lined cookie sheet. Roast the squash until it is tender, about 15-20 minutes. When the squash is done, transfer it from the hot pan to a bowl.

4. Heat some olive oil in a large casserole or Dutch oven over medium heat. When the oil starts to shimmer, add the shallots. Sauté them until they begin to soften. Add the apples to the shallots, and heat them together for about a minute or two. Add the butternut squash, and stir everything together. Add the chicken stock and the apple cider. Let everything simmer for about 20 minutes, skimming any foam that rises to the surface.

5. When the apples are tender, blend everything together with an immersion blender until smooth. Adjust the seasoning. Add the maple syrup and heavy cream. Stir everything together, and adjust the seasoning for a final time. Garnish with a dollop of crème fraîche and serve.

Grilled Delmonico with Mashed Potatoes and Sautéed Spinach


After about 3 weeks of kitchen hiatus, it feels so good to be back to cooking again.

I busted out my grill pan — which had been languishing in the back of my cabinets for years. Really years.

Why haven’t I used it? I don’t know. It was kind of an out-of-sight, out-of-mind kind of thing. Pretty ironic, actually, given all the meat in my freezer.

But now that it is out, I am putting it to good use!

Delmonico steaks are also known as boneless rib-eye steaks. The cut famously refers to Delmonico’s Restaurant in NYC, where the cut originated around 1830 as the house steak. In terms of tenderness, it is like a filet mignon, however a proper Delmonico is more marbled, and juicier as a result.

My grill pan has allowed me to get back in touch with grill marks, or cross-hatching.

Cross-hatching, also fancily know as quadrillage, is created by positioning your steak on the grill at roughly the 10 o’clock position, and then rotating it to the 2 o’clock position after about one or two minutes, depending on the thickness of your steak.

To help visualize this, here is the fabulous David Leite from Leite’s Culinaria. Click here for the video.

Some great tips for successful steak + how to use a stove top grill pan:

1. Take your meat out of the fridge about half an hour before you want to cook it. You want the steak to come up to room temperature before grilling so that it cooks evenly. This doesn’t mean that your steak should be warm; it should be cool to touch, but not fridge temperature.

2. Season your steaks well. Salt makes flavor pop.

3. Get the grill hot, man. Once the meat is on the grill, you can turn down the heat if it seems like it is cooking too fast.

Perhaps one reason why I stopped using my grill pan was that every time that I cooked on it, my fire alarm went off and the apartment was filled with smoke. Recently, I realized that I just never learned how to use it properly. Now, it hardly makes any mess and a bare minimum of smoke, even when brushed with olive oil. And it still tastes like grilled food. Not outdoor grilled food, but I accept the limitations of a grill pan.

The keys to not simulating a house fire? Make sure your meat is not fridge temperature when you put it on the grill. Brush your cast-iron pan (they shouldn’t even sell non-stick grill pans; once cast-iron is properly seasoned, it is effectively non-stick) lightly with oil. Too much oil = too much burning oil. Heat your pan until it is hot. Once the pan starts to smoke, put your meat on. I never leave the temperature as high as it was to heat the pan in the first place. I generally lower the heat to medium, particularly for thicker cuts because I want the interior to cook before the outside burns. That was the biggest lesson that I learned about using a stove-top grill pan: it shouldn’t be smokin’ hot for the entire duration of cooking. For more tips, click here.

4. Resist the urge to mess with the steak once it’s on the grill before it is ready to turn. You can monitor the doneness by touching the top of the steak with your finger or a pair of tongs. You don’t actually need a thermometer to do this. Make a really tight fist. Now with your other hand poke the fleshy part of your fist between your index finger and your thumb. That bouncy hard resistance that you feel is what a super well-done steak would feel like if you poked it. Open your hand and make a super loose fist. Touch the same part. That’s what really, really rare feels like. Now, aim for somewhere in-between.

5. Let it rest a little bit before serving.

Irish Bacon and Cabbage Soup


From the archives!

As I am currently a little out-of-commission, I decided to revisit some meals that I have made in the recent past, but haven’t blogged about yet.

This soup is one of them. A few months ago, I got some Irish bacon in my CSA. What is the difference between Irish bacon and regular ol’ streaky bacon? Well, according to Wikipedia — the be-all, end-all arbiter of everything — regular bacon is made from pork belly (which is why it’s so nice and streaked with fat). Irish bacon, on the other hand, is made from center-cut pork loin — which is along the backside of the pig. Because this kind of bacon is not from the belly, it tends to be much leaner. There is usually a narrow band of fat that rings the edge, but each slice is generally more pork than fat. Similar to Canadian bacon, Irish bacon isn’t supposed to get crispy like belly bacon. It still has incredible flavor though, and holds up well to things like thick soups and stews. This recipe, adapted from Epicurious, makes a warm, wonderful, and traditional stick-it-to-your ribs kind of meal. Perfect for the rain and newly arrived cold weather. Ingredients: 1 pound of sliced Irish bacon 3 tablespoons of butter 1 medium onion, chopped 2 large Yukon Gold potatoes, peeled and diced 1 quart of chicken stock 2 bay leaves 1/2 of a small head of Savoy cabbage, cored and thinly sliced Salt and pepper Special equipment: 1 hand-held immersion blender How to prepare: 1. Place the bacon in a medium saucepan, and cover it with about two inches of cold water. Bring the water to a boil. Reduce the heat so that the water is at an even simmer, skimming any foam that rises to the surface. Cook the bacon for about 7 minutes. Drain the bacon, and when it is cool enough to handle, cut it width-wise into 1/2-inch strips. 2. In a large casserole, melt the butter over moderate heat. When the butter begins to bubble, add the chopped onions. Sauté the onions, stirring often, until they begin to soften and turn slightly translucent. Add the potatoes to the onions, and sauté everything together for about 2-3 minutes more. Add the stock and the bay leaves. Adjust the seasoning, and bring everything to a boil. Reduce the heat and simmer everything together until the potatoes are soft and tender, about 8 to 10 minutes. 3. When the potatoes are ready, add the cabbage to the pot. Simmer the cabbage until it is soft too, about 5 minutes. Fish out the bay leaves and discard them. Don’t forget . . . like I did! 4. Once you find and remove the bay leaves, blend the soup together until it is smooth. If the soup is really thick, you may want to add some water to it to thin it out a little. If you don’t have an immersion blender, you can use a regular blender or a food processor, working in batches if necessary. Once the soup is puréed, stir in the bacon. Adjust the seasoning for the final time, and rewarm the soup if needed before serving.

Roasted Miso-Curry Delicata Squash with Pork

Yet another recipe adapted from Heidi Swanson’s Super Natural Every Day. This dish is a marvelous mixture of flavors and textures. It also shows off some of the first of Fall’s bounty: the gorgeous Delicata squash.

Oblong and streaked with golden yellow, forest green, and ivory, Delicata squash have a thin and delectable skin that does not need to be peeled. It cooks quickly, and yields a sweet, pure taste.

Though Swanson’s original recipe, like all of her recipes, is vegetarian, I find that the addition of thinly sliced pork goes well with the miso-curry sauce.

Ingredients:

A scant 1/4 cup of white miso

A scant 1 tablespoon of Thai red curry paste

Olive oil

1 Delicata squash

About 1 pound of small red potatoes, quartered or cut into even chunks

1 boneless pork chop (about 1/2 a pound), cut into 1/4 inch-thick slices

1-2 handfuls of shelled pepitas

Half a bunch of roughly chopped lacinato kale, stems removed

2/3 cup cilantro, roughly chopped

The juice of 1 limes (2 if the limes are small)

How to prepare:

1. Heat your oven to 400°.

2. In a small bowl, whisk together the white miso, the red Thai curry paste, and about a 1/4 cup of olive oil with a fork. Add more oil to loosen up the mixture if it seems too thick.

3. Trim both ends of the Delicata squash. Cut it in half lengthwise. Scoop out all of the seeds and discard them. Cut each half into 1/2-inch half moons.

4. In a medium bowl, combine the squash and the potatoes with about half of the miso-curry mixture. Toss the vegetables together with your hands until they are evenly coated. Turn the vegetables out onto a parchment paper-lined rimmed baking sheet. Spread them out in a single layer, and bake them for about 20 minutes.

5. In a small bowl, toss the pork with half of the remaining sauce. After the potatoes and the squash have roasted for about 20 minutes, evenly scatter the pork and the pepitas over the tops of them. Continue to roast everything until the pork is cooked and the potatoes are done, about 15 minutes more.

6. In a large bowl, combine the kale, the cilantro, the remaining miso-curry, and the lime juice. Add the roasted pork and vegetables to them. Toss everything gently together. Serve and enjoy.

Peanut Butter and Jelly Tart with Concord Grape Sauce


Fall is my favorite time of year.

I love the crisp air, and harvest time, and hayrides, and watching the leaves turn colors.

I love squash, and apples, and spice, and all those nice things that we start eating when the weather begins to get cooler. I love being able to turn on my oven again without turning my apartment into a sauna. I love roasted meats, and roasted vegetables. It is wonderful that is getting chilly enough to be able to eat cheesy, creamy sauces again. I love stew.

We are currently in the throes of Concord grape season — not for much longer, but long enough to partake in what must be the very essence of childhood. Concord grapes have that grapey grapiness that turns your tongue purple with nostalgia. The taste instantly transports me back to lunch in the third grade.

This tart is far from the PBJ’s that I ate as a child, but the flavors are still there — just in a more refined way.

The original recipe from Epicurious seemed a little too sweet to me, so I eliminated the extra brown sugar in the peanut butter topping. Also, the recipe calls for the Concord grapes to be halved and tossed with Concord grape jam as a topping. However, as Concord grapes are pretty fabulous on their own (commercial jam is usually too sweet anyway), I opted to get rid of the topping and make my own Concord grape sauce with local grapes.

Ingredients:

For the crust:

12 5×3-inch graham crackers, broken into pieces

1 cup of salted, roasted peanuts

1/8 teaspoon of allspice

1/2 cup of melted butter

For the filling:

4 ounces of cream cheese, softened

3 tablespoons of butter, softened

1/2 cup of smooth peanut butter

1 cup of heavy cream

1/2 teaspoon of vanilla

About 1/2 cup of Concord grape jam*

For the sauce:

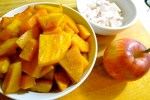
1 pound of Concord grapes

1/2 cup of water

3/4 cup of sugar

A pinch of salt

The juice of 1 lemon

Special equipment:

1 11-inch fluted tart tin with a removable bottom

1 food processor

1 half-size sheet pan

1 strainer

1 fine-mesh strainer

1 hand immersion blender

How to prepare:

1. Set your oven to 350°.

2. While your oven is heating up, blend the graham crackers, the peanuts, and the allspice in your food processor until the nuts are evenly ground up. Add the melted butter, and pulse everything together until the crumbs are evenly moistened.

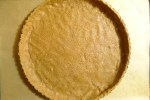
3. Turn the moistened crumbs out into the fluted tart tin. Using your fingers, firmly press the crumbs evenly into the bottom and up the sides of the tin.

4. Set the tart tin gently on a half-size sheet pan that is lined with parchment paper. Bake the crust in the oven for about 10 to 15 minutes. When the crust is lightly browned and “set,” remove it from the oven and let it cool.

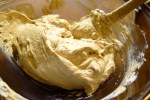
5. While the tart crust is cooling, blend the peanut butter, the butter, and the cream cheese together with an electric mixer set at medium-high speed until the mixture is fluffy. In a separate bowl, whip the cream and the vanilla together until soft peaks form. Fold the whipped cream gently into the peanut butter mixture.

6. Very carefully spread the jam over the bottom of the cooled tart crust. If you have an offset spatula, this is a little easier to do, but it’s okay if you don’t (I do have one . . . something I realized only after the tart was done). Wipe off your spatula, and carefully smooth the peanut butter topping over the top of the jam. Chill the tart in the refrigerator until the tart is firm, about 3+ hours.

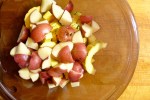
7. While the tart is chilling (tart be chillin’!), prepare the sauce. Over a small bowl, slip the skins off of all the Concord grapes (they should come off easily, and if you do this over a bowl, the bowl will catch all of the juices). Reserve the skins, and keep them in separate bowl.

8. Bring the pulp and 1/2 cup of water to a boil in a small saucepan. When the peeled grapes have turned opaque, pour them into a mesh sieve set over a medium-sized bowl. Using a spatula, push the pulp through the sieve. Discard the seeds.

9. Add the grape skins to the bowl of grape pulp. Using an immersion blender, purée the skins and the pulp together. Push the mixture through the fine-mesh sieve set over a bowl, pressing the remains of the grape skins with a spatula to extract all of the juice. Discard the grape skins.

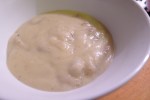
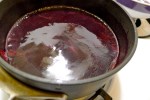
10. In a small saucepan, combine the strained grapes with the sugar and the lemon juice. Set the pan over medium heat until it begins to boil. Skim any foam that you see off of the top. When it begins to boil, lower the temperature until the sauce is just barely at a simmer (be careful that it doesn’t boil over). Keep the sauce at barely a simmer until it has thickened and reduced to a syrupy consistency. When it gets to that point, turn off the heat and let the sauce cool.

11. When the tart has cooled and set, cut it into wedges. Make a pool of grape sauce in the middle of a dessert plate, and place one tart piece on top of the purple puddle. Serve immediately.

* My recipe actually makes quite a bit of sauce, and I imagine that if you prefer to not have any commercial jam in your tart at all, you could just cook the sauce down further — with the addition of a 1/4 cup more of sugar — until you have a thick syrup. Use this instead of the jam as a layer.

Ricotta-Topped Rigatoni with Tomato, Sausage, and Kale Sauce


I have a new love: Jersey Farms Crushed Tomatoes.

I can eat them straight out of the can. Seriously. They just taste so rich and, well, tomatoey.

All of the tomatoes come from just 6 cooperative farms in New Jersey. Once picked, they are canned within 24 hours with no added water or preservatives, only a little salt. The crushed tomatoes are thick, but not too thick. They are perfect. Just perfect. You almost don’t need any seasoning at all. You practically don’t even need to cook them.

But if you do cook with them, whoa golly, are you in for a treat. These tomatoes make the best pizza sauce. The best anything, really.

Using some mild beef sausage from my CSA, I made a quick sauce with just garlic, olive oil, and some extra kale I had in the fridge. After rolling some al dente rigatoni in it for a couple of minutes, I topped everything with a sloppy spoonful of creamy, locally-made ricotta. A little drizzle of olive oil to add an extra bit of luster.

And I tell you, it was delicious.

Ingredients:

2 cloves of garlic, finely minced

1 tablespoon of olive oil

1 pound mild Italian beef sausage, casings removed

Red pepper flakes to taste

1 28-ounce can of crushed tomatoes (preferably Jersey Farms Crushed Tomatoes)

2 cups of kale, chopped with the ribs removed

Salt and pepper

1 pound of rigatoni

Whole milk ricotta cheese

More olive oil for drizzling

How to prepare:

1. Heat the olive oil over medium heat in a large casserole, or Dutch oven. When the oil begins to shimmer, sauté the garlic in it until it is fragrant. The garlic should just begin to have a little bit of color, but not too much. Crumble the sausage into the oil, and cook it until it is evenly browned (be sure to break up larger pieces of sausage with the edge of your spoon as you cook). Add as many red pepper flakes as you like. Toss the red pepper flakes with the browned sausage for about a minute before adding the tomatoes.

2. Carefully pour in the crushed tomatoes. If the sauce seems too thick to you, you can add some water to thin it out a little bit. Stir everything together. Lower the heat, and let the sauce simmer for about 15-20 minutes before adding the kale.

3. In the meanwhile, bring a large pot of salted water to boil. When the water begins boiling, add the pasta and cook it until it is al dente.

4. Let the kale wilt in the sauce while the pasta cooks. Adjust the seasoning.

5. When the pasta is done, drain it well. You will add about a ladleful of sauce per 1/4 pound of pasta. Toss everything together, and then divide the pasta into warmed bowls.

6. Top each serving of pasta with a nice, fat dollop of ricotta cheese. Drizzle some olive oil on top of everything. Before eating, be sure to mix the ricotta into the pasta with your fork!

Pan-Seared New York Strip Steak with Butter and Soy Sauce


Is there Tom Colicchio backlash? The Top Chef judge is everywhere these days, opening and closing Crafts across the country, and thoroughly saturating the New York market with ‘wichcraft sandwiches.

You kind of want to hate him, or in the very least wonder sneeringly if he is actually ever in a kitchen these days. In any case, Sifty, in his recent re-review for the New York Times, did re-bestow 3 stars on Craft . . . so does that mean it never lost them after over a decade of dining?

Possible backlash aside, I have to admit that I love Colicchio’s book Craft of Cooking: Notes and Recipes from a Restaurant Kitchen. The book is not for the faint of heart. He does not give you “easy” recipes. They are dead simple, but they are very precise and suffer a little bit from Thomas Keller Syndrome, meaning that to execute some of them you feel the pressure to raise and snuggle a piglet from birth, feeding it only milk proteins and ambrosia until it reaches market weight.

Many times, I go over the recipes and think about how I can do it faster.

Not better, but lazier.

I inevitably find, though, that Colicchio’s way is the best way.

One of my favorite ways to prepare steak is how they did it at Craftsteak: in a hot pan continually bathed in butter to finish.

I also love my friend Tomoko’s suggestion to add a hefty splash of soy sauce to the end. The soy and butter marry beautifully together, giving a lusciously heady hit of umami to an already rich grass-fed steak.

Colicchio gave away his steak technique in an Esquire magazine article a while back, so this is just to summarize:

You will need:

A cast-iron skillet

Steak, a nice thick cut

Salt and pepper

About a tablespoon of canola oil

About 3 tablespoons of butter

Good soy sauce

How to prepare: 

1. For all successful steaks, make sure your meat is about room temperature before cooking. Take it out of the fridge about an hour before you want to eat it.

2. Season the steak heavily with salt and pepper on both sides.

3. Heat the canola oil in the cast-iron skillet over high heat. When the oil is almost smoking, sear the meat on both sides until it is brown and crusty. Please note that the steak will be seared, but it will NOT be done.

This is important because . . .

4 . . . after you have seared both sides, reduce the heat to medium-low. Let the pan cool a bit before adding the butter (you don’t want the butter to sizzle and burn on contact). Using a spoon, continually baste the steak with butter, flipping it halfway through to ensure even cooking.

5. Continue basting until it is not quite at the level of doneness that you desire. Right before that point, add a good, hefty splash of soy sauce to the pan. Keep basting the steak in the butter and soy until it is done. Alternatively, I guess you could add the butter and soy at the same time.

Ideally, a medium-rare steak will have a internal temperature of about 135°, but you can also gauge the doneness by touching its surface.

You don’t actually need a thermometer to do this. Make a really tight fist. Now with your other hand poke the fleshy part of your fist between your index finger and your thumb. That bouncy hard resistance that you feel is what a super well-done steak would feel like if you poked it. Open your hand and make a super loose fist. Touch the same part. That’s what really, really rare feels like. Now, aim for somewhere in-between.

6. Let the steak rest for a few minutes before serving.

Black Bean Salad with Oven-Roasted Tomatoes, Corn, Almonds, and Lemon Zest


This is another great recipe adapted from Heidi Swanson’s Super Natural Every Day. Swanson, whose blog 101 Cookbooks is an amazing source of ideas and inspiration, makes food that is healthy, wholesome, a little quirky, always delicious, and never preachy.

The great thing about her vegetarian recipes is how amenable they are to your tastes. You can substitute chicken for tofu, or add shrimp, or beef, or pork, and the dishes will still be great.

For this recipe, I added local corn and the farfalle. Since Hurricane Irene, our farmers need all the help we can give them. Though NYC was mostly spared, many of the farmers and growers who bring the literal fruits of their labor every week to us were not. Almost no farm was left untouched by the flooding.

Support local and please make a donation here.

Ingredients:

1 pint of Sun Gold tomatoes (cherry or grape tomatoes work too), halved

Salt and pepper

Granulated cane sugar

Olive oil

3/4 cup of raw almonds, halved width-wise

1 cup of corn kernels (about two ears)

2 15-ounce cans of black beans, rinsed and drained

1/3 pound of farfalle, prepared according to package directions

The grated zest of one lemon

The juice of one lemon

1/4 pound of French feta, crumbled

How to prepare:

1. Preheat your oven to 350°.

2. Line a rimmed baking sheet with parchment paper. Spread the tomato halves over the sheet and sprinkle them liberally with salt and sugar. Drizzle the halves with olive oil. Toss everything together so that the tomatoes are evenly coated in the oil, salt, and sugar. Arrange the tomatoes cut-side up. Roast them until they have shrunken, and have begun to caramelize around their edges, about 45 minutes. Remove them from the oven, and when they are cool, scrape them into a large bowl along with all their caramelized juices.

3. Meanwhile, heat the almonds in a single layer in a large cast-iron skillet set over medium heat. Toss them around every couple of minutes until they are fragrant and toasty. Be sure to monitor the nuts closely; they can burn in a minute! When the almond halves are toasted, add them to the same large bowl as the tomatoes.

4. Wipe out the skillet and add about 1 tablespoon of olive oil. Heat the pan over medium-high heat until the oil begins to shimmer. Add the corn, and toss the kernels in the hot oil until they begin to brown. Add the corn to the same large bowl as the almonds and tomatoes.

5. Add the remaining ingredients to the bowl and drizzle everything with olive oil. Toss everything together well. Adjust the seasoning and serve.

High Point Farms CSA: Last Chance to Sign Up for the Fall

Our Fall CSA is currently underway with one pick-up out of 6 down.

Shares are still available to you lucky ducks who are salivating at the thought of grass-fed beef, pastured pork, free-range chickens and eggs!

Sign up now and pick up your share at one of two locations in the city:

http://highpointfarms.net/nyc-area-csa.html

Shares have been pro-rated to reflect the remaining pick-ups!

Asparagus with Chorizo and Croutons


Have you ever made something from memory, and then gone back to the original recipe to find that you mixed it all up?

That’s what happened here, but that is not to say that the results are not still delicious.

This is sort of one of Jacques Pépin’s Fast Food recipes. I’m sure that his is better, but the basic combination of chorizo, asparagus, and croutons is delicious — with or without the almonds.

I adore Jacques Pépin. If I had to pick anyone living or dead to have a meal with, it would be him. Famously frugal, I saw him once on PBS make adorable garnish mice out of basically garbage. He can do that and I would eat it because he’s Jacques Pépin. Unbelievably awesome.

The man is a walking legend.

Ingredients:

1/2 pound of chorizo, cut into 3/4-inch pieces

1/2 pound of asparagus, trimmed and cut into pieces

2 cups of day old bread, cubed

1/2 cup of Parmesan cheese, grated

Salt and pepper

Olive oil

How to prepare:

1. Place the cubes of bread in a large bowl. Drizzle them with olive oil, and season them with salt and pepper. Sprinkle them with the Parmesan and toss everything together again until the bread cubes are evenly coated.

2. Heat about 1 to 2 tablespoons of olive oil in a large skillet set over medium-high heat until it begins to shimmer. Add the chorizo, the asparagus, and the bread to the skillet. Toss and stir everything together for about 5 to 6 minutes. You want the chorizo to brown, the bread to toast, and the asparagus to cook through.

Adjust the seasoning and serve immediately.