Classic Gratin Dauphinois (Potato Gratin)

Classic potato gratin
The best gratin dauphinois that I have ever had was made many years ago by a woman in the Dordogne.

The future stepmother of my companion at the time had a chateau in the Périgord. It had been years since she had been there herself and taking advantage of our position in Paris, she asked us to take a weekend off and go down to check on the property for her. After a long drive from Paris that was made even longer by a detour forced by an errant herd of sheep, we arrived at the property famished and exhausted. The chateau itself was uninhabitable. In lieu, we stayed in the caretaker’s home — a crumbling stone house in need of many repairs, the least of which was a new roof.

Dark, dusty, and overrun with audible mice, the house was inhabited by a desperately lonely woman who not only feared the state of the only home she had known for more than 20 years, but had also become increasingly worried about her precarious life. What would happen if the owner decided to sell the property? What would happen if the owner came back and forced her out? She had nowhere to turn and no income to speak of besides her limited state pension.

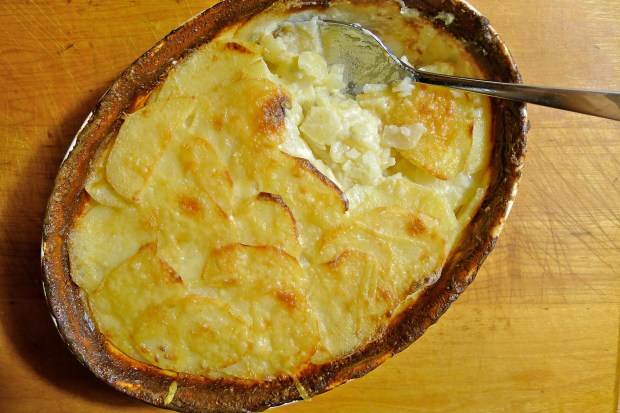
Communication between her and the stepmother was so poor that she initially thought we were sent to kick her out. Once it was established that we most certainly were not, she relaxed and began to list everything that needed to be fixed. Unfortunately, there was nothing that we could really do besides listen and watch her gnarled fingers expertly reduce a pile of meager potatoes into thin slices with a dull paring knife. She continued to fret while we ate that divine gratin. In the heat of the fire (yes, the stove was a wood one) the potatoes had collapsed into a silky smooth cake; the individual layers had become indistinguishable from the whole. This was all washed down with a dozen small glasses of homemade walnut liquor made from nuts that had fallen from the trees surrounding the property.

It was a delicious meal, albeit a very sad one.

I never knew what happened to the woman. The stepmother tossed away the caretaker’s worries with nothing more than a soupçon of concern and my relationship didn’t survive the move back to New York. Consequently, I never followed up on the story.

However, ever since that meal, I have tried literally hundreds of recipes for gratin dauphinois in the hopes of recreating that recipe-less dish that was probably as natural for that woman to make as it was for her to breathe. I have made gratins with liters of heavy cream and piles of Alpine cheeses. I have added truffles and more butter. I have tried different varieties of potatoes soaked in milk, not soaked in milk, and even parboiled in milk and cream. I have tried slicing the potatoes paper thin with mandolines. I’ve tried Julia Child’s recipe.

After all that experimentation, nothing has come close. However, this recipe comes the closest.

Like all dishes born out of need and necessity, gratin dauphinois is best simple — not gussied up with an excess of cream, butter, and cheese. Although the urge to be decadent is strong when it comes to French farmhouse dishes, the best ones are made with only whole milk, some stock, and the gentlest kiss of cheese. The allure of excess is not rewarded as richly as the alchemical reaction of humble ingredients and time.

Ingredients:

1-2 sprigs of fresh thyme

1-2 sprigs of fresh rosemary

1-2 sprigs of savory

2 bay leaves

3 smashed garlic cloves, plus one more

5-6 black peppercorns

Freshly grated nutmeg

Salt

1 cup of chicken stock

1 cup of whole milk (or light cream if you must)

4 smallish waxy potatoes, peeled and cut into 1/8-inch slices

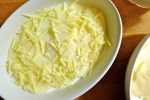
1/2 cup of grated Gruyère

1 tablespoon of unsalted butter

How to prepare:

1. Preheat the oven to 350°.

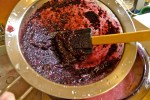
2. In a medium-sized saucepan, cover the herbs, the black peppercorns, and three of the smashed garlic cloves with the milk and the stock. Season with salt and freshly grated nutmeg to taste. Over a medium-low flame, gently heat the mixture until it just comes to a boil. Turn off the heat, cover the pan, and let the herbs and garlic steep.

3. While waiting for the milk mixture to cool, rub an oven-proof dish with the remaining smashed clove of garlic. Generously butter the dish.

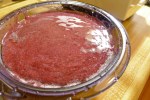
4. Strain the milk mixture. I like to do this into a measuring cup with a spout as it makes it easier to build the gratin later.

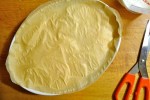
5. In the bottom of the gratin pan, make an even, single layer of potato slices. Pour just enough of the milk mixture to cover the slices and then add another layer on top. Top that layer with just enough of the milk mixture to cover the slices. Scatter a little bit of the grated cheese on top. Continue to build the gratin with a little bit of grated cheese in-between every other layer, and with each layer covered with the milk mixture. Reserve just enough cheese to scatter on top near the end of baking. The final layer at this point should be just potatoes. Use your hand and press down on top of the gratin. Add more milk mixture if needed, but leave about 1/2-inch of clearance from the top of the gratin dish.

6. Dot the top of the gratin with butter and cover it with a piece of parchment paper cut to fit.

7. Bake the gratin for about 30 minutes before removing the parchment paper. Continue to bake the gratin uncovered for about 15 minutes. Sprinkle the remaining cheese over the top and continue baking for 15-20 minutes until the top of the gratin is golden and the potatoes are soft. This is very important: let the gratin rest for about 10 minutes before serving.

Our Growing Edge

This blog post is my second contribution to the amazing Genie De Wit’s Our Growing Edge. Our Growing Edge is a monthly event that aims to connect food bloggers, broaden our horizons, and encourage us to try new things.

The month is just starting and anyone can be a part of the party! For more information, please go to the page Genie has set up on her blog Bunny. Eats. Design.

This month’s host is Leah from Sharing the Food We LoveThank you so much for hosting, LeahTo take a look at the participating bloggers this month, click here.


Advertisement

Backwoods Blueberry Buttermilk Sherbet

The final product!
Have you ever made a claim and promptly regretted its utterance? I often jinx myself with these kinds of pronouncements, also known as “famous last words.” Usually, when I begin a sentence with “I won’t” followed by “get lost,” “be late,” “cut myself,” “fall off this box,” “regret this tattoo,” or “take an unreasonable amount of time to finish graduate school,” I basically ensure that I will.

If you google the phrase “famous last words,” you’ll find the following Urban Dictionary explanation: to say “famous last words” out loud is to invoke “a warning that following the course of action just mentioned will result in impending doom.”

But this is not a story about doom. No, wait. I take that back. It is a story about doom! It is also a story about setbacks, humility, learning, redemption, and WINNING TWO FREAKIN’ ICE CREAM MAKERS BECAUSE I’M FREAKIN’ AWESOME YA’LL!

I offer you Daisy’s long overdue Brooklyn Ice Cream Takedown Diary:

Thursday, June 27: I return to NYC after visiting my parents for 10 days and spend the next 4 days drinking heavily decompressing.

Monday, July 1: I finally get around to buying an ice cream maker for the Brooklyn Ice Cream Takedown on July 7th. Having the choice between a $59.99 machine, an $89.99 machine, and a $400 machine, I go for the least expensive model. “Frozen Treats in 20 Minutes or Less!” is prominently advertised on the box.  Feeling buoyant and unstressed, I am unconcerned by having never used an ice cream maker before (prior to this experience, I had only made ice cream the old school way by dumping the ice cream mixture into a metal pan, putting the metal pan in the freezer, and stirring it every 30-45 minutes to break up the ice crystals). I am certain that the ice cream maker will make this Takedown a cinch. I leave it unopened on the floor of my apartment.

Tuesday, July 2: I confidently “chat” with Eryn at Ugly Food Tastes Better. She is in the competition too and is fretting about her freezer on the fritz. I mention that I am excited for the Takedown, especially given that the ice cream only takes 20 minutes to churn. I stretch and envision this being a walk in the park, a mere breeze after the HOURS spent baking 250 cookies for the Cookie Takedown or wrapping 250 little bacon candies until my fingers were aching and sore. True, I have to make two gallons of ice cream and the machine only churns 1.5 quarts at a time, but at 20 minutes a batch, I am confident I can knock out all 8 quarts on Saturday afternoon, the day before the competition.

In comparison, this will be so much easier, I say. Then I add the cursed phrase: “Famous last words, right?”

“Hahaha yeah!” Eryn laughs. Then she drops the bomb that shatters my smug peace and calm: “This one is time consuming because you have to refreeze the bowl 24 hours between batches.”

Omg. WHAAAAAAAAAAAAATTTTTTTTT????????????

I open up ice cream maker and swear that the i’s in “Cuisinart” are middle fingers.

The ice cream maker now sits in pieces on floor. There is the machine element, the freezer bowl, and the plastic dome that covers it all. I only have this one freezer bowl and it is not frozen. I also have a freezer so full of meat that I cannot even fit that one bowl in it. I officially freak out. I am in full panic mode.

At 4:30 am, I cave and order two more freezer bowls from Amazon. Overnight delivery. I pray that Amazon’s overnight delivery is really overnight delivery. When my neighbor across the hall wakes up later in the morning, I transfer the entire contents of my freezer to her freezer, shove the insulated bowl in it and wait.

Wednesday, July 3: The extra freezer bowls arrive in the morning and after a whole day in the freezer, only one of the three seems to be frozen. I hear no sloshing when I pick it up and shake it. I attempt my first test batch around midnight, figuring that I can only do two, maybe three tests before having to pick a final recipe. Sadly, there is no time for tinkering, no time for research, no more time for consulting fellow bloggers and friends.

I decide on a custard based ice cream and my inaugural flavor will be Peach Bourbon Jalapeño.

After much stirring, scorching, sieving, and saving, I come to the horrible realization that custard takes FOREVER to make! Worse, when I finally pour the ice cream mixture into the machine and turn it on, it churns for 20 minutes and produces no ice cream, only soup. It is not even the consistency of a smoothie.

Worst of all? The taste. My Peach Bourbon Jalapeño ice cream tastes like peanut butter-covered pepper jack cheese.

There is no peanut butter or pepper jack cheese in the recipe.

I start crying.

Thursday, July 4: I decide to start fresh in the morning with a different custard base. Test batch #2 is to be a fresh strawberry, balsamic vinegar, and black pepper ice cream. The custard tastes good. I pour it into the machine and turn it on. It churns for 20 minutes. I have soup. Again.

At least it’s delicious soup 😦

Three hours before needing to leave to meet up with Tomoko for fireworks on her rooftop, I decide it’s triage time. I don’t have any time left to set up two gallons worth of custard base. I basically don’t have time for anything cooked. My downstairs neighbor Niki lends me a copy of Martha Stewart Living with a special section on ice cream — the last resort. I thumb despondently through it and my eyes fall on a recipe for Blueberry Buttermilk Sherbet that requires no cooking. The buttermilk catches my attention because being so lean (buttermilk is mostly water), I know it will freeze hard and fast. Blueberries are in the market too, which is fantastic since there are so few elements in a sherbet that you want the best fruit you can find. Best of all? No cooking required.

I do a quick test batch. It sets up better than the custard based ice creams since there is hardly any fat (things that inhibit freezing are gelatin, alcohol, stabilizers such as invert sugars, fat, and sugar). Unfortunately, it is still way too slushy.

As for the taste? The sherbet is a pretty color, but there are too many seeds (blueberries have tons). It’s also too sweet. The lemon zest has clumped unattractively around the ice cream paddle and looks like something found in a drain.

I throw the test sherbet in the freezer and cry all the way to the Upper West Side. At Tomoko’s, we troubleshoot and decide that given the time constraints, a sherbet is still the way to go. We also conclude that the freezer bowls are not getting cold enough to freeze the mixture properly. It does not help that my apartment is too warm and the bowls are loosing chill faster than the ice cream can churn. I go home, throw out everything that can be tossed from my fridge, turn the temperature setting as low as it can go, and hope for the best.

Friday, July 5: After staying up doing research and reading about how to achieve a good, smooth texture, I do the following:

1. I get myself a freezer thermometer. It costs a whopping $2 and tells me exactly what I suspected it would tell me: my freezer doesn’t get cold enough to completely chill the ice cream maker’s insulated bowls 😦

2. I figure that since the ice cream maker can only make slush, the best way to break up the giant ice crystals produced is to churn it as best as I can, let it sit in the freezer for about an hour, stick an immersion blender in the half-set ice cream, whizz it to get a smoother consistency, and let the freezer freeze it the rest of the way. I think I got the idea from Southern Living, but I frankly don’t remember anymore.

3. Contrary to Martha’s recipe, I decide to sieve the blueberry purée twice. If I had the time and patience, I probably would have done it once more on top of that.

4. I add booze. Specifically moonshine. I briefly consider vodka but think moonshine is more interesting. Besides, nothing beats a hillbilly-themed table!

5. I add more lemon juice. The forecast for the Takedown is sunny and hot, and I want something tart and refreshing.

6. I follow Susan’s recommendation and add a stabilizer to enhance mouthfeel and improve texture. She recommends glucose and thankfully, Niki’s candy business has her swimming in glucose. I cadge a couple of cups off my neighbor and hope that the combination of alcohol and invert sugar will prevent crystallization and keep my ice cream stable in the heat.

I put together my boozy blueberry buttermilk mixture, pour it into the machine, and lo and behold . . .

Houston, we have sherbet 🙂

I crank out 4 quarts and put the bowls back in the freezer to refreeze.

Saturday, July 6: I crank out the remaining 4 quarts and collapse.

As for the competition results the following day? I am pleased to report it went well 🙂

Read more about it here.

* A very special thanks to Eryn for the heads-up about the machine! I would have been in serious trouble if not for you!

The next stand mixer I win is yours, Babe! 

And everyone should check out Eryn’s blog on which she has posted her recipe for Honeysuckle Tres Leches Ice Cream with Tres Harinas Cake Crumb and Red Fruit Compote. Delicious!

Special equipment:

A 1-1.5 quart ice cream maker

A fine-mesh sieve

A stick or immersion blender

Ingredients:

2 pints of fresh blueberries

1 cup of sugar

1 tablespoon of glucose or of another invert sugar such as light corn syrup (optional)

2 cups of buttermilk

2 tablespoons of moonshine or vodka

The juice of 3 lemons, strained

How to prepare:

1. In a food processor or blender, purée the blueberries with the sugar and the invert sugar if using. Press the purée through a fine-mesh sieve with a silicon or flexible plastic spatula. Discard the solids and pass the purée through the sieve a second time to get the remaining seeds. You can even choose to sieve the purée a third time if you would like an even smoother texture.

2. Combine the purée with the buttermilk, the moonshine or vodka, and the strained lemon juice.

3. Churn the mixture in your ice cream maker according to the manufacturer’s instructions. If your sherbet fails to properly set up like mine did, churn it as best as you can in the machine, transfer it to a sturdy container, and let it harden in the freezer. After 45 minutes to an hour, use an immersion blender to blend the sherbet and break up any larger ice crystals. When the mixture is smooth, return it to the freezer to harden.

The finished sherbet will keep for about two weeks in the freezer.

Our Growing Edge

This blog post is also my first contribution to the amazing Genie De Wit’s Our Growing Edge. Our Growing Edge is a monthly event that aims to connect food bloggers, broaden our horizons, and encourage us to try new things.

Anyone can be a part of the party! For more information, please go to the page Genie has set up on her blog Bunny. Eats. Design.

This month’s host is Stacey from The Veggie Mama. Thank you so much Stacey! To take a look at the participating bloggers this month, click here.