Macaroni and Cheese with Sliced Hot Dogs

Is it? Could it possible be?

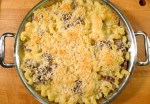
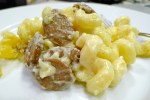
Oh, yes. It’s macaroni and cheese. With hot dogs.

Don’t be a food snob. You know you want it.

Ingredients:

8 ounces of dry pasta

3 tablespoons of butter, plus 1 tablespoon

1/4 cup of flour

2 cups of milk

1/4 teaspoon nutmeg

8 ounces of grated cheese (I used raw milk cheddar)

4 hot dogs, sliced into 1/4-inch wide coins (I used beef hot dogs from my meat CSA)

1/2 cup of breadcrumbs

How to prepare:

1. Preheat your oven to 350°.

2. Prepare the pasta according to directions, but drain the pasta just right before it’s al dente.

3. Now, while your pasta is boiling, prepare the béchamel. Melt 3 tablespoons of butter over medium-low heat in a medium saucepan. Add the flour and stir them both together to make a roux. Continue to heat the roux until the flour starts to just brown. Add the milk a little bit at a time, stirring constantly as you add it. It will seize up when you add the first little bit of liquid, but will relax the more you stir it. Add the nutmeg after you have added all 2 cups of milk. Continue to stir and stir and stir. Don’t worry about adjusting the seasoning; the cheese and hot dogs should add enough sodium. Once the béchamel has thickened to a nice, smooth white sauce, turn off the heat and move the saucepan off of the burner.

4. Combine the pasta, the cheese, the sauce, and the hot dogs in a large bowl. Pour the mixture into a good-sized baking dish.

5. Melt the remaining tablespoon of butter and mix it with the breadcrumbs. Sprinkle the breadcrumbs evenly over the top of the macaroni and cheese. Bake for 30-35 minutes until brown and bubbly. Serve with a good, heaping side of Midwestern nostalgia.

Cottage Pie (also known as Shepherd’s Pie with Beef)


I like mashed potatoes on top of just about anything.

This dish is one of those great things that you can play around with, improvising with whatever you have around the house. Parsnips? Sure, throw them in. How about a turnip? Sounds good. Lamb? Change “cottage” to “shepherd” and you’re good to go. Beef? Beef is better than okay! Tomato paste? Some fresh chopped tomato. I say add whatever makes you feel warm and happy.

Just imagine whatever you would like to eat in your cottage if you had one (you might).

Ingredients:

3 medium Russet potatoes, cut into large dice

1 heaping tablespoon of kosher salt

2 tablespoons of butter

1/2 to 1 cup of milk

1 tablespoon of olive oil

1 medium onion, chopped

2 large carrots or 3 medium carrots, diced

2-3 cloves of garlic, finely minced

1 pound of grass-fed, lean ground beef

1 1/2 tablespoons of Worcestershire sauce

1 1/2 teaspoons of fresh rosemary, finely chopped

2 tablespoons of flour

1 cup of veal or beef stock (you could also use milk or chicken stock)

1/2 cup of frozen green peas

Salt and pepper to taste

How to prepare:

1. Preheat the oven to 375°.

2. Put the potatoes in a large saucepan and cover them with water. Add the salt. Bring the water to a boil and cook the potatoes until they are tender. You will know that they are ready when you can crush a potato piece easily against the side of the pan with a wooden spoon. Drain the potatoes. In the same pan, mash the potatoes with the butter. Add the milk a 1/4 cup at a time until you get the right consistency. You don’t want the potatoes to be dry, but you don’t want them soupy either. Aim for a texture that is loose enough to spoon on top of your beef filling, but not so loose that the potatoes add a lot of excess water to your pie.

3. In a large skillet, heat the olive oil over medium heat. When the oil is hot, add the onions and carrots. You want to cook the onions until they are translucent and are just beginning to brown. At that point, add the minced garlic to the carrots and onion. Cook the garlic for about a minute until it is fragrant but not burning. Add the ground beef to the pan. Breaking up bigger chunks of ground beef with your wooden spoon, cook the beef until there is no longer any visible pink. Sprinkle the beef with the Worcestershire sauce and the rosemary. Cook everything for another minute or two. Sprinkle the beef with flour. Stir again and cook for a few more minutes to brown the flour. Add the stock to the pan and stir to combine everything. The sauce should begin to thicken. When the sauce has gotten to the point that you think it is ready (the mixture should be held together by a nice, thick sauce) , distribute the peas over the top of the beef and continue to cook everything together for about another minute before turning off the heat.

4. Spread the meat mixture over the bottom of a casserole dish. Spoon the mashed potatoes on top of the meat. You can even use a fork to rough up the surface if you like. Bake the casserole uncovered in the oven for 25 minutes. The potatoes will have just started to brown. Wait at least 15 minutes before serving.

NY Strip Steak, ATK-Style


How do you cook a nice, thick steak in a pan? You sear it, right? On high heat to get that nice browned crust. Then you move it to a hot, hot oven to finish. “Sear and blast,” goes the standard mantra.

But what if you did the reverse? In pursuit of the perfectly cooked, medium-rare steak without that darned grayish band of overcooked protein ringing the outer edge of the meat, those pesky perfectionists at Cook’s Illustrated did precisely that: they started the steaks in a reasonably cool oven, and then moved them to a hot pan to sear.

The result? Very. Evenly. Cooked. Steak.

Of course, under the weight of all their test kitchen trials, you might be persuaded that this is the right way, nay the only way to cook your meat.

But it’s not.

It is fun to try it, though.

Ingredients:

2 New York strip steaks, at least 1-inch thick

Kosher salt

1 teaspoon olive oil, plus 1 tablespoon

Freshly ground black pepper

2 nice pats of butter

Special equipment:

1 half-size heavy-duty sheet pan

1 wire rack to fit the half-size, heavy-duty sheet pan

1 leave-in meat thermometer

How to prepare:

1. In order for this method to work, your steaks should be about room temperature before cooking. Be sure to take your steaks out of the fridge, or from wherever you are storing them, ahead of time.

2. Preheat the oven to 275°.

3. Using paper towels, thoroughly pat your room-temperature steaks dry. Season both sides liberally with kosher salt and rub the olive oil all over them.

4. Position the steaks on the wire rack that you have set in the sheet pan. Insert the meat thermometer probe into the center of one of the steaks. You will want the tip of the probe to be parallel to the steak, so the probe should go in the side of the steak instead of sticking straight up. Make sure not to position the probe tip too close to the wire rack or to the top of the steak. Set the timer to go off at 100°.

5. When the timer goes off, remove the steaks from the oven. Remove the probe. Heat the remaining olive oil over medium-high heat until the pan is nice and hot, and oil is not quite smoking. Sear the steaks on both sides. You should remove them from the pan when they reach an internal temperature of 125° for rare, or 130° for medium rare. While the steaks are resting, the internal temperature should continue to rise about 5 degrees.

If you feel like this is a bit fussy (those America’s Test Kitchen folks are really fussy!), you can just sear your steaks for about a minute or two per side and call it a night.

6. Place a nice pat of butter and a good grind of black pepper on each steak before serving. Serve and smile.

Tomato and Parsley Bruschetta


I love this. I usually only ever make it when we have guests, but today I decided to spoil myself. It is so easy and so tasty. It will be even better once it’s summer and tomatoes are in season.

Ingredients:

1 pint of grape tomatoes

2 tablespoons of fresh Italian parsley, finely chopped

1 small clove of garlic, finely minced

Olive oil

Maldon salt

1 baguette or ciabatta loaf

How to prepare:

1. Preheat the oven to 450°.

2. Cut each grape tomato into eights. You can also dice up about a pound of any tomato that you want — just be sure to seed the tomatoes before dicing them.

3. Combine the tomatoes, parsley, and garlic in a bowl. Drizzle with very good extra- virgin olive oil. Shower with a generous sprinkle of Maldon salt. Toss everything together and let the mixture sit for about 5 minutes.

4. In the meanwhile, cut the bread into 1/2 inch-thick slices. Brush one side with olive oil. Toast the bread in the oven until the slices are golden brown. Remove the bread from the oven and let the slices cool.

5. Once the bread has cooled off, mound the tomato mixture on top of each slice. Serve.

Hamburger, Grape Tomato, and Red Onion Pizza


I got this idea from Martha Stewart and it has become one of my favorite things to make with ground beef from our CSA. It’s quick, it’s easy, and it’s delicious. On the table in less than 20 minutes too.

Now that’s what I call good fast food!

Ingredients:

Pizza dough, about 1 pound of dough will make two 12-inch pizzas, or one really big pizza

Marinara sauce

Low-moisture mozzarella cheese or sliced provolone

1/2 pound of grass-fed, very lean ground beef

12-14 grape tomatoes, halved

1/2 a small red onion, thinly sliced into rings

Maldon salt

Special equipment:

A large baking sheet

Parchment paper

How to prepare:

1. Preheat the oven to 450°.

2. You can easily make your own pizza dough, but I rarely ever do it anymore since I can buy reasonably good, organic frozen dough at the market. In a hurry, I have also been known to run down to the nearest slice joint and buy their dough. Most pizzerias will sell it to you, you just have to ask.

I know. Gasp! I don’t make it from scratch? No. On special occasions, maybe. But if I’m tired and hungry, no. And that’s okay!

Once your dough ball is made, defrosted, or acquired, you need to stretch it out. Start by flattening your dough ball into a disk. By flouring both sides, you avoid having to flour your countertop. Any hard surface will do to stretch out the dough as long as it is flat, clean, and dry. Using your fingertips, start pushing down on the dough, roughly making the border that will become your crust. Now begin using the palm of your hand to pull the dough away from you and away from its center while turning it. At this point, you can try tossing it up in the air. But every time I try doing that, I end up looking like a fool with dough on the floor. Instead, you can position your knuckles under the dough and start stretching it out off of your flat surface. This super helpful video will give you a better idea what to do (contrary to the video, you don’t actually need a marble or stainless steel surface. And just flour is okay if you have no semolina lying around).

2. Now that your dough is nice and stretched out, position it on your parchment paper- lined baking sheet. Egads! No pizza stone? No tiles or bricks wrapped in aluminum foil lining your oven to achieve optimal heat?

No. When I can afford a real, wood-burning Neapolitan oven outside my villa then I will do things like they do in the old country.

3. Spread your marinara sauce around your stretched out dough. I buy this too. I really like the sauces from Sauces n’ Love. They’re wonderful. The pizza sauce is good. Very good.

4. Top the pizza with either the mozzarella or the provolone. I like the flavor of the provolone better with the ground beef, but I love the melty creaminess of mozzarella. Try one, or the other, or both. Maybe at the same time.

5. Scatter the onion rings, halved tomatoes, and RAW ground beef over the pizza.

6. Bake in the oven for 15 minutes, longer if you want a more browned crust. I kind of prioritize though: absent the hardware and capability to get a really excellent crust, I aim for just really excellently cooked beef. Shower your finished pie with Maldon salt, slice, and serve.

Parchment Paper-Wrapped Salmon with Sliced Mango and Calamansi Juice


“Why,” my friend asked, “Are you taking such a huge bag with you to San Francisco when you are only going for three days?”

She has a point, I thought, but she doesn’t understand what’s in sunny California: lemons. Big, shiny, juicy, fabulous lemons. Meaty, fragrant, unsprayed suckers growing like weeds in everyone’s backyard.

Oh, and I guess my new godson is in California too 😉

Living on the East Coast, we get wonderful apples, but zero good citrus. Limes from Chile arrive bright green on the outside, and dry as popcorn on the inside. Lemons smell vaguely like styrofoam and are mouth-puckeringly tart — not in a good way. Even the Meyer lemons we get are a little overripe and slightly smushy.

So was I going to miss out on my golden (state) opportunity to bring back some excellent fruit? No way!

Thankfully, my best friend and her warm, welcoming family were more happy to accommodate. Her parents raided her uncle’s lemon trees and came out with a great big bag of fat fruit. Hooray! I must have been quite the sight at the baptism running around with a fresh lemon stuck under my nose.

And as I was packing to head back to the frigid northeast, my friend’s mother palmed a handful of super tiny, but ultra-perfumed orbs into my hand.

Calamondin, or calamansi, are used a lot in Filipino cooking. I wasn’t sure what to do with them, but I certainly was not about to let that stop me from finding out!

This recipe is from a terrific cooking blog called Coconut & Lime. Instead of wrapping the salmon in aluminum foil, I opted for my preferred parchment paper. Salmon en papillote, southeast Asian-style.

I’m also testing out a brand new camera!

Ingredients:

2 individual portions of center-cut salmon, bones and skin removed

1 small onion or shallot, very thinly sliced

1 small ripe mango, cut into thin strips

1-2 small Bird’s Eye Chiles, thinly sliced

1 1/2 teaspoons of coconut vinegar

The juice from a handful of calamansi oranges

Olive oil

Salt to taste

Special Equipment:

Parchment paper

Baking Sheet

How to prepare:

1. Preheat the oven to 350°.

2. Place the salmon portions in the center of a large sheet of parchment paper. Arrange the sliced onions evenly on top of the salmon, followed by the mango slices, and finally the sliced chiles. Sprinkle the salmon with the coconut vinegar and the calamansi juice. Drizzle olive oil over everything. Season with a shower of kosher salt to taste.

3. Pull the edges of the parchment paper up lengthwise. Roll the edges down together, making several folds as you go along. The paper should be snug against the salmon, but not too tight. Twist, or tie with butcher’s twine, the ends of each side so that you end up with a nice, neat packet.

4. Place the packet on your baking sheet seam-side up. Bake the salmon for 20 minutes. The fish should be fully cooked. When opening the packet, be careful to not burn yourself with the steam. Serve with steamed white rice.

Potato Salad with Fresh Herbs


When I conceived of this salad, I was living in Paris, nursing a killer craving for big American picnic food: fried chicken in Tupperware, carrot salad with raisins, tart lemonade with sprigs of fresh mint.

What I really, really wanted was potato salad. Mounds of it smothered unapologetically in Hellmann’s mayonnaise.

But this was Paris, and Hellmann’s was nowhere to be found (actually, it was but it cost you 12 euros at a specialty shop). As the hot, late July air blew through my French windows, making my own mayonnaise with raw eggs just so that I could tote my nice, dressed salad out to a sunny park sounded like tempting fate.

So I thought to dress my potatoes up with a super lemony vinaigrette, tossing in whatever else was in my kitchen that day (radishes and celery in my case). It turned out to be delicious.

I have made this salad many times over the years. Recently, I unearthed my original scribblings from France, hastily scrawled on supermarket circular. Only then did I realize how different the potato salad that I was making New York was from that one made on that warm Parisian day.

No matter. Whether you add this, or that, or not, you will have something wonderful to eat. Picnic-safe too.

What I make now:

Ingredients:

2 pounds of waxy red potatoes, unpeeled and cut into 1-inch cubes

2 tablespoons of minced fresh herbs (thyme, parsley, rosemary, oregano, and/or dill)

Basic Mustard Vinaigrette:

Juice of one lemon, which should be about 2 tablespoons of lemon juice

1/2 cup olive oil

1 tablespoon of good grainy Dijon mustard

Salt and pepper to taste

How to prepare:

1. Boil the potatoes in a large pot of heavily salted water. You should be able to easily pierce a cube with a paring knife when they are done. Drain the potatoes and let cool.

2. Make the vinaigrette. Pour the vinaigrette over the still warm potatoes (you might want to do this a little bit at a time to avoid dousing them in dressing — something that fat-and-salt-loving me has a hard time not doing). Add the fresh herbs and toss until everything is evenly incorporated.

What I made then:

Ingredients:

1 pound of small Yukon gold potatoes (peeled, quartered, boiled, and cooled)

2-3 stalks of celery, chopped

4-5 small radishes, sliced very thin

2 minced shallots

2 tablespoons of minced fresh dill

Basic Mustard Vinaigrette:

Juice of one lemon

1/2 cup olive oil

1 tablespoon of Dijon mustard

Salt and pepper to taste

How to prepare:

1. In a large bowl, combine all ingredients together. Using a wooden spoon to stir, smash some of the potatoes against the side of the bowl to create texture. Keep stirring until all ingredients are well incorporated. Serve on a bed of lettuce. Can be made a day in advance.

White Bean Dip with Sizzled Sage


Friends are coming over in 15. Need a snappy dip quick! A hurried perusal of the cupboard reveals a can of cannellini beans. Hooray! With an effortless prep, a whiz of the hand-held blender, and a finishing touch of sizzled sage, the party is saved.

Ingredients:

1 can of cannellini beans (or any other kind of white bean), rinsed

Chicken stock

Some fresh or dried herbs (rosemary, sage, and/or thyme) to taste

1-2 cloves of garlic, sliced

Salt and pepper to taste

1 tablespoon of fresh sage, chopped

2 tablespoons olive oil

Special equipment:

A hand-held stick immersion blender

How to prepare:

1. In a small saucepan, combine the beans, the herbs, and the garlic. Add enough chicken stick until the beans are just barely covered. Simmer the beans over medium heat until they are tender and no longer gritty to taste. Remove the pan from the heat. Purée everything in the pan with a hand-held stick immersion blender until the dip is nice and smooth.

2. In a small skillet, heat the olive oil over medium heat. When the oil is not quite smoking, add the sage. Sizzle the leaves quickly in the oil, being careful not to burn them. Add the sizzled sage to the bean dip. Stir to combine. Adjust the seasoning and serve. You can also make this ahead of time and chill it in the refrigerator until you are ready to eat.

Oven-Roasted Baby Back Ribs

Finger-lickin' good.
It is official: my mother is a kitchen saboteur.

For Valentine’s Day this year, I decided to toss some ribs in the oven and save my boyfriend and myself from a night out. I was thinking something fun to eat. Finger food. Something fast and easy.

I thought of my mom’s fantastic oven-roasted baby back ribs.

When I asked her for the recipe, she casually tossed out something more like a manner than a method with what I realize now to be a completely non-realistic cooking time.

“35 minutes? For real?”

I hooted with joy. Thirty five minutes of roasting meant that I could leave off dinner until the last minute! I could dawdle around the supermarket playing with squeeze bottles of agave syrup and Dijonnaise without feeling the pressure to get going and get home!

So I went about my day, happy and relaxed. Then my mother called somewhere around the dairy section to say that it was actually about 35 minutes . . . after the first hour.

First hour? What first hour! Am I hard of hearing? Does my cellular service suck?

No, I can hear fine. The service is not terrific, but the call was crystal.

My mother had lied. Again!

And again, it turns out, as she had to call back a second time to say that it was actually more like 35 minutes to an hour after the first hour.

Well, mine ended up taking about one hour and 40 minutes. I imagine that that can be a little less or more depending on thick your racks of ribs are.

So here is a great, super easy recipe for juicy, falling-off-the-bone ribs done in your oven.

Seriously, no lie.

Ingredients:

1 or 2 racks of baby back pork ribs

1/3 of a cup of dark brown sugar per rack of ribs

1 heaping tablespoon of steak seasoning or rib rub (I like one with some smoke) per rack of ribs

Special equipment:

One half-size sheet pan

One wire rack to fit the sheet pan

How to prepare:

1. Pre-heat the oven to 375°.

2. The secret to melt-in-your mouth tender ribs? You have to remove the membrane on the back of the pork ribs. It’s super easy to do and allows your ribs to cook nice and flat, without curling up. It also makes them much nicer to eat. Flip the ribs bone-side up. Using the flat handle of a spoon or a butter knife, loosen the membrane on one end of the rack of ribs. Grasp the loosened end with a paper towel and pull the membrane slowly in the direction of the opposite end. It will probably come off in one piece but if not, you can just grab the torn end and continue. To help visualize, here is a pretty great Youtube how-to clip from BBQTalk.

3. In a small bowl, mix together the brown sugar and seasoning with your fingers. After you have dried off your rack of ribs with paper towels, rub the brown sugar-seasoning mix into both sides of the rack. Lay the rib(s) out on the wire rack.

4. Set the racks of ribs in the oven. Carefully pour about 2 1/2 to 3 cups of water into the bottom of the sheet pan. The water should not touch the bottom of the wire rack. Roast the ribs in the oven at 375° for one hour. Lower the temperature to 350° and continue to roast until the ribs are tender and buttery, about 40 minutes to an hour longer depending on the thickness of your rack of ribs. Remove carefully from the oven. Let the ribs rest for 5 to 10 minutes before slicing and serving.

Rick Bayless’s Roasted Tomato and Jalapeño Salsa


Can anyone resist a big crunchy pile of chips and a bright red bowl of salsa?

I can’t.

It’s my weakness; I find the crunchy saltiness of the chips and the spicy sloppiness of the cool salsa irresistible.

Like everything else, I have been on the hunt for that perfect version.

This doctored-up Rick Bayless recipe comes darn close. It’s really better the next day too.

Ingredients:

2 pounds of plum tomatoes

3 jalapeño peppers, stemmed

1 medium white onion, sliced into thin rings

4 fat cloves of garlic

1 1/2 teaspoons of apple cider vinegar

The juice of 4 limes (maybe 5)

1 bunch of fresh cilantro, chopped (about 1 loosely packed cup)

1 small white onion, minced

Salt to taste

How to prepare:

1. Turn on your oven’s broiler.

2. While the broiler is heating up, spread the tomatoes and the jalapeño peppers out on a cookie sheet. Do not brush them with any oil. Broil them until their skins are blackened in spots and blistered in some parts. Turn the tomatoes and peppers throughout the cooking to make sure that all their sides are evenly colored. Remove the pan from the oven and let everything cool.

3. Set the oven to 425°. Spread the onions out on another cookie sheet, separating the rings. Tuck the garlic underneath the onions and roast in the oven until the onions are soft and starting to brown.

4. Using a food processor, process the onions, garlic, peppers and tomatoes together.

5. In a large bowl, combine the processed mixture with the remaining ingredients. You may want to add more lime juice, depending on how it tastes. Adjust the seasoning and serve.