The Daring Kitchen March Cooks’ Challenge: Braised Short Ribs with Braised Root Vegetables


For last month’s Daring Kitchen Cooks’ Challenge, Lis and Audax Artifex (whose parents must be congratulated for giving him the best name on the planet) gave us a very technical challenge and dared us to make patties.

This month, Carol from Newfoundland, Canada, has given us another technical challenge: braising.

When most people consider braising, they think of tougher cuts of meat that generally have a lot of muscle or connective tissue — think lamb shanks, oxtails, short ribs, or stew beef. Braising is a very easy way to cook these economical cuts of meat, transforming them into meals that are the embodiment of pure comfort and elemental nourishment.

Braising can also be used for certain kinds of vegetables — carrots, celery and parsnips, for example — that take a long time to cook to mouthwatering tenderness.

To attain braised perfection, you really only need three things:

1. Low and steady heat
2. Liquid
3. Time.

In Carol’s challenge PDF, she gave us several recipes for ideas, including one for braised short ribs from Michael Ruhlman. Ruhlman’s recipe jazzes up short ribs with a snazzy gremolata. However, whenever I think of braised short ribs, I think of the traditional French bonne femme: pure, simple, and uncomplicated . . .

. . . which is of course why I chose a recipe from Thomas Keller‘s Ad Hoc at Home cookbook — ha ha! there goes the uncomplicated bit!

Reproduced in Food and Wine Magazine, this recipe from Keller and his brother Joseph is really quite simple. Though there seem to be like a lot of steps, they are all dead easy. The difficulty comes in just waiting to eat as your house fills with the wonderful smells of braised meat. The absolute most difficult thing is delaying gratification for a day, if you can, in order to be able to remove the fat rendered from the ribs and deepen the flavors of the braise.

I can only say that though it is hard, waiting is not impossible so long as you chant like a mantra, “It will be better tomorrow, it will be better tomorrow”!

And order a pizza 😉

A big thank you to Carol for the great challenge! I encourage everyone to take a look at her challenge PDF. She includes so many more ideas for braising (fennel, duck, pork belly and oxtail), and it is a great way to learn more about braising!

Blog-checking lines: 
The March, 2012 Daring Cooks’ Challenge was hosted by Carol, a/k/a Poisonive – and she challenged us all to learn the art of Braising! Carol focused on Michael Ruhlman’s technique and shared with us some of his expertise from his book “Ruhlman’s Twenty”.

Special equipment:

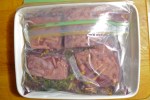
2 large Zip-loc bags

A large Dutch oven with a lid, or any enameled cast-iron casserole

(please do note though that if you do not have an enameled cast-iron pot, it is still possible to braise. Keller’s recipe calls for the short ribs to be braised in a either a large baking dish or roasting pan covered tightly with aluminum foil)

Ingredients:

4 beef short ribs (about 2 pounds)

1 bottle of full-bodied red wine like a Côtes du Rhône, minus one glass (because I drank that)

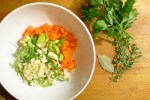
2 medium carrots, peeled and cut into 1-inch pieces

1 large leek, white and tender green parts only, roughly chopped

5 garlic cloves, minced
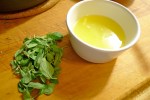
4 sprigs of parsley

2 sprigs of thyme

1 bay leaf

Salt and freshly ground black pepper

1/2 cup of all-purpose flour for dredging

2 tablespoons of vegetable oil

3 cups of veal stock (or one 1.5 ounce package of demi-glace + 3 cups of water)

2 tablespoons of grainy Dijon mustard

1 bunch of baby carrots, peeled

1 small turnip, peeled and cut into 1 1/2-inch pieces

2 medium parsnips, peeled and cut into 1 1/2-inch pieces

1 cup of chicken stock

2 tablespoons of butter

How to prepare:

1. In a large saucepan or Dutch oven, bring the wine to boil over medium-high heat. Remove the wine from the heat and add the vegetables, the parsley, the thyme and the bay leaf. Cover the saucepan and let the marinade cool completely.

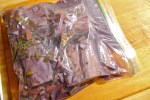
2. When the marinade has cooled, season the short ribs with salt and pepper and arrange them in a single layer in a large Zip-loc bag. You may want to double up the Zip-loc bags, just in case they leak. Pour the marinade over the ribs. Squeeze any air out of the bags and seal them. Let the ribs marinate in the refrigerator overnight, turning the bag over every once in a while to make sure that the ribs marinate evenly.

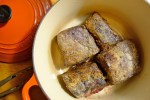
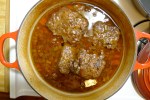
3. Preheat the oven to 300°. Remove the short ribs from the marinade. Strain the marinade, and reserve the liquid and the vegetables in separate bowls. In a large skillet, heat two tablespoons of vegetable oil until almost smoking. Dredge the ribs in flour, knocking off any excess, and add them to the skillet. Brown them over medium-high heat on all sides, about 4 minutes per side. Arrange them in a single layer in the bottom of a large Dutch oven.

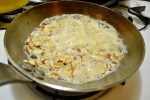
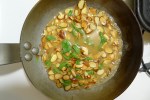
4. Spoon off all but 1 tablespoon of fat. Add the strained vegetables and cook them until they begin to brown. Add them to the short ribs. Tip the reserved liquid to the skillet and bring it to a boil. Pour the hot liquid, along with the stock, over the ribs and the vegetables. Cover the pot with its lid and bake the ribs for about 3 hours. The meat should be very tender and almost falling off the bone.

If proceeding to step 5a, leave the oven on. Turn the oven off if proceeding to step 5b.

5a. Transfer the meat to a large bowl. Skim off as much fat as you can from the surface of the cooking juices. Bring the liquid to boil over medium-high heat until it has reduced to about two cups of sauce. Whisk in two tablespoons of grainy mustard. Adjust the seasoning. Return the meat to the pot, cover, and bake for another 30 minutes.

5b. Braised short ribs are notorious having a deep layer of rendered fat floating on top of the braising liquid. If you can delay gratification for one day, let the ribs cool in their braising liquid overnight in the refrigerator. Remove and discard the layer of solidified fat from the top before preparing the ribs to be reheated. The beauty of this is that it easily allows you to get rid of all that fat. Secondly, as with all stews and braises, flavors meld together and become richer the longer the stew or the braise has to sit.

So by waiting, not only will your braise not be swimming in grease, but it will have more depth of flavor. Good things come to those who wait!

After removing the top layer of solidified fat, let the short ribs return to almost room temperature before preheating your oven to 300°. Scoop out the short ribs and transfer them to a large bowl as you finish the sauce. Set the Dutch oven with the braising liquid over medium-high heat. Reduce the liquid until you have about 2 cups of sauce. Whisk in two tablespoons of coarse mustard. Adjust the seasoning. Add the short ribs back to the sauce, cover the Dutch oven with its lid, and bake everything in the oven for about 30 minutes.

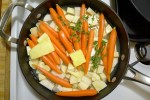
6. In the meanwhile, prepare your root vegetables. In a large deep-sided skillet, arrange the parsnips, the baby carrots and the turnips in an even layer. Add the chicken stock and the butter to the vegetables. Season with salt and pepper, and bring the liquid up to a lively simmer. Reduce the temperature to low and cover the skillet. Cook the vegetables until they are tender, about 15 minutes. Remove them from the braising liquid with a slotted spoon.

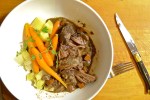
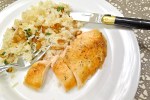
Let the short ribs cool slightly before serving them with the braised vegetables.

Simple Roast Chicken and Yotam Ottolenghi’s Parmesan Rice with Buttered Almonds and Fresh Oregano


The past few weeks have been insane schedule-wise. First of all, I had a slew of administrative concerns that needed to be sorted out. Never fun. Secondly, I had to take a Foreign Language Proficiency Exam. In Spanish.

I don’t speak Spanish.

So why did I have to take it? Well, long story short, for my degree, I basically needed to show that I can do research in a language other than my native one if necessary. Since I am in a French department, French doesn’t count even though it is not my native language. English doesn’t count either because it actually is my native language.

Yes, I agree; it didn’t make a whole lot of sense to me either that I had to pick something else.

What is really embarrassing is that I have actually known about this requirement for years. Why did I put it off for so long? Well, it kept getting superseded by more pressing things like students who needed final grades, or coursework that needed to be completed. Silly things like that!

I think that I also had these pleasant daydreams of jetting off to Buenos Aires to learn Spanish while sucking down copious amounts of Malbec. Or learning Spanish in Madrid with a dictionary in one hand and a tapas in the other. Or going to Lima and eating chifa until I exploded. You get the idea.

In any case, it just got to the point where I couldn’t avoid it anymore.

And that is how I found myself in a situation where I had to teach myself advanced-level Spanish in three weeks!

To those who say that Spanish is “easier,” I say that you don’t know what you’re talking about.

I have spent many, many, many years teaching French to undergrads. That is a lot of experience breaking language down into manageable chunks and patterns. Believe me when I say that, comparatively, Spanish has a lot more verb forms than French does. It also has more than one verb for “to be,” a crazy, confusing thing called the “a personal,” and imperfect past, past perfect and future subjunctive tenses that actually get used.

I would guess that people say that Spanish is easier for two primary reasons: Americans tend to have more exposure to Spanish than any other foreign language, and Spanish-speakers, in general, seem to be much more tolerant of badly-spoken Spanish than French or Italian speakers are of badly-spoken French or Italian.

Needless to say, I was so stressed out I wasn’t eating very well. However, at a certain point last week, I just couldn’t take it anymore. My body would not accept any more slices of pizza,  any more handfuls of almonds, or any more weird juice drinks in an effort to have my fruit and vegetables in a speedy, non-chewable way.

I just had to cook something. It had to be warm and comforting. It had to be interesting too, but in as fuss-free a way as possible.

A roast chicken fit the bill beautifully. Trussed tight, massaged with butter, and showered with salt and pepper is all the effort needed to turn out a beautifully golden bird.

But woman cannot live by poultry alone!

So I paired it with this fantastic Parmesan rice recipe that I adapted from Yotam Ottolenghi — which was equally as easy to make, as well as being elegant to look at and eat. Is the dish Middle Eastern-inspired? Persian? Moorish? Italian? Turkish? Who the heck knows, but it was delicious.

As for the exam, I hope that I passed! I find out in 4-6 weeks. Fingers crossed that I don’t have to take the gosh darned thing again!

Ingredients:

5 tablespoons of butter (divided into 2 tablespoons, and 3 tablespoons)

1 1/2 cups of basmati rice

3 cups of water

Salt and white pepper

1 cup of freshly grated Parmesan

1/2 cup of raw slivered almonds

The juice of 2 lemons

1 tablespoon of fresh oregano leaves

Sumac (optional)

How to prepare:

1. Melt 2 tablespoons of butter in a medium-sized saucepan over medium heat. Toss the rice in the melted butter until the individual grains become translucent. Add 3 cups of water and a good pinch of salt. Raise the heat to medium-high, and bring the rice to a boil uncovered. Cover the pan, and lower the heat about as low as it can go. Cook the rice until all the liquid has been absorbed and the rice is tender.

2. When the rice is done, fluff it with a fork. Evenly sprinkle the rice with the cheese and stir everything together. The Parmesan should be evenly distributed throughout the rice. Adjust the seasoning with salt and white pepper. Cover the rice again while you prepare the almonds.

3. In a small frying pan, melt the remaining 3 tablespoons of butter over medium to medium-low heat. Once the butter has melted, add the almonds. Turn the almonds in the foamy butter until they begin to brown and turn golden. Remove the pan from the heat. VERY CAREFULLY add the lemon juice by pouring it over the back of a wooden spoon into the almonds. Stir in the oregano leaves. Adjust the seasoning.

4. Mound the Parmesan rice in a large dish. Spoon out the almonds and pour the sauce evenly over the rice. Sprinkle with sumac and serve with roast chicken.

For the Roast Chicken:

This is not a recipe per se, but more like a set of guidelines that I have used over the years for cooking perfect poultry.

1. Buy the best bird you can find. Organic, all-natural, free-range, no hormones or antibiotics, humanely-raised and processed if you can.

2. Take your chicken out of the fridge about 30 minutes to an hour before you want to cook. Your bird should be on the cool to touch (like the cooler side of room temperature), but not refrigerator cold.

3. Dry your bird throughly with paper towels, inside and out. Let it sit on the countertop uncovered. The dryer the skin, the crispier the chicken.

4. Pre-heat your oven to 425-450°. Give yourself some time for the oven to come up to temperature. This generally takes 15-20 minutes, but can take up to 30 minutes depending on your oven.

5. No stuffing. This is the secret to perfect chicken. I find that by the time the stuffing is done cooking, you have overcooked your lovely bird. I like just a few things in my chicken: one lemon (cut into wedges if your chicken is small), one onion, a few cloves of garlic and fresh thyme. If it’s Meyer lemon season, please do use one of those.

6. Use the best butter or olive oil. In Nigella Lawson’s cookbook, How to be a Domestic Goddess, she writes that when roasting chickens, you should anoint your chicken with the highest quality butter or olive oil the same way you might apply very expensive hand cream. I always liked that image.

7. Truss your bird tight. Like a compact little football. I really do think it helps your bird cook more evenly. Moreover, chicken just looks better without its legs all akimbo.

8. Season liberally. In his Bouchon cookbook, Thomas Keller writes that he never butters his bird because the moisture in the butter creates steam that will ruin the integrity of the skin’s crispiness.

I’ve never found that to be the case.

I did once try Keller’s approach sans butter and found the skin to still be tasty, but less glossy and appealing overall. I do like his salting technique though: “I like to rain the salt over the bird so that it has a nice uniform coating that will result in a crisp, salty, flavorful skin (about 1 tablespoon). When it’s cooked, you should still be able to make out the salt baked onto the crisp skin. Season to taste with pepper.”

So by all means, hold your hand high and shower that bird with seasoning!

9. 20-20-20-15 or 15-15-15-15. I don’t always follow this but when I do, I like the results. Inspired by Patricia Wells’s Roast Lemon Chicken recipe in her Paris Cookbook, I start the bird in a super hot oven on one side. After twenty minutes (or 15 if the chicken is small), I turn it on the other side for another twenty. After that, I drop the oven temperature to 375°. I turn the chicken breast-side up for yet another twenty minutes — a total of 1 hour.  I continue roasting it until the chicken’s internal temperature reaches 165°. When the chicken is done, the juices should run clear when you pierce the thickest point of the thigh with a paring knife or skewer.

Sometimes, I will just put the chicken in breast-side up at 425-450° for about half and hour to 40 minutes before dropping the temperature to 375° for the remainder of the time. I know it sounds weird, but I think you can start to smell when you should turn down the heat. I find the results to be almost as good.

10. Remove from oven and let rest for 10-30 minutes before carving. Such an important step and essential for serving a juicy bird. Plus, you don’t risk burning your fingers!

Tips:

No basting.

A top-knotch carving knife is always an asset in the kitchen.

Keep the carcass and the juices! They are worth their weight in gold.

High Point Farms Buyers Choice CSA! Sign Up Now!


As many of you know, one of the major inspirations for this blog was High Point Farm’s Meat CSA — my very first CSA ever.

CSA stands for Community Supported Agriculture. The basic CSA model is that you become a member of the farm, pay for a certain amount of food up front and come to pick up your “shares” at designated times throughout the season. CSA’s have all kinds of benefits. First of all, you support local agriculture, sustainable and environmentally- sound farming practices, and small farms. Second of all, you are able to form a relationship directly with your farmer. You learn about how your food is raised, how it is harvested, how your food gets to your table.

Most importantly, you get the best quality food for your money.

The meat is from our CSA absolutely amazing. All the beef is grass-finished, which means that the cows are fattened by grass — hay and baleage in the winter — not grain. The flavor is deep, rich and incredible.

I actually can’t have steak in restaurants now because it just doesn’t taste like meat!

I had always wanted to do a CSA. However, the only kind of CSA that I ever knew of before hearing about High Point Farms was either a vegetable or a fruit CSA. As someone who hates to waste food, I feared having to throw out more food than I could prepare or eat at any given moment — which is precisely what made a meat CSA so appealing.

Our farmer gives us our meat frozen. It is vacuum-packed in super thick plastic so that it keeps in the freezer really well. For anyone who claims that fresh meat is superior to frozen, I would say that this is really spoken from a place of ignorance as so much of the “fresh” meat sold in markets (even high-end butcher chops) was frozen — it just got defrosted by the shop or the butcher instead of by you!

You can go on the farm’s facebook page and see what a happy and wonderful life the animals have. If you are going to eat meat, wouldn’t you want the animals to be raised with love and care, and humanely slaughtered with deep respect and appreciation? To the argument that eating animals is “unhealthy,” I have to say that what is really unhealthy is eating pesticide-covered vegetables imported from Chile or some other South American country with horribly lax labor and safety practices — not to mention the carbon-footprint!

Some other vegetable CSA’s in the City offer meat through partnerships with other farms. However, I have to say that though I found High Point Farms almost by accident two years ago, getting involved with them has been one of the best and most rewarding things that I have ever done in New York City.

As I live close to the pick-up site in Manhattan, I am able to help the farm out on the distribution end by helping to coordinate the CSA’s bi-monthly pick-ups. Thanks to Tina and Bob MacCheyne, the farmer-owners of High Point Farms, I have learned so much. Not only have I discovered new cuts of meat and how to cook them, I have learned so much about being a better eater, consumer, and food advocate.

High Point Farms will be starting its next CSA season next week. There are still membership spaces available. The farm will be moving to a new model for this time around called a Buyers Choice.

This is how it works: there are different share options, beginning with a Trial Membership at $225 and going up to a Gourmet Share for $1000. That money goes directly to the farm, and is also your credit at the farm store for the season. Every two weeks, you go to the online store and load up your shopping cart with what you want: steaks, osso buco, oxtails, ground beef, roasts, chickens, eggs, cheese, pork chops, sausages, bacon. You can order as much or as little as you want. You can even skip that pick-up and wait for the next one. If you run out of credit, you can add more to your account. You come, you pick up your meat, you go home and cook it. And then you shiver with delight because it tastes soooo good.

And look, you just supported local agriculture and not evil giant agro-business.

The Deets:

• Our CSA season will run from March to December. You do not have to pick up something every pick-up., only on the days when you have ordered meat for pick-up.

In New York City, we have three pick-up locations this season:

East Village: Jimmy’s 43 (on East 7th Street, between 2nd and 3rd Avenues)
Williamsburg: Crossfit Virtuosity (221 North 8th St, between Driggs and Roebling)
Brooklyn Heights: Sweet Pea CSA (you must be a member of Sweet Pea Vegetable CSA to join this group)

• For the season’s delivery dates, click here.

• Membership Share Prices:

Trial Share: $225.00 (buys $225.00 of Farm Store Credit)

Single Share: $350.00 (buys $350.00 of Farm Store Credit)

Medium Share: $500.00 (buys $515.00 of Farm Store Credit + priority on limited items)

Large Share: $700 (buys $735.00 of Farm Store Credit + priority on limited items)

Gourmet Share: $1000.00 (b $1050.00 of Farm Store Credit + first priority on limited items)

There is a $25.00 Membership fee at sign up. ne time charge per CSA Season to offset the farm’s administrative and shipping costs.

For more information and to sign up, click here!

PS. See all that nice food pictured at the top of this blog post? You too can make all that awesomeness with High Point Farm’s meat!

Crustless Mini-Quiches


I love quiche because I love the four basic components of classic quiche: pork, cheese, custard, and butter crust.

Quiche is one of those things that can be easily pulled together, but it can also be amazingly time-consuming and complicated. The last time that I made quiche, I decided on Thomas Keller’s Quiche Lorraine from the Bouchon Cookbook (a modified version of which appeared in Food and Wine).

The Bouchon quiche may rank up there as one of the most challenging things that I have ever cooked. First of all, at a super deep 2-inches, getting the center to set perfectly is not easy. Secondly, Keller’s recipe instructs you to aerate the egg mixture to the consistency of a sloshy, frothy broth before pouring it into your delicate parbaked crust in 2 stages. And you must do this without the quiche leaking at all.

Tricky. Very tricky.

And I have to admit that I wasn’t entirely successful.

What I am successful at is the standard quiche, perfected over years and years of repetition. Even though I can whip up a butter crust with my eyes shut, it always seems like a big affair because equipment always needs to be pulled out of tight spaces, and countertops need to be cleared to roll out the crust.

And let’s not even talk about the clean-up!

So what to do when you want to get your French on, but find yourself pressed for time, space and energy à l’américaine?

You make a crustless quiche, Silly 😉

Now before you scoff at a crustless quiche, let me just say that I love butter crust. As I might love butter crust even more than the average bear, I thought that I would really miss it in crustless quiches. However, I still thought these were wonderful.

Think of them less as quiches, and more like ham-custard poppers! Or quiche shooters!

The idea to use bread crumbs as a quick and easy base on which to build a crustless quiche comes from Gourmet Magazine. I changed the ratio of eggs to cream to milk so that the quiches would hold together a little better when you remove them from the muffin pan (the original recipe makes just one big quiche).

I used ham and Gruyère, but you can very easily use anything you like: cheddar, broccoli, mushrooms, feta, bacon. The possibilities are endless.

Special Equipment:

A 12-cup muffin pan, preferably non-stick (thanks, Laura! You’re never getting your pan back! Bwahahahaha!)

Ingredients:

1 cup of Panko breadcrumbs (or any other kind of plain breadcrumbs)

1 cup of ham, diced (you could also use a cup of chopped, cooked bacon)

1 cup of Gruyère, shredded

2/3 of a cup of whole milk

2/3 of a cup of heavy cream

4 large eggs

1/4 teaspoon of freshly grated nutmeg

Salt and white pepper

How to prepare:

1. Preheat the oven to 425°.

2. If you don’t have a non-stick muffin pan, be sure to butter each individual cup well. Cover the bottom of each muffin cup with a layer of bread crumbs.

3. Evenly divide the shredded cheese among all the muffin cups.

4. Do the same with the ham or bacon.

5. In a large bowl, whisk together the milk, the cream, the eggs, the nutmeg, and salt and white pepper to taste. Carefully pour the mixture into each muffin cup (this is easier with a spouted bowl or measuring cup). Leave about a 1/4-inch between the top of the egg mixture and the rim of each cup.

6. Bake the quiches until they are set and the tops are golden, about 20 minutes. They will be puffy like a soufflé when you remove them from the oven. Let them settle and cool slightly before removing them from the pan and serving with a nice green salad.

Brisket King of NYC Cook-Off Tomorrow Night at Santos House


As a follow-up event to last fall’s Meat Week NYC, Jimmy Carbone of Jimmy’s No. 43 will be hosting NYC’s second annual Brisket Cook-Off tomorrow night at Santos Party House in Little Italy/Upper Chinatown.

Formerly named A Brisket A Brasket, this year’s event will feature over 10 chefs vying to be crowned the Brisket King of NYC.

High Point Farms (whose wonderful meat is all over this blog) will be paired up with Chef Jessica Wilson from Jimmy’s 43! I’ll be there taking pictures and cheering on High Point’s meat — which has been training super hard in a vat of marinade for the past few days.

So, ahem, be prepared to be there when the event gets renamed The Brisket QUEEN of NYC!

Tickets are still available for the event. For $55 you get to sample all the competitors’ briskets, in addition to UNLIMITED BOOZE in the form of Pickle Backs (shot of booze + shot of pickle juice) and Bull Shots (shot of booze + shot of BRISKET JUICE).

For tickets, click here.

See you all at Santos!

* Update: Unfortunately, we didn’t win. We ran out of brisket in about an hour! Ticket-holders who got there right at the start of the event came back for seconds and thirds. They gobbled everything up before everyone had the chance to vote, all 500 PORTIONS!

Which means we are AWESOME! Kudos to Chef Jessica for pairing brisket with a punchy roasted grape chimichurri. It was a great counterpoint to the rich, beer-brased beef, and brought freshness and a bright acidity to the palate!

For the a list of the winners, click here.

Cuban-Style Minute Steaks with Black Beans and Rice


“Hey, T! What do you do with your minute steak?”

“I don’t know,” Tomoko texted back, “It’s hard because of how it’s sliced. What do you do with it?”

“Steak sandwiches usually, but I was kind of looking for something different this time …”

Indeed.

The minute steak that we get in our CSA has always presented a bit of a challenge for me. Minute steak, as I have learned, is not cube steak. Well, not always. It’s pretty confusing, actually, when you start searching for minute steak cooking ideas.

Most sources that I have seen say that minute steak and cube steak are basically the same thing. However, there seem to exist regional distinctions: in some parts of the country minute steak and cube steak refer to the same cut, whereas in other parts of the country, they are quite different from one another.

From what I can gather, cube steak is a cut of top round or top sirloin that has been run through an electric cube steak machine. The “cubing” refers to the kind of cross-hatched pattern that appears on the surface after the meat has been tenderized. It literally looks like it is made up of little cubes. Minute steak, on the other hand, is very thin slices of steak that are stacked, formed and shaped into a steak shape. Minute steaks, like cube steaks, cook very quickly — hence the name and the confusion.

One of the best things about having a meat CSA is learning how to cook different cuts that I would have never tried on my own. Minute steak is one of these. You could probably just throw it in a pan and be done with it, but I have found that figuring out the right cooking method with the right cut of meat can turn a perfectly good meal into something downright spectacular.

Bistec de palomilla with Cuban black beans and white rice is one of those meals that is so simple that hardly anyone bothers, as Tomoko would say, to write it down. People do write it down, of course. On the web, you can easily find many recipes for it, including this one from the New York Times that I used as the base for the one below.

In all honesty, I could have chosen any recipe for bistec de palomilla since they are all almost identical. Sure, I was tempted to put my own wacky spin on it, but sometimes good things are so good that you just have to leave them alone.

The essentials are that you marinate thin cuts of beef in garlic and lime juice (it doesn’t necessarily have to be minute steak or cube steaks, just thin steaks), you cook rice with lime juice and garlic, you cook the beans with lime juice, garlic and onions, and finally you sear the beef and top it with sautéed onions.

But just because it is simple doesn’t mean it that doesn’t taste divine.

So if you like lots of limes and lots of garlic, this recipe is for you!

* If you love limes and garlic but not the meat so much, the black beans and rice are easy to make and absolutely fabulous on their own. I used canned beans here because that is what I had in the pantry, but if you prefer dried beans (and who doesn’t), by all means soak ’em and cook ’em!

Ingredients:

For the steak:

1 to 1 1/2 pounds of minute steak (or any other kind of thinly-sliced steak)

The juice of 3 limes

4 cloves of garlic, finely minced

Salt and pepper

1 medium onion, sliced

2 tablespoons of olive oil

For the rice:

2 cups of white rice

3 cups of water or chicken stock

The juice of 1 lime

2 cloves of garlic, finely minced

1 tablespoon of olive oil

Salt

For the beans:

1 small onion, chopped

3-4 cloves of garlic, finely minced

Olive oil

2 cans of black beans

The juice of 1 lime

Salt

Fresh cilantro

How to prepare:

1. Lightly sprinkle the steaks with salt and pepper (because the limes are so punchy, you can reduce the salt without sacrificing flavor). In a large zip-loc bag, combine the lime juice, the garlic and the meat. Toss everything together in the bag until the steaks are evenly coated with the garlic and the lime juice. Let the steaks marinate for about 45 minutes, but do not marinate them for more than an hour.

2. While the steaks are marinating, make the rice and the beans. In a medium-sized saucepan, bring the rice (you don’t need to rinse it), the 3 cups of water or chicken stock, the lime juice, the garlic and the olive oil to a boil over medium-high heat. Turn the heat down to low. Simmer the rice until it is tender and all the water has been absorbed — about 15-20 minutes. Remove the rice from the heat and fluff it with a fork. Cover it while you prepare the rest of the meal.

3. In another medium-sized saucepan, heat some olive oil over medium-high heat until it begins to shimmer. Sauté the chopped onion in the olive oil until it begins to turn translucent — about 5 to 6 minutes. If the onions seem to be cooking too quickly, lower the heat to medium. Add the finely minced garlic. Continue to sauté everything together for about another minute or so. Add the beans (you don’t need to drain them) and the lime juice. Stir everything together and simmer the beans over medium/medium-low heat until the cooking liquid has thickened. The beans should be tender at this point. Adjust the seasoning.

4. Heat 2 tablespoons of olive oil in a large cast-iron skillet set over medium-high heat. When the oil begins to shimmer, add the sliced onion. Sauté the onion until it just begins to turn translucent and take on a little bit of color. Remove the onions to a separate bowl or plate. Lift the steaks out of the marinade and add them to the skillet. Cook them for about 2 minutes per side (they will cook even more quickly if the steaks are really thin). Remove the steaks to a large plate or platter. Add the sautéed sliced onions back to the pan to let them soak up all those nice, meaty, lime-scented juices. Heap the onions on top of the steaks. Top everything with sprigs of fresh cilantro.

Serve the steaks with heaping scoop of white rice and another of black beans.

The Real Manhattan Diet


When I opened up the New York Times the other day, my eyes drifted down the page and stopped cold on a feature about a trio of diet books coming out on the market.

Generally when I see the word “diet,” I wrinkle my nose and turn the other direction. But there was something about this particular book that caught my attention. The word attached to “diet” was “Manhattan,” and the title instantly drew up comparisons to some other books that have played up cultural stereotypes to sell books like French Women Don’t Get Fat and Japanese Women Don’t Get Old or Fat.

Eileen Daspin’s book will be coming right on the heels of another book currently making waves called Bringing Up Bébé, which is ostensibly about how French parents raise perfect little angels who eat stinky cheese from birth, whereas Americans raise picky, raucous monsters who end up on reality television shows with British nannies.

Just like how not all American children will suck and spit out your will to live, the fact is that Manhattan women are no fatter or thinner than people outside of Manhattan. Whenever I go home to visit my parents in Fort Wayne, Indiana, people look just fine. There is not an excessive amount of small sizes on the sale racks, and neither my parents nor their neighbors look like rhinoceroses. Furthermore, does the book’s title mean to imply that Brooklynites are fatter? or that people from Queens, the Bronx and Staten Island might as well be reclassified as heifers undeserving of their own diets?

As the book has yet to be released, this post is not meant to be a book review; these are simply my thoughts on what I see to be a disturbing and pervasive trend in marketing books to women. In the New York Time’s blurb, they mention that the Daspin was inspired to write the book after reading another article published in the Times about how Manhattan women are the skinniest out of all the city’s boroughs.

Maybe it’s the skeptical Academic in me, but despite saying that this data report comes from the Federal Government (which has such a good reputation for reliability . . . not!), I just don’t buy it. I really want to meet the actual people who collected this data because I highly suspect two things:

1. They collected BMI’s from people who don’t actually live in New York.

Manhattan is notoriously the stomping ground of models, entertainers and industry types who all skew towards the skeletal because that is their job. Many of these people are either foreigners or recent transplants who want to make it as actresses, models, singers, dancers or something else like that.

No one comes to New York City to do amazing numbers in medical equipment sales.

There are also a lot of ridiculously wealthy people who live here and weigh nothing. Not to bring up the culture wars or anything, but these people really do live on another planet despite the shared zip code.

Regardless where these glamourous folk come from, they are all just transients who order our food and don’t eat it. To the argument that owned real estate confers “here-ness,” I say just that because your name is on the door, doesn’t mean that you can call yourself a New Yorker, let alone a Manhattanite.

I don’t want to have to resort to a How I Met Your Mother reference, but the show did lay down some very basic (and very funny) criteria for being a New Yorker. I scoffed at each and every one of these “You’re not a real New Yorker until you have . . .” statements until I realized that I had done almost all of them.

According to the show, to be a real New Yorker, you must have:

• Seen Woody Allen.

Now, I have never actually seen Woody Allen, but I know where he is: he plays the clarinet every single freakin’ Monday night at the Carlyle Hotel. So if I wanted to see him I could, so long as I was willing to throw down for his jazz band’s exorbitant cover charge.

Quite frankly, I’d rather just watch one of his older movies.

• Stolen a cab from someone who needs it more than you.

To Pregnant-Lady-With-Crying-Child-And-Dirty-Small-Dog-in-the-Rain, I am really, really sorry. Your angry finger haunts me to this day, but I wasn’t late for my dentist appointment.

• Cried on the subway and not given a damn what anyone thinks.

I have regularly cried on the subway without a damn about what anyone thinks. In fact, not only have I cried on the subway, I have cried IN A SUBWAY WITHOUT BUYING A SANDWICH.

Yup.

And I am not ashamed.

• Killed a cockroach with your bare hands.

Yes. Absolutely! It is just an automatic reflex.

Because those suckers are fast.

I have even scooped a fist-sized roach OFF OF A RESTAURANT WALL WITH MY DINNER NAPKIN, GOT UP AND HANDED THE ROACH-FILLED NAPKIN TO THE RESTAURANT’S GM WITHOUT ANY RISE IN BLOOD-PRESSURE, and returned to finish my mussels and beer in front of my horrified friend like nothing happened.

Do I think any skeletal models, industry types, or socialites have done any of these things?

Well, they have probably met Woody Allen.

2. The government’s data collectors have averaged these un-average figures with the rest of us who actually live here.

If you include unreal figures from unreal people with that from normal folk, it’s going to look like the whole island is filled with Amazons and Vikings.

But Manhattanites — just like the French, the Japanese, or any other demographic whose geographic location evokes exotic images of whippet-thin women who are way more chic and together than you will ever be — are really just like everyone else.

There are fat French people. There are fat Japanese people. There are fat and old Japanese people. There are French parents who raise terribly behaved children just like there are Chinese people who are bad at math and Ethiopians who are shitty runners.

People in Manhattan lose weight and maintain their weight just like everyone else on the planet: they exercise more and they eat less.

It is not a secret, but what I find strange is that every single pre-review that I have read of Daspin’s book names the following formula as being the key to Manhattan-like sylphitude:

• Walk a lot.
• Cook at home.
• Eat small portions.

Well, duh.

I don’t know why any publisher would give a book deal to someone claiming that this diet was privileged information until the author decided to investigate and reveal it for the good of the masses.

Also, anyone who actually lives in Manhattan knows that this “secret” is a load of bull honky because most people who live in Manhattan do not cook. At all. Or hardly ever.

Out of my friends, the overwhelming majority like (some even love) cooking, but don’t get to do it very often due to time and space constraints. Most New Yorkers eat out, if not for most meals then at least for many. Eating out might consist of a slice of pizza or a cheap falafel, but it’s still not cooking at home.

Unfortunately, I can only count myself and two or three other friends who cook at home on a regular basis. Evidence for this can be found by observing people in the check-out lines at any Whole Foods in the city: there are either a lot of prepared foods in baskets or — especially if they are girls — a couple of protein juice drinks and a lone container of blackberries or blueberries.

Those who have a lot of groceries? Look closely: their carts are usually filled with four or five vials of spices, some endive, some fennel, and a big cut of meat. This means that they are cooking from a recipe, and that they probably haven’t cooked anything in a long time (hence all the spices).

Because people who cook regularly tend to buy pantry staples like flour, sugar, crushed tomatoes, Parmesan, butter and dried beans. We see each other in line and we nod. We recognize our own kind. 

So with that lengthy preamble, I give you the my REAL Manhattan diet (and I say mine because I cannot speak for all New Yorkers):

Breakfast:

Coffee. Extra black, extra strong.

Milk is for pussies.

I slurp my coffee as carefully as possible while running to the train because I generally wake up late.

I dream of eating breakfast, but sadly only really get to eat it when I am on vacation and there is a complimentary breakfast buffet at the hotel. Sometimes I will choose sleep over the breakfast buffet.

Lunch:

I curse when

. . . I see that once again some jerk has removed all the pieces of raw fish from the sushi bar at the Korean deli, leaving only fishy-smelling logs of sushi rice behind.

. . . when I have to chuck half of the salad that I have brought back to the library into the trash because half of the leaves are disintegrating with rot.

. . . I chew on the crappy scone that I bought with my extra strong, extra black coffee, muttering that this must be the worst baked good to have ever crawled out of Elizabeth, New Jersey.

. . . I chew on the weird fair-trade spelt bread that my friend has offered as a replacement. Bought from the newest artisanal bakery in town, it has matcha and spirulina, and tastes like sourdough pond scum.

. . . I lament the lack of decent lunch options that are under $12 in a city where you can get everything else that you could possibly want at 4 o’clock in the morning.

Calories consumed by swearing? About 30.

Dinner:

On fancy nights out, I can become that obnoxious guest who complains about the cloudy ice in my cocktail. I know. It is flat-out ridiculous, but the air tastes bad.

I am also that crazy person who will order the foie gras in a Mason jar topped with Sauternes gelée, the pork rinds and vinegar, the local Brussels sprouts in brown butter with Pecorino, the pork belly three ways, and the lamb burger with sweet potato fries. I will wave away any bread basket until I see that it comes with a tub of whipped lardo because, come on, it’s whipped lard!

Or

Sometimes when I am too tired to cook, I scan of all the take-out menus that I have collected with the following thought in mind, “What is cheap, filling, not totally unhealthy, and still meets the $10 delivery minimum?”

Or

I eat my leftovers. With fried eggs on top.

This is usually what I do. I make a whole lot of something amazing, and then I eat it every single day until it’s gone.

Have I lost weight? No. I am sadly not the bobble-headed stick I was in college.

But I’m not huge and neither are most people I know both in and outside of New York.

I do walk a lot though 😉

The Daring Kitchen February Cooks’ Challenge: Patties


Last month, when I opened up the Daring Kitchen‘s Chefs’ Challenge for February, I remember thinking, “Oh. Patties.”

As you can surmise, my initial enthusiasm was less than palpable.

It was a long PDF too, delving somewhat into the history of the patty:

“Irish chef Patrick ‘Patty’ Seedhouse is said to have come up with the original concept and term as we know it today with his first production of burgers utilizing steamed meat pattys – the pattys were ‘packed and patted down,’ and called pattys for short, in order to shape a flattened disc that would enflame with juices once steamed.”

And offering a somewhat of a basic definition:

“Technically patties are flattened discs of ingredients held together by (added) binders (usually eggs, flour or breadcrumbs) usually coated in breadcrumbs (or flour) then fried (and sometime baked).”

I would hesitate to say that anyone “invented” the patty. Flattened discs of pan-fried food seem to be commonly found everywhere, and I imagine that the technique goes as far back to when humans started smushing things together to eat. Maybe it didn’t get codified until much later, but I’m not sure that really matters much as this is the case for a lot of foods.

What kept my attention was that the hosts of this month’s challenge, Lisa and Audax, went into great detail about the technical aspects of patties, providing a kind of matrix for making them:

Main ingredient(s): some kind of ground protein (meat, poultry, seafood, beans or nuts) and/or vegetables.

Binders: eggs, flour, breadcrumbs (fresh or packaged), bran, tofu, mashed potatoes or any kind of mashed vegetable or legume.

Moisteners: water, milk, sour cream, mayonnaise, sauces, mustard, chopped spinach, shredded carrots or zucchini, shredded apples, anything that would add extra moisture if needed.

Technique: shallow pan-frying or baking.

Frying fat: butter, rice bran oil, canola, olive oil, ghee, or any other kind of oil with a relatively high smoking point.

Can you believe that I am such a food nerd that it was actually the 3.5 single-spaced pages of technical patty construction talk that sold me on the idea?

And as tempting (and easy) it would have been to have come up with a recipe on my own — ideas that I had? shrimp, chili pepper, and cilantro patties with some kind of scotch bonnet relish, or something Cantonese-ish like shrimp, corn, and egg whites — the fact is that I have been so overwhelmed with work and school lately that I haven’t had much time to devote to fun things like cooking challenges.

So, dear Readers, please do forgive my inability to milk any extra creative juice out of my brain right now!

These wonderful little quinoa patties are from Heidi Swanson‘s Super Natural Everyday cookbook. They are great for lunch or a light supper. I only made half of the recipe because I just had a cup and a half of leftover quinoa, but you should certainly make the full recipe by doubling the amounts that I list below. The patties keep exceptionally well, and reheat easily in the oven.

One thing I learned from the challenge? My strong suspicion that my stove sits on uneven flooring is once and for all confirmed: all the oil slid to one side of the cast-iron pan while cooking, resulting in patties that were darker on one side than the other.

As soon as I get the time, I’m going to get in there and stick some little wooden wedges under the stove to even it out.

Thank you again Lis and Audax for the technical exercise and great challenge.

And isn’t Audax just the best name ever?

Mandatory blog-checking lines: 

The Daring Cooks’ February 2012 challenge was hosted by Audax & Lis and they chose to present Patties for their ease of construction, ingredients and deliciousness! We were given several recipes, and learned the different types of binders and cooking methods to produce our own tasty patties!

Ingredients for Heidi Swanson’s Little Quinoa Patties:

1 1/2 cups of cooked quinoa (you might also use leftover cooked bulgur wheat, millet, rice, or lentils)

2 eggs

Salt

2 tablespoons of chives, chopped

1 small onion, finely chopped

3 tablespoons of freshly grated Parmesan

1 fat garlic clove, very finely chopped

About 1/2 cup of Panko breadcrumbs, plus more if needed

1-2 tablespoons of olive oil or clarified butter

Special equipment:

A 3-inch ring mold

A cast-iron skillet

A lid to fit the skillet

How to prepare:

1. In a large bowl, combine the quinoa and the eggs together with a good pinch of salt. Add the chives, the onion, the Parmesan, and the garlic. Stir in the Panko, and let the mixture sit for a few minutes so that the breadcrumbs can absorb some of the moisture.

2. After a few minutes, you should be able to easily shape the mixture. If it seems a little wet, you can add more Panko to firm up the mixture. Conversely, if you find the mixture too dry, you can add a little water to loosen it up.

Swanson recommends erring on the moist side so that the patties won’t be overly dry — which is what I would recommend as well. As I left the quinoa mixture on the moist side, I found that it was easier to use a ring mold to make the patties instead of using my hands to shape them.

Set a ring mold on a plate and fill it with about three heaping spoonfuls of the quinoa mixture. Spread the mixture out evenly in the mold. Lightly compress each one by pressing on the top of the patty with the bottom of a spoon. Carefully remove the mold. Continue until you have used up all of the quinoa mixture. You should have about 6-7 patties total (or about 12 if you make the full recipe).

3. Heat the olive oil in a large cast-iron skillet over medium-low heat until it begins to shimmer slightly. Using a thin, flexible spatula, carefully transfer the patties to the skillet. You should be able to fit in all six with a little room in-between each one. Cover the skillet and let the patties cook for about 7-10 minutes. The bottoms should be deeply browned, but not burnt. Carefully flip the patties and cook them on the other side for about 7 more minutes. When both side are evenly colored, transfer the patties to a paper towel-lined plate.

Serve warm with a nice green salad.

Cauliflower and Ham Gratin with Sourdough Rye Breadcrumbs


A few days ago at the CSA pick-up, a member came in and said, “It’s snowing! It’s snowing!”

Was it finally winter finally? By the time I got outside, the scant millimeter of snow that we got had melted and the skies were clear. And it was warming up again.

I think that the season has been toying with me, bringing week after week of warm spring-like days alternating with gusty arctic ones. For someone who likes matching my meals to the season, this has all made for some pretty schizophrenic eating. I have found myself wanting to nibble on mâche and radishes, and then wanting to bury myself under cheese and carbs the next day.

As it is currently quite chilly, I feel like I need to hurry up and cook some cold-weather food before the temps climb back up to 60°. This cauliflower gratin fits the bill quite well. It is basically a macaroni and cheese, with the cauliflower filling in for the mac — which makes it feel somewhat healthier!

Ingredients:

1 head of cauliflower, cut into small florets

1 1/2 cups of ham, diced

1 clove of garlic, lightly smashed

1 1/2 cups of aged cheese (I used an aged farmstead cheese from Snow Farm Creamery, but you could use an aged Gruyère, or another good, firm earthy cheese)

1/4 cup of flour

4 tablespoons of butter, plus 1 tablespoon

4 cups of milk

1/4 teaspoon of freshly grated nutmeg

Salt and pepper

1 cup of sourdough rye breadcrumbs (or any other bread you might have one hand: sourdough, rye, brown . . .)

How to prepare:

1. Preheat the over to 350°. Rub a large ceramic or clay baking dish with the smashed clove of garlic.

2. Combine the cauliflower florets with the ham in a large bowl.

3. In a medium-sized sauce pan, melt the 4 tablespoons of butter over medium-low heat. Once the butter has melted, stir in the flour. Cook the flour for about a two or three minutes (you want to get rid of that raw, floury taste). Once the flour has toasted a little, add the milk all at once and whisk everything together. Add the nutmeg. Raise the heat to medium, and continue to whisk the sauce as it thickens. Once the sauce has thickened, turn off the heat and stir in the cheese. Continue stirring until all the cheese has melted. Adjust the seasoning.

4. Pour the sauce over the cauliflower and the ham. Stir everything together until the cauliflower is evenly coated. Tip everything into the baking dish.

5. Melt the remaining tablespoon of butter. Toss the breadcrumbs in the melted butter, and then spread them evenly over the top of the cauliflower.

6. Bake for about 40 minutes, or until the gratin top is browned. The sides should be nice and bubbly too. Let rest for about ten minutes before serving.

Peanut Butter and Milk Chocolate Chip Rice Krispies Treats


Last weekend I went to a Super Bowl party where my friend Dave was in charge of the kitchen. He had put together a menu featuring these great burgers: loosely packed patties covered with carmelized onions and loads of béarnaise sauce. Isn’t that a great idea? As we were chatting in the kitchen, Dave mentioned that this vision of béarnaise + burgers had been incubating in his mind for years before he set out to make it a reality.

Sometimes that happens. Sometimes you hold onto a sprout of an idea for a long time, waiting for the right time to make it happen. Other times, inspiration strikes in speedier ways.

When snack stadiums were popping up all over the Internet, I remember seeing a particularly unholy one in which the stadium was constructed of alternating ham hoagies and Rice Krispies treats. It was kind of disgusting, but it definitely made me think about bringing marshmallowy treats to the Super Bowl party (one should never come empty handed).

I have been nursing a jones for peanut butter for a couple weeks now, as well as a chocolate craving. So, I thought, why not a peanut buttery, chocolatey Rice Krispies treat? Like one of those Reese’s Crispy Crunchy Bars, but with much better chocolate and peanut butter.

I love the combo of salt, fat, and sugar, and you will too if you don’t already. This is going to taste like childhood, so don’t knock the milk chocolate. I used a good one, and so should you.

As you can see, the chocolate was so good that I went a little over-bonks on the drizzle.

Ingredients:

6 cups of plain Rice Krispies

1 1/2 cups of salted whole peanuts

1 1/2 cups of milk chocolate chips + 1 cup (2 1/2 cups of chocolate chips total)

4 tablespoons of unsalted butter

1/2 cup of creamy peanut butter

4 cups of mini marshmallows (about 10 ounces)

How to prepare:

1. Lightly butter a large dish.

2. Combine the Rice Krispies, the peanuts, and 1 1/2 cups of the chocolate chips in a large mixing bowl.

3. Melt together the butter, the peanut butter, and the marshmallows over medium-low heat in a medium-sized saucepan. When the mixture is creamy, pour it into the dry ingredients. Using a large wooden spoon, quickly stir everything together until the dry ingredients are evenly coated with the marshmallow mixture.

4. Tip everything into the buttered dish. Using your hands (moisten them a little with water so that they don’t stick), gently press the mixture into the dish, making an even layer.

5. In a small saucepan over very low heat, melt the remaining cup of chocolate chips. Be sure to stir them constantly so that the chocolate doesn’t separate or burn. When it has melted, remove it from the heat. Using a spatula, scoop a little bit of chocolate out of the pot and flick it quickly across the Rice Krispies treats. Continue to do this until the entire surface is evenly drizzled.

6. Let everything cool. When the chocolate has hardened, use a sharp knife to cut squares of Rice Krispies treats.