Kale Pesto with Whole Wheat Fusilli


What’s a girl to do when faced with too much kale and too little time? Make pesto!

When it comes to something like pesto, it’s hard to say that anyone has proprietary claims to any one recipe. I did look at this recipe on Tastespotting and this recipe on Food 52 for nut-cheese-oil ratios. In all honesty, I have so much kale on hand that I threw those proportions right out of the window. I just kept tinkering and measuring until I had a sauce that was so good, I wanted to eat more and more of it.

Kale has a clean, bitter flavor that I think pairs better with walnuts than pine nuts. When using walnuts, I like to also use walnut oil. Some Meyer lemon zest keeps the sauce nice and fresh. You can also zest a regular lemon if Meyer lemons are not available to you. If you don’t want to emphasize kale’s refreshing bitterness, you can use just olive oil. It will still taste great.

Kale pesto has an earthier flavor than basil-based pestos, and that flavor demands a heartier pasta like whole wheat. Fusilli is always a good choice for pesto because the spirals catch and capture the sauce beautifully.

It’s always a good idea to toss pasta and pesto together in a separate bowl. You don’t want the Parmesan in the sauce to burn and stick to the bottom of a hot pot or pan. The warm pasta — plus a little of the hot pasta cooking water if needed— will loosen the sauce up without the need for any external heat.

I am looking forward to eating my kale pesto in other ways this week, like on pizza or in lasagna. I hope it freezes well too because I made a lot of it!

Ingredients:

1 pound of whole wheat fusilli

2/3 of a cup of walnuts

2 cloves of garlic

2/3 of a cup of freshly grated Parmesan

The zest of 1 lemon

5 cups of washed and torn kale leaves, no stems and no ribs

1/2 cup of olive oil

1/2 cup of walnut oil

Salt

How to prepare:

1. Preheat the oven to 350°.

2. Spread the walnuts out in an even layer on a baking tray. Bake the walnuts until they are nicely toasted. This can take between 6-8 minutes. Be very careful to not let the walnuts burn. Let them cool before making the pesto.

3. While the walnuts are cooling, bring a large pot of salted water to a boil. Cook the pasta until it is al dente, about 12 minutes.

4. While the pasta is cooking, combine the garlic and walnuts together in a food processor with some salt. Add the Parmesan and the lemon zest. Pack all the kale into the food processor bowl and with the processor running, slowly drizzle in the olive and walnut oils. Continue to process everything until you have a smooth and creamy sauce. Adjust the seasoning.

5. When the pasta is cooked, drain it and pour it into a large bowl. Add the pesto, a dollop at a time, until the pasta is nicely and evenly coated. Serve immediately.

Mascarpone-Polenta Cake with Rhubarb and Meyer Lemon


I wish that I was more of a baker. Unfortunately, my baking past is littered with all kinds of baking misfortunes: lumpy cakes, leaden cakes, cracked cakes, dry cakes, lopsided cakes, burned cakes, burned cakes with runny centers, runny cakes with charred tops. The list is unfortunately long!

I think it must be related to the fact that, when it comes to recipes, I am incorrigible: I rarely follow them to the letter. It doesn’t help that I am generally inclined to eyeball amounts instead of dirtying up another measuring cup or spoon. This is fine for regular cooking, but kind of disastrous when it comes to baking.

So when I decided to try to come up with my own recipe for a polenta cake with mascarpone that would make use of the first of this season’s rhubarb, I was pretty nervous.

Thankfully, it came out beautifully. The cake had a wonderfully moist and tangy crumb that beautifully complemented the rhubarb’s tartness. The idea of arranging the fruit (or vegetable? I guess rhubarb actually a vegetable) on the top of the cake batter comes from Nigel Slater’s Blueberry-Pear Cake from his Kitchen Diaries.

One more thing: be sure to remove any leaves from your rhubarb stalks before cooking. Only the stems are edible. The leaves contain oxalic acid that can make you pretty sick. It goes without saying to keep your animals away from rhubarb. More for you, I say. What a delicious way to live dangerously!

Ingredients:

About 2 1/2 cups of rhubarb, washed, trimmed and sliced into 1/2 inch pieces

1 cup of brown sugar, plus an additional 1/4 cup

8 tablespoons of butter (1 stick), softened

1 egg

3/4 cup of mascarpone

The zest and juice of one Meyer lemon

1 cup of all-purpose flour

1 cup of yellow corn meal

3/4 teaspoon of salt

1 teaspoon of baking powder

1/4 teaspoon of baking soda

How to prepare:

1. Line the bottom of a 9-inch springform pan with parchment paper. Butter the sides.

2. In a medium-sized bowl, toss the rhubarb with 1/4 cup of brown sugar. Let the rhubarb sit for about 30 minutes.

3. Preheat the oven to 350°.

4. Sift the dry ingredients (the flour, the corn meal, the salt, the baking powder and the baking soda) together into a large bowl.

5. In another large bowl, cream together the remaining cup of brown sugar and the softened butter. Add the egg, followed by the mascarpone, the lemon zest and the lemon juice. Continue beating the mixture until it is nice and fluffy. Beat in the dry ingredients, a little bit at a time, until they are well-incorporated into the batter.

6. Spread the batter out as evenly as possible onto the bottom of the springform pan. It will be thick. Arrange the rhubarb by pressing each piece into the batter in concentric circles. Bake the cake for about 1 hour and 30 minutes, until the top is golden and the center has set.

Let cool before slicing and serving.

Asparagus with Fried Egg and Parmesan


It’s asparagus season! Which means it’s time for my favorite fast lunch: sweet local asparagus topped with a fried egg and sprinkled with Parmesan. To anyone who thinks that making yourself lunch takes too much time, I challenge them to find something quicker than this meal.

But, Daisy, don’t you have to steam asparagus? Or boil it? That takes time!

Oh no no, young Padawan. You can . . . microwave it!

This idea comes from Andrew Carmellini‘s Urban Italian. In the book, he recommends microwaving asparagus as a quick and terrific way to perfectly cook it without sullying up another pot. I just have to quote him on this:

“Asparagus in the microwave is awesome. Yup. You read that right. I’m sure some food snob somewhere is recoiling in horror and throwing this book across the room, but I don’t care.”

I don’t care either. I love Carmellini’s food. He’s got a Michelin star and two James Beard Awards. If microwaving asparagus is good enough for him, it’s good enough for me.

This is one of those no recipe-recipes that can be multiplied by as much as you need. I give you the recipe for one but obviously, if you are cooking for more people, you will need to punch an extra minute or two into the microwave.

Ingredients:

6-7 asparagus spears, rinsed clean and trimmed of their woody ends

Olive oil

1 egg

Butter

Salt and freshly ground black pepper

Grated Parmesan cheese

How to prepare:

1. Spread out the asparagus in a single layer on a microwave-safe plate. Season the asparagus with salt and sprinkle on a little bit of water. Drizzle it with some olive oil. Cover the plate tightly with plastic wrap and nuke it for 1 minute and 30 seconds.

2. In the meanwhile, fry up an egg in butter.

3. Carefully remove the plastic wrap from the plate and arrange the asparagus spears on a clean plate. Top the asparagus with the fried egg. Season everything with salt and black pepper. Sprinkle on as much grated Parmesan as you like.

Serve with a good, crusty bread.

Ramp Risotto with Pancetta, Meyer Lemon and Parmesan


Spring is officially here when ramps are in!

And when I think ramps, I think risotto.

Sometimes, people think that risotto is difficult. But as long as you are willing to be patient, and don’t mind giving your stirring arm a little workout, risotto is a ridiculously easy way to have an elegant dinner.

This recipe is for two, but you can easily make the recipe for more people by adhering to the following ratio: for every 1/4 cup of rice, you will need one cup of liquid.

Ingredients:

1 quart (4 cups) of chicken or vegetable stock

3 ounces of pancetta, sliced into thin strips

Olive oil

1 bunch of ramps, cleaned with stems and leaves divided

1 cup of Arborio rice

1/4 cup of white wine

The zest and juice of 1 Meyer lemon

2 tablespoons of butter, cut into small cubes

1/4 cup of Parmesan, plus more for sprinkling

How to prepare:

1. Thinly slice the white ramp bulbs and roughly chop the leaves. Keep them separated.

2. In a saucepan, bring the stock up to a boil and then turn off the heat.

3. In a large Dutch oven or heavy-bottomed saucepan, brown the pancetta over medium heat until most of the fat has rendered and the pancetta has just begun to crisp. Spoon off all but one tablespoon of fat. Add the sliced white parts of the ramps and sauté them until they begin to turn translucent. Add the rice and toss the grains in the fat for about a minute or two.

4. When the rice grains begin to lose their opacity, add the white wine. When the wine has been absorbed, begin adding the hot stock, a ladleful at a time, while stirring constantly, until you have used all the stock or the rice has lost its chalky hardness and is perfectly al dente. This can take between 15-20 minutes.

5. When the rice is creamy and the grains are al dente, turn off the heat. Add the lemon juice and zest, the chopped green ramp tops and the butter. Incorporate everything into the rice. When the ramp tops have wilted, stir in about a 1/4 cup of Parmesan. Adjust the seasoning, adding a little hot water or more hot stock if the risotto seems to be a little thick. Serve immediately topped with more grated Parmesan.

The Daring Kitchen April Cooks’ Challenge: Whole Wheat Flatbread with Grilled Eggplant, Goat Cheese Ricotta, Sundried Tomatoes and Maple-Chili Pistachios


This was the Daring Kitchen challenge that almost didn’t happen. After a few weeks of thinking, toying with ideas and brainstorming, the challenge got put on hold and then was quickly buried under a sea of other priorities. When I finally got around to making a grocery list and buying ingredients, my oven promptly decided that it was no longer participating in my kitchen adventures 😦

I thought about changing direction and doing something else, but my heart had been set on making a flatbread. I went as far as to contemplate doing the flatbread in a cast-iron pan on top of the stove (the stovetop was still working) and using a mini-blowtorch to char the top of it.

“Daisy,” Laura said, “I think that’s a bad idea.”

I even went out and bought pressurized butane despite having doubts that my newly acquired mini-torch — meant for itty bitty crèmes brûlées — would probably melt or malfunction if used on something as big as a 12 or 14-inch pizza . . .

“Daisy. It’s just a bad idea.”

Sigh.

Thankfully, my oven got fixed a lot sooner than anticipated — which just goes to show that you can get anything fixed in this town so long as you utter three magic words:

I smell gas . . .

I thought that was pretty smart of me 😉

Once the oven was fixed, I was back on track, though given the chance, I would have tinkered with the recipe more before posting. To make up for how rough the recipe is, I have written the recipe based what I would do it if I were to make it again — like use a lot more eggplant!

Also, I would suggest that you tinker a little bit with your cooking times and temperatures as it appears that when they fixed my oven, they also re-calibrated it so that it seems to run hotter that it did before.

This month, David and Karen from Twenty-Fingered Cooking challenged us to come up with our own recipes using the three lists of challenge ingredients. The recipe must include at least one item from each list, and if we fail, we must order a pizza.

The challenge lists were:

List 1: Parsnips, Eggplant, Cauliflower
List 2: Balsamic Vinegar, Goat Cheese, Chipotle Pepper
List 3: Maple Syrup, Instant Coffee, Bananas

When I first saw the challenge, I was thinking of a balsamic, instant coffee and maple syrup-glazed steak on top of a parsnip-goat cheese purée.

Then I thought about using the eggplant and cauliflower to make a vegetarian chili with chipotle peppers and instant coffee.

Then I thought that it would be fun to try to challenge myself to make the most inedible dish possible. Some kind of cauliflower-instant coffee banana cream pie, or a banana-chipotle baba ghanoush, but I felt like that might be a violation of the challenge’s good spirit.

To save me from myself, I threw the idea out to amazing Heather over at Ruby and Wheaky (one of my favorite blogs and one of my favorite bloggers — do check her site out when you get the chance! She is a phenomenal writer). She suggested a “maple syrup and chipotle-glazed cauliflower dish,” “an instant coffee dusted baked/fried eggplant dish with a goat cheese topping,” “an eggplant, goat cheese sandwich with a side dish of coffee-infused banana chips,” or “a crazy sort of eggplant, goat cheese pizza topped with maple- glazed pistachio nuts.”

As you can see, her ideas were way better than mine!

A giant thank you to David and Karen for the great challenge! I had a ton of fun dreaming up different recipes. Your challenge made me feel like an Iron Chef!

Blog-checking lines:
Our April 2012 Daring Cooks hosts were David & Karen from Twenty-Fingered Cooking. They presented us with a very daring and unique challenge of forming our own recipes by using a set list of ingredients!

Ingredients:

For the flatbread:

1 packet of active, dry yeast (about 2 1/4 teapoons)

1 cup of lukewarm water (between 105°-115°)

1 teaspoon of salt

2 tablespoons of olive oil

2 cups of bread or all-purpose flour

1 cup of whole wheat flour

For the toppings:

2 medium eggplants or one large eggplant, cut into 1/4-inch thick slices

Olive oil

2 tablespoons of balsamic vinegar

1 teaspoon of salt

1/2 cup of sundried tomatoes, cut into thin strips

6 ounces of goat milk ricotta (or another kind of soft and crumbly goat cheese)

1/3 of a cup of shelled pistachios

1 teaspoon of maple sugar (or one tablespoon of maple syrup)

1/4 teaspoon of chipotle pepper powder

1/2 teaspoon of salt

How to prepare:

1. In a large bowl, mix together the yeast and the warm water. Let the yeast bloom undisturbed for about 10 minutes.

2. In a separate bowl, mix the two flours together. Once the yeast has bloomed, add the salt and two tablespoons of olive oil. Stir in the flour, a little bit at a time, with a wooden spoon until it has all been incorporated. Turn the dough out onto a lightly floured countertop and knead it for about 6-8 minutes until the dough is soft and satiny. Shape the dough into a ball and place it in a lightly oiled bowl. Cover the bowl tightly with plastic wrap and let it rise until it has doubled, about 1 1/2 to 2 hours.

3. In the meanwhile, prepare the eggplant. In a small bowl, whisk together the balsamic vinegar and 1 teaspoon of salt. Let sit for a minute or two to let the salt dissolve. Whisk in about four tablespoons of olive oil. Brush both sides of each eggplant slice with the balsamic-olive oil mixture.

4. Brush a grill pan lightly with olive oil and heat it over medium-high heat. When the oil just begins to smoke, lay a few slices of eggplant on the grill. Grill the slices for a minute or two on each side. If you want, you can give the slices a quarter turn on the grill so that they have some nice grill marks. Remove the slices to a plate as you finish them.

5. Preheat the oven to 350°. In a small bowl, toss the shelled pistachios with the maple sugar or maple syrup, the chipotle pepper powder and a drizzle of olive oil until they are evenly coated. Toast the nuts for no more than 5 minutes, checking them frequently to make sure that they don’t burn. Remove the nuts from the oven and let them cool before roughly chopping them.

6. Turn the oven up to 425°. Punch the risen dough down and stretch it out to cover the bottom of a half-sheet pan. Lightly brush the surface with olive oil and evenly arrange the grilled eggplant slices over the top. Scatter the sun-dried tomatoes and the goat cheese evenly over the eggplant. Bake the flatbread in the oven for about 10-15 minutes. The dough should be crisp and the edges should be browned. Remove it from the oven and scatter the chopped pistachios over the top. Drizzle the flatbread with olive oil and cut into squares to serve.

Young, Green Garlic Knots with Parmesan and Marinara Sauce


Well, I did it. I broke my oven.

After a week of intense pizza-making, my oven decided that it was having no more of this high-heat nonsense and promptly decided that it was going to go on strike.

The stovetop still works, but the oven just makes a clicking noise and stays as cold as my hopes and dreams for weekend baking 😦

If my landlord doesn’t fix it in the next day or so, this will certainly throw a wrench into my plan for this month’s Daring Kitchen challenge. It is strongly looking like I am going to have to get creative fast.

Thankfully, before my oven decided that it had lived through enough, I was able to crank out these awesome garlic knots using Patricia Wells‘ basic pizza dough recipe.

Since I used the rest of the green garlic I got at the Greenmarket, the garlic butter turned out to be more like a garlic spread. No matter, the results were still sloppily delicious. I inhaled about four in a row while standing in my kitchen. They were just so soft, pillowy and slathered with green garlicky goodness that I couldn’t eat just one or two . . . or, erm, three!

On another note, I passed that darned Spanish exam! Tequila para todos!!!

Ingredients:

For Patricia Wells’ Basic Pizza Dough:

1 teaspoon of active dry yeast

1 teaspoon of sugar

1 1/3 cups of lukewarm water (between 105°-115°)

2 tablespoons of olive oil

2 teaspoons of salt

3 3/4 cups of bread flour (thank you RubyandWheaky!) or all-purpose flour

For the Marinara Sauce:

2 tablespoons of olive oil

1 28-ounce can of crushed tomatoes (if you don’t live in the Tri-State area, you can order Jersey Fresh tomatoes here, or use the best San Marzano tomatoes that you can find)

Salt

For the Young, Green Garlic Spread:

2 bulbs of young, green garlic, white and green parts trimmed and thinly sliced

2 tablespoons of olive oil

2 tablespoons of butter

1 teaspoon of salt

Freshly grated Parmesan cheese for sprinkling

How to prepare:

1. In a large bowl, mix together the yeast, the warm water and the sugar. Let it stand for about 5 minutes before stirring in the olive oil and the salt.

2. Using a wooden spoon, stir in the flour, a little bit at a time, until most of the flour has been absorbed and the dough begins to pull together. Turn the dough out onto a lightly floured countertop and knead it until it is smooth and elastic, about 5 to 6 minutes. Shape the dough into a ball and transfer it to a large lightly oiled bowl. Cover the bowl tightly with plastic wrap and let the dough rise between 8-12 hours in the refrigerator, or until it has doubled or tripled in size.

3. When the dough has risen, remove it from the refrigerator and punch it down. Let the dough rise again until it has doubled in size.

4. While the dough is rising, heat two tablespoons of olive oil in a heavy-bottomed saucepan over medium heat. Add the tomatoes. Reduce the heat to medium-low and simmer the tomatoes, stirring frequently, until all the oil has been incorporated and the sauce has thickened. Adjust the seasoning.

5. Preheat the oven to 400°.

6. Divide the dough into 15 2-ounce portions. Use your hands to roll and stretch each portion into a 6-8 inch-long strip. Make a knot, and tuck the ends under the bottom of the knot. Arrange the knots on a parchment paper-lined sheet pan so that they are evenly spaced apart. Bake the knots for about 20-25 minutes, or until they are browned and golden.

7. While the knots are baking, soften the green garlic in the olive oil and butter over medium heat. When the garlic is soft, season it with about a teaspoon of salt. Transfer everything to a food processor and process it until you have a smooth purée.

8. When the knots are done, remove them from the oven and let them sit until they are just cool enough to handle. Spread the green garlic purée over the top of each knot. Let the knots cool and absorb the the melted butter and olive oil in the purée. Sprinkle each knot with Parmesan cheese and serve with marinara sauce on the side.

Orecchiette with Broccoli Rabe and Italian Sausage (Orecchiette con cime di rapa e salsiccia)


Have you ever had one of those weeks where you were amazed at how busy your schedule was, yet surprised at how little you seemed to get done?

That was last week for me and the blitz of activity left me little time to cook, let alone eat something good for me. Lunch was reduced to a handful of jalapeño-flavored potato chips and half a curried tofu sandwich. Dinner was an even more embarrassing affair consisting of leftover boiled potatoes drizzled with olive oil and followed by gelato straight out of its paper container.

I was starting to feel like a human garbage disposal, and was yearning for a real meal, meaning something satisfying that was also quick and easy to put together.

Orecchiette with Sausage and Broccoli Rabe fit the bill perfectly as simple, rustic Italian seems to be my go-to cuisine when my belly is rumbling and my eyes are blinkered from low blood sugar.

One of the emblematic pastas of Puglia, orecchiette are thus named because they are supposed to resemble little ears. I don’t know about that, since they only look like ears to me if we’re talking (nerd alert!!!!) Ferengi ears. I do know that they are delicious and are perfectly shaped to cup little bits and pieces of chopped vegetables. The bitterness of broccoli rabe always goes well with savory sausage, garlic and red chili pepper flakes. To make this dish vegetarian, simply omit the sausage. It is very tasty that way as well.

As this is a very simple dish, I have given you proportions for two, even though I ate the two for one.

Yep, that’s how I roll in Hungry Town 😉

Ingredients:

1/3 of a pound of orrechiette

1/2 pound of pork Italian sausage, casings removed

Olive oil

1/3 of a bunch of broccoli rabe, roughly chopped

3-4 cloves of garlic, thinly sliced

Red chili pepper flakes

Salt and pepper

How to prepare:

1. Bring a large pot of salted water to boil. Cook the pasta until it is al dente.

2. While the pasta is cooking, heat a little bit of olive oil in a heavy skillet over medium-high heat. When the oil begins to shimmer, pinch off one-inch pieces of sausage and brown them in a single layer in the pan. When the sausage pieces are browned on all sides and cooked through, remove them to a paper towel-lined plate or bowl.

3. Drain the pasta, reserving about a 1/4 to 1/3 of a cup of the pasta water. Wipe out the skillet and add about 2 tablespoons of olive oil to the pan. Set the pan over medium heat and sauté the garlic slices until they are fragrant, about a minute or two. Add as many chili pepper flakes as you like and continue to sauté for about 30 more seconds. Be careful that the chili pepper flakes don’t burn. Add the chopped broccoli rabe and a little bit of the pasta water (you can always add more water later if the dish starts to look a little dry) to the pan. Cook the rabe until it begins to wilt. Add the sausage and the pasta, along with another splash or two of pasta water if needed. Toss and let everything cook together for another minute or two. The pasta should begin to absorb some of the sauce. Adjust the seasoning if needed.

Serve in large warmed bowls with an additional drizzle of olive oil.

Breakfast Sausage, Spinach and Roasted Red Pepper Muffins


Lately, I have been trying to get myself to eat breakfast more often. I actually love breakfast, but I regretfully have rarely made time to have it.

Breakfast muffins are a great thing to make. They are so easy to pull together. They look beautiful, and a nice big basket of them is always a hit for brunch. You can also make a batch the night before and toss one or two (three for me) in the oven to warm the following morning while you make coffee.

These muffins are a great way to use the pork breakfast sausage that I get from my CSA, but in all honesty, the recipe is fairly versatile. You can make them meatless, with broccoli, or any other vegetable that you like. You can use Parmesan or Asiago instead of Cheddar.

The tricks are to not over mix your batter, and to make sure that your vegetables have as little moisture as possible so that your muffins don’t turn out to be soggy.

I have been playing around with different combinations of ingredients and like the mix of roasted red peppers and spinach. I think it’s because I like the idea of starting the day with lots of color!

Ingredients:

1 pound of bulk breakfast sausage

1 large red bell pepper

6 ounces of baby spinach

1 cup of cheddar cheese, shredded

1 cup of whole milk

2 eggs

2 cups of all-purpose flour

4 teaspoons of baking powder

1 teaspoon of salt

Special equipment:

A 12-cup muffin pan, preferably non-stick

How to prepare:

1. Preheat the oven to 400°.

2. If you have a gas range, set the red bell pepper directly on the gas burner with the heat on high. Turn the pepper periodically to make sure that the skin chars evenly.

If you have an electric range, rub the bell pepper with olive oil and place it on a cookie sheet set underneath the broiler. You can also rub the pepper with olive oil and pop it into a 450° oven. Remove it when the skin is blistered and blackened.

When your pepper is nice and charred, put it in a clean plastic grocery bag or a small paper bag and wait for it to cool. When it is cool enough to handle, you should be able to gently rub off all the charred skin from the pepper. Seed the pepper, and discard the seeds and the stem. Dice the pepper and spread the pieces out onto paper towels to absorb any excess moisture.

3. In a large skillet, brown the breakfast sausage over medium to medium-high heat, breaking up any large pieces with the side of your wooden spoon or spatula. Remove the browned sausage to a large mixing bowl with a slotted spoon, leaving as much of the drippings behind as possible.

4. Wipe out the skillet and wilt the spinach in it over medium heat with a little bit of olive oil and about a tablespoon of water. When the spinach has wilted, remove it to a colander to drain. When the spinach is cool enough to handle, gently press as much liquid out of the leaves as you can without squeezing them.

5. Roughly chop the spinach leaves and add them to the browned sausage meat along with 2/3 of the roasted red pepper (reserve 1/3 of the peppers to top the muffins), the cheese, the milk and the eggs. Gently stir all the ingredients together until everything is well-mixed.

6. Sift together the flour, the baking powder and the salt. Gently fold the flour mixture, a little bit at a time, into the other ingredients until the batter just comes together. Do not over mix.

7. Divide the mixture evenly among all the muffin cups. Top each with a few pieces of roasted red pepper. Bake the muffins for about 20-25 minutes. The tops should be browned and golden. Let them cool in the tin for a couple of minutes before removing them to a cooling rack.

Simple Roast Chicken and Yotam Ottolenghi’s Parmesan Rice with Buttered Almonds and Fresh Oregano


The past few weeks have been insane schedule-wise. First of all, I had a slew of administrative concerns that needed to be sorted out. Never fun. Secondly, I had to take a Foreign Language Proficiency Exam. In Spanish.

I don’t speak Spanish.

So why did I have to take it? Well, long story short, for my degree, I basically needed to show that I can do research in a language other than my native one if necessary. Since I am in a French department, French doesn’t count even though it is not my native language. English doesn’t count either because it actually is my native language.

Yes, I agree; it didn’t make a whole lot of sense to me either that I had to pick something else.

What is really embarrassing is that I have actually known about this requirement for years. Why did I put it off for so long? Well, it kept getting superseded by more pressing things like students who needed final grades, or coursework that needed to be completed. Silly things like that!

I think that I also had these pleasant daydreams of jetting off to Buenos Aires to learn Spanish while sucking down copious amounts of Malbec. Or learning Spanish in Madrid with a dictionary in one hand and a tapas in the other. Or going to Lima and eating chifa until I exploded. You get the idea.

In any case, it just got to the point where I couldn’t avoid it anymore.

And that is how I found myself in a situation where I had to teach myself advanced-level Spanish in three weeks!

To those who say that Spanish is “easier,” I say that you don’t know what you’re talking about.

I have spent many, many, many years teaching French to undergrads. That is a lot of experience breaking language down into manageable chunks and patterns. Believe me when I say that, comparatively, Spanish has a lot more verb forms than French does. It also has more than one verb for “to be,” a crazy, confusing thing called the “a personal,” and imperfect past, past perfect and future subjunctive tenses that actually get used.

I would guess that people say that Spanish is easier for two primary reasons: Americans tend to have more exposure to Spanish than any other foreign language, and Spanish-speakers, in general, seem to be much more tolerant of badly-spoken Spanish than French or Italian speakers are of badly-spoken French or Italian.

Needless to say, I was so stressed out I wasn’t eating very well. However, at a certain point last week, I just couldn’t take it anymore. My body would not accept any more slices of pizza,  any more handfuls of almonds, or any more weird juice drinks in an effort to have my fruit and vegetables in a speedy, non-chewable way.

I just had to cook something. It had to be warm and comforting. It had to be interesting too, but in as fuss-free a way as possible.

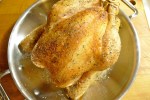
A roast chicken fit the bill beautifully. Trussed tight, massaged with butter, and showered with salt and pepper is all the effort needed to turn out a beautifully golden bird.

But woman cannot live by poultry alone!

So I paired it with this fantastic Parmesan rice recipe that I adapted from Yotam Ottolenghi — which was equally as easy to make, as well as being elegant to look at and eat. Is the dish Middle Eastern-inspired? Persian? Moorish? Italian? Turkish? Who the heck knows, but it was delicious.

As for the exam, I hope that I passed! I find out in 4-6 weeks. Fingers crossed that I don’t have to take the gosh darned thing again!
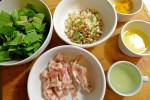
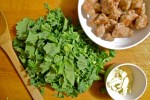
Ingredients:

5 tablespoons of butter (divided into 2 tablespoons, and 3 tablespoons)

1 1/2 cups of basmati rice

3 cups of water

Salt and white pepper

1 cup of freshly grated Parmesan

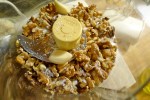
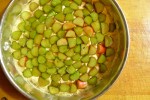
1/2 cup of raw slivered almonds

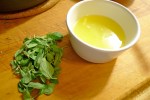
The juice of 2 lemons

1 tablespoon of fresh oregano leaves

Sumac (optional)

How to prepare:

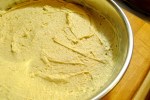
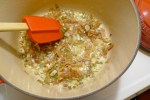
1. Melt 2 tablespoons of butter in a medium-sized saucepan over medium heat. Toss the rice in the melted butter until the individual grains become translucent. Add 3 cups of water and a good pinch of salt. Raise the heat to medium-high, and bring the rice to a boil uncovered. Cover the pan, and lower the heat about as low as it can go. Cook the rice until all the liquid has been absorbed and the rice is tender.

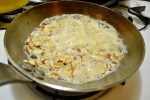
2. When the rice is done, fluff it with a fork. Evenly sprinkle the rice with the cheese and stir everything together. The Parmesan should be evenly distributed throughout the rice. Adjust the seasoning with salt and white pepper. Cover the rice again while you prepare the almonds.

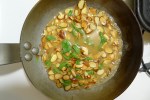
3. In a small frying pan, melt the remaining 3 tablespoons of butter over medium to medium-low heat. Once the butter has melted, add the almonds. Turn the almonds in the foamy butter until they begin to brown and turn golden. Remove the pan from the heat. VERY CAREFULLY add the lemon juice by pouring it over the back of a wooden spoon into the almonds. Stir in the oregano leaves. Adjust the seasoning.

4. Mound the Parmesan rice in a large dish. Spoon out the almonds and pour the sauce evenly over the rice. Sprinkle with sumac and serve with roast chicken.

For the Roast Chicken:

This is not a recipe per se, but more like a set of guidelines that I have used over the years for cooking perfect poultry.

1. Buy the best bird you can find. Organic, all-natural, free-range, no hormones or antibiotics, humanely-raised and processed if you can.

2. Take your chicken out of the fridge about 30 minutes to an hour before you want to cook. Your bird should be on the cool to touch (like the cooler side of room temperature), but not refrigerator cold.

3. Dry your bird throughly with paper towels, inside and out. Let it sit on the countertop uncovered. The dryer the skin, the crispier the chicken.

4. Pre-heat your oven to 425-450°. Give yourself some time for the oven to come up to temperature. This generally takes 15-20 minutes, but can take up to 30 minutes depending on your oven.

5. No stuffing. This is the secret to perfect chicken. I find that by the time the stuffing is done cooking, you have overcooked your lovely bird. I like just a few things in my chicken: one lemon (cut into wedges if your chicken is small), one onion, a few cloves of garlic and fresh thyme. If it’s Meyer lemon season, please do use one of those.

6. Use the best butter or olive oil. In Nigella Lawson’s cookbook, How to be a Domestic Goddess, she writes that when roasting chickens, you should anoint your chicken with the highest quality butter or olive oil the same way you might apply very expensive hand cream. I always liked that image.

7. Truss your bird tight. Like a compact little football. I really do think it helps your bird cook more evenly. Moreover, chicken just looks better without its legs all akimbo.

8. Season liberally. In his Bouchon cookbook, Thomas Keller writes that he never butters his bird because the moisture in the butter creates steam that will ruin the integrity of the skin’s crispiness.

I’ve never found that to be the case.

I did once try Keller’s approach sans butter and found the skin to still be tasty, but less glossy and appealing overall. I do like his salting technique though: “I like to rain the salt over the bird so that it has a nice uniform coating that will result in a crisp, salty, flavorful skin (about 1 tablespoon). When it’s cooked, you should still be able to make out the salt baked onto the crisp skin. Season to taste with pepper.”

So by all means, hold your hand high and shower that bird with seasoning!

9. 20-20-20-15 or 15-15-15-15. I don’t always follow this but when I do, I like the results. Inspired by Patricia Wells’s Roast Lemon Chicken recipe in her Paris Cookbook, I start the bird in a super hot oven on one side. After twenty minutes (or 15 if the chicken is small), I turn it on the other side for another twenty. After that, I drop the oven temperature to 375°. I turn the chicken breast-side up for yet another twenty minutes — a total of 1 hour.  I continue roasting it until the chicken’s internal temperature reaches 165°. When the chicken is done, the juices should run clear when you pierce the thickest point of the thigh with a paring knife or skewer.

Sometimes, I will just put the chicken in breast-side up at 425-450° for about half and hour to 40 minutes before dropping the temperature to 375° for the remainder of the time. I know it sounds weird, but I think you can start to smell when you should turn down the heat. I find the results to be almost as good.

10. Remove from oven and let rest for 10-30 minutes before carving. Such an important step and essential for serving a juicy bird. Plus, you don’t risk burning your fingers!

Tips:

No basting.

A top-knotch carving knife is always an asset in the kitchen.

Keep the carcass and the juices! They are worth their weight in gold.

High Point Farms Buyers Choice CSA! Sign Up Now!


As many of you know, one of the major inspirations for this blog was High Point Farm’s Meat CSA — my very first CSA ever.

CSA stands for Community Supported Agriculture. The basic CSA model is that you become a member of the farm, pay for a certain amount of food up front and come to pick up your “shares” at designated times throughout the season. CSA’s have all kinds of benefits. First of all, you support local agriculture, sustainable and environmentally- sound farming practices, and small farms. Second of all, you are able to form a relationship directly with your farmer. You learn about how your food is raised, how it is harvested, how your food gets to your table.

Most importantly, you get the best quality food for your money.

The meat is from our CSA absolutely amazing. All the beef is grass-finished, which means that the cows are fattened by grass — hay and baleage in the winter — not grain. The flavor is deep, rich and incredible.

I actually can’t have steak in restaurants now because it just doesn’t taste like meat!

I had always wanted to do a CSA. However, the only kind of CSA that I ever knew of before hearing about High Point Farms was either a vegetable or a fruit CSA. As someone who hates to waste food, I feared having to throw out more food than I could prepare or eat at any given moment — which is precisely what made a meat CSA so appealing.

Our farmer gives us our meat frozen. It is vacuum-packed in super thick plastic so that it keeps in the freezer really well. For anyone who claims that fresh meat is superior to frozen, I would say that this is really spoken from a place of ignorance as so much of the “fresh” meat sold in markets (even high-end butcher chops) was frozen — it just got defrosted by the shop or the butcher instead of by you!

You can go on the farm’s facebook page and see what a happy and wonderful life the animals have. If you are going to eat meat, wouldn’t you want the animals to be raised with love and care, and humanely slaughtered with deep respect and appreciation? To the argument that eating animals is “unhealthy,” I have to say that what is really unhealthy is eating pesticide-covered vegetables imported from Chile or some other South American country with horribly lax labor and safety practices — not to mention the carbon-footprint!

Some other vegetable CSA’s in the City offer meat through partnerships with other farms. However, I have to say that though I found High Point Farms almost by accident two years ago, getting involved with them has been one of the best and most rewarding things that I have ever done in New York City.

As I live close to the pick-up site in Manhattan, I am able to help the farm out on the distribution end by helping to coordinate the CSA’s bi-monthly pick-ups. Thanks to Tina and Bob MacCheyne, the farmer-owners of High Point Farms, I have learned so much. Not only have I discovered new cuts of meat and how to cook them, I have learned so much about being a better eater, consumer, and food advocate.

High Point Farms will be starting its next CSA season next week. There are still membership spaces available. The farm will be moving to a new model for this time around called a Buyers Choice.

This is how it works: there are different share options, beginning with a Trial Membership at $225 and going up to a Gourmet Share for $1000. That money goes directly to the farm, and is also your credit at the farm store for the season. Every two weeks, you go to the online store and load up your shopping cart with what you want: steaks, osso buco, oxtails, ground beef, roasts, chickens, eggs, cheese, pork chops, sausages, bacon. You can order as much or as little as you want. You can even skip that pick-up and wait for the next one. If you run out of credit, you can add more to your account. You come, you pick up your meat, you go home and cook it. And then you shiver with delight because it tastes soooo good.

And look, you just supported local agriculture and not evil giant agro-business.

The Deets:

• Our CSA season will run from March to December. You do not have to pick up something every pick-up., only on the days when you have ordered meat for pick-up.

In New York City, we have three pick-up locations this season:

East Village: Jimmy’s 43 (on East 7th Street, between 2nd and 3rd Avenues)
Williamsburg: Crossfit Virtuosity (221 North 8th St, between Driggs and Roebling)
Brooklyn Heights: Sweet Pea CSA (you must be a member of Sweet Pea Vegetable CSA to join this group)

• For the season’s delivery dates, click here.

• Membership Share Prices:

Trial Share: $225.00 (buys $225.00 of Farm Store Credit)

Single Share: $350.00 (buys $350.00 of Farm Store Credit)

Medium Share: $500.00 (buys $515.00 of Farm Store Credit + priority on limited items)

Large Share: $700 (buys $735.00 of Farm Store Credit + priority on limited items)

Gourmet Share: $1000.00 (b $1050.00 of Farm Store Credit + first priority on limited items)

There is a $25.00 Membership fee at sign up. ne time charge per CSA Season to offset the farm’s administrative and shipping costs.

For more information and to sign up, click here!

PS. See all that nice food pictured at the top of this blog post? You too can make all that awesomeness with High Point Farm’s meat!