Holiday Ham with Pomegranate Molasses, Black Pepper and Bourbon Glaze


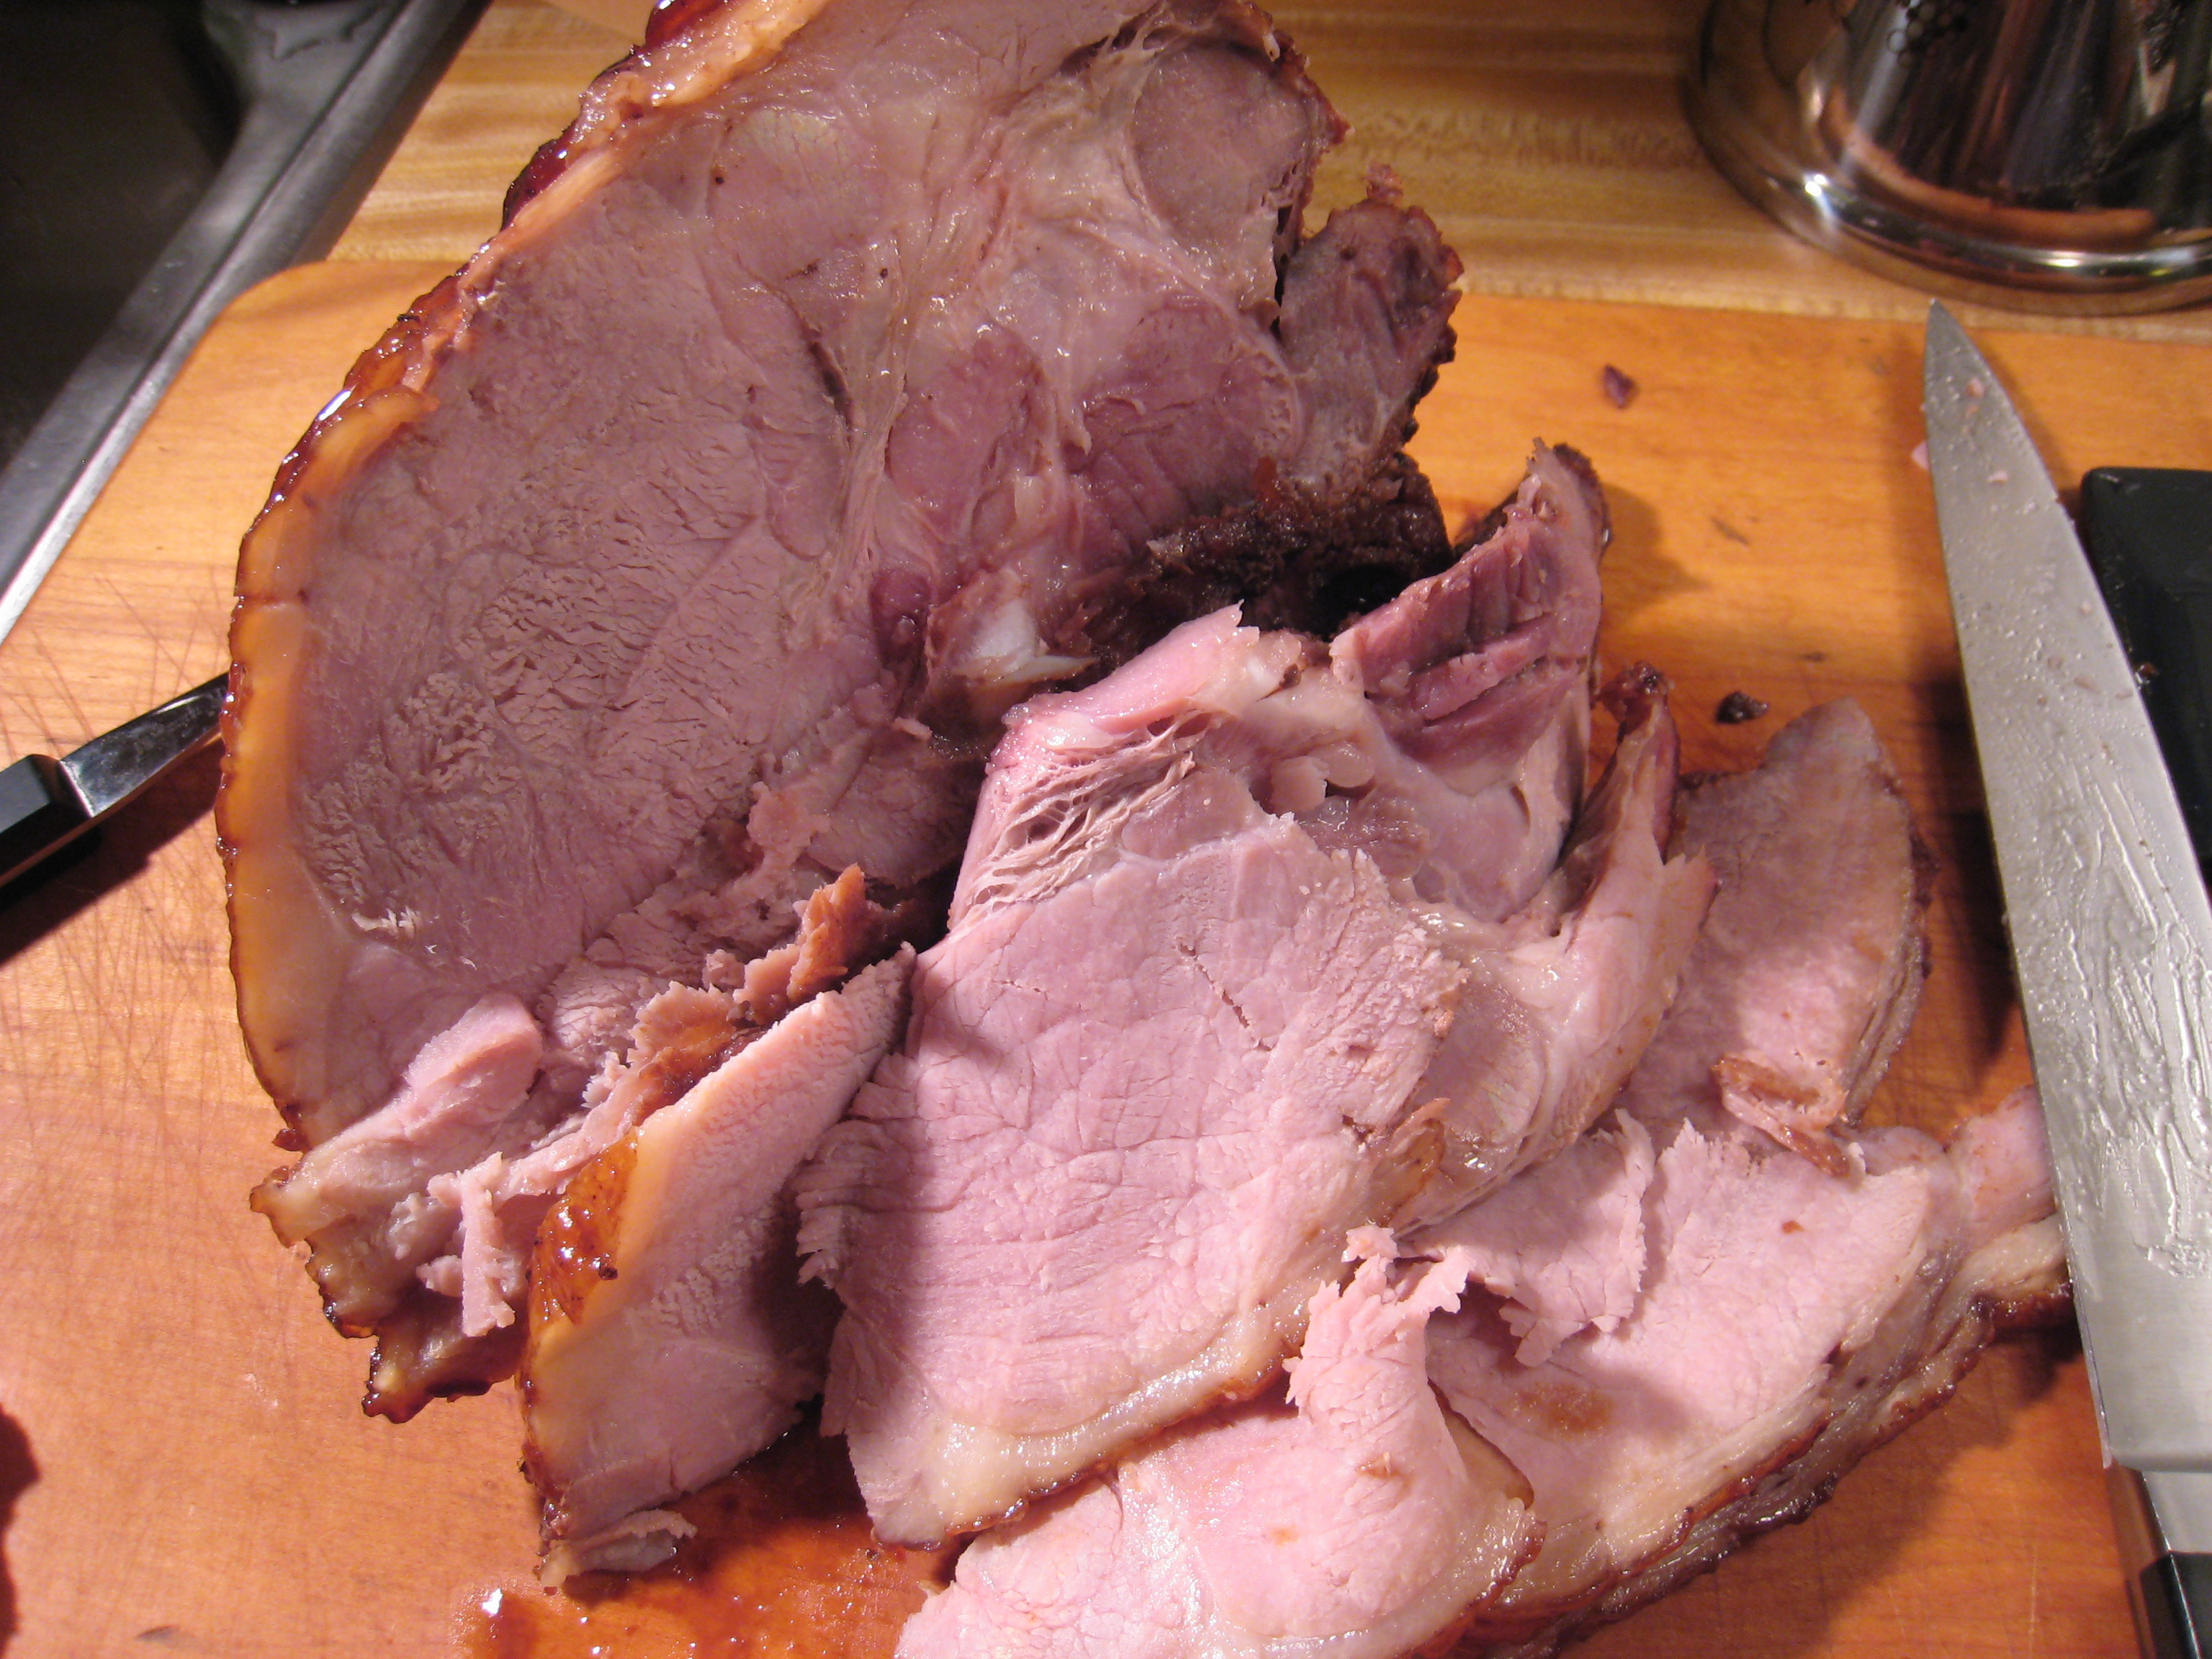
There was a special treat in the CSA basket last week: a beautiful ham.

Growing up, hams in my household were always honey-baked affairs, spiral-cut and gifted by friends and relatives who came to the house bearing boxes of See’s Candies. I don’t think I ever remember my parents baking a ham themselves, so this was a new experience for me.

What to do with a lovely ham? When Tina from High Point Farms suggested a glaze, something in clicked in my mind that I had filed away in my mental “To Cook” folder: pomegranate.

I have been seeing crates of pomegranates lately in the market. ‘Tis the season!

Though native to ancient Persia, the pomegranate figures prominently in the Greek myth of Persephone. Dear Persephone, minding her own business in a field, is abducted by her uncle Hades and spirited away to the underworld to be his bride. Overwrought with sorrow, her mother Demeter, Goddess of the Harvest, plunges the Earth into brutal winter. With nothing growing, Zeus sends Hermes to demand that Hades return her daughter to her. But not without caveats : Persephone can only return if nothing — no food nor drink — from the Underworld has passed her lips. Good Persephone had indeed been denying herself both, but when presented with a gorgeous pomegranate, she is unable to resist and swallows six ruby-red seeds. For this, she is allowed to be reunited with her mother for 6 months out of the year — 6 glorious months filled with sunshine and green, growing things — before returning to Hades, leaving her mother’s sadness to expand over the cold and frigid earth.

Such a story! To be seduced by a pomegranate! Certainly something to think about as the ham bakes, filling the apartment with warm, cuddly smells of sweet spice and exotic fruit. Maybe, I wondered as I basted another candy-colored layer onto the ham, it was worth it after all?

This recipe is from the terrific food blog, Food 52. It calls for pomegranate molasses, which I assume is easily available in most ethnic and specialty food markets. Actually, I wouldn’t know because I found it even easier to just make my own. You can too. The recipe is super easy and doesn’t require much attention, leaving you free to mind other things.

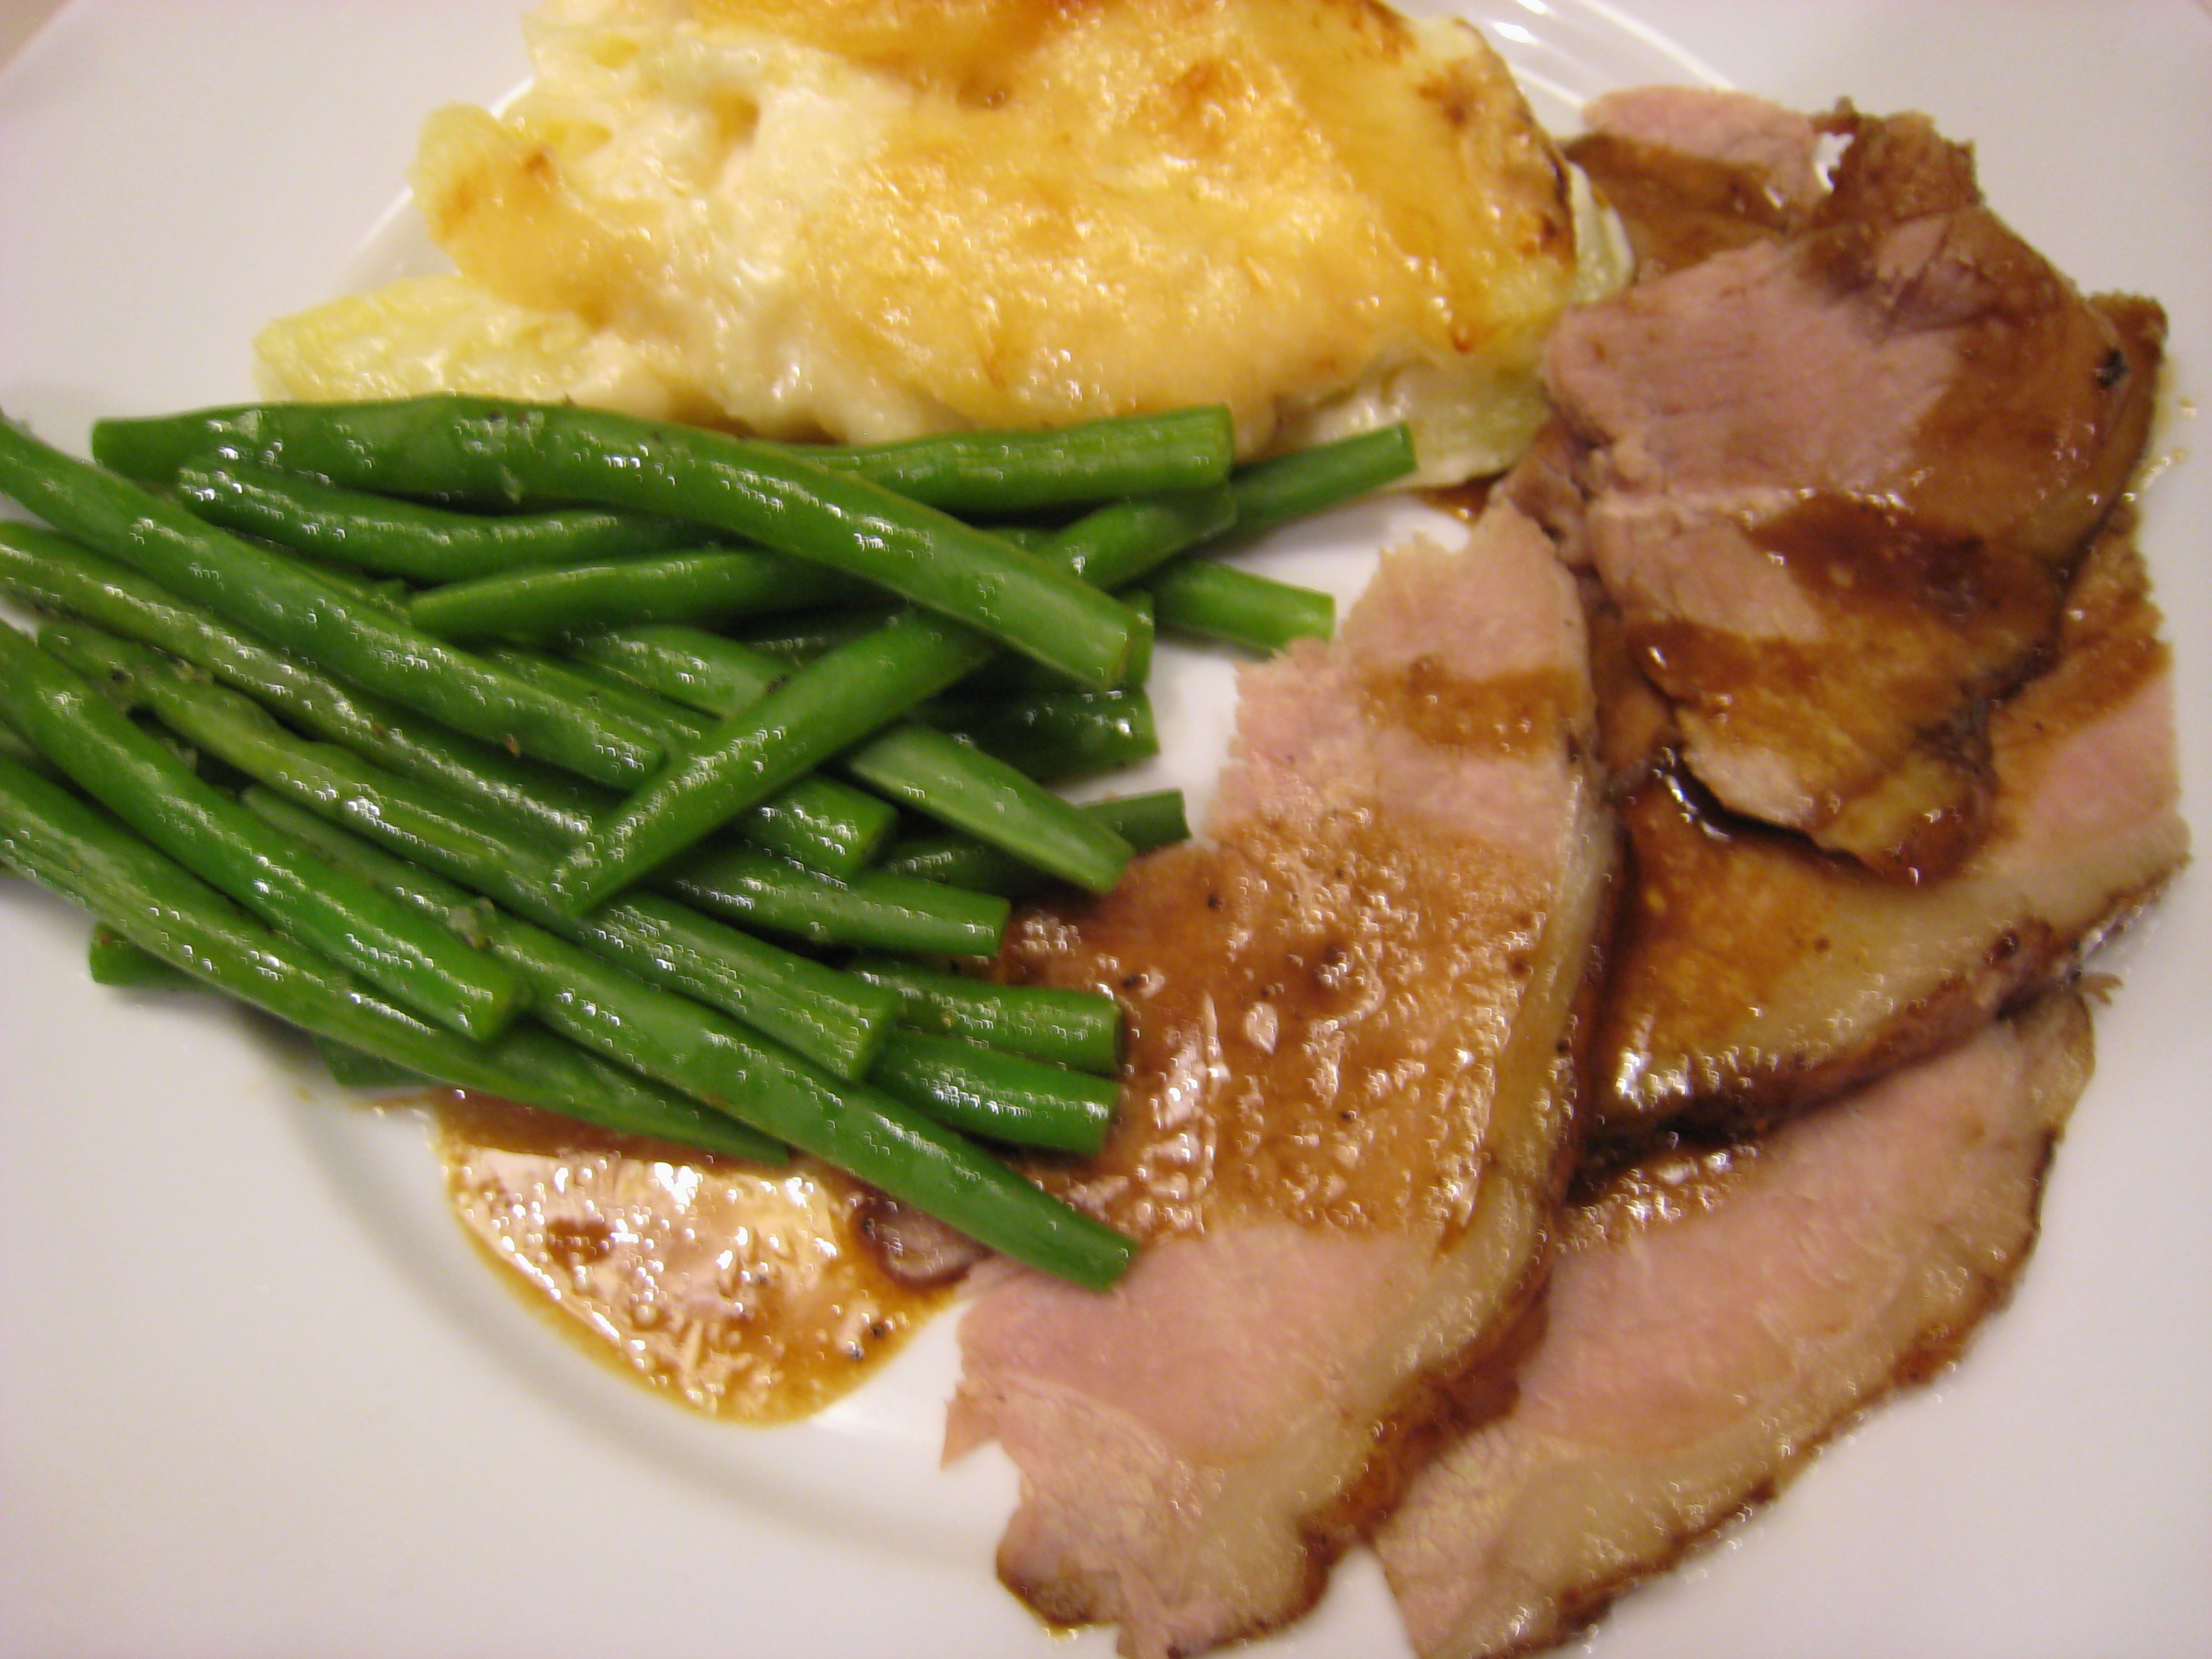
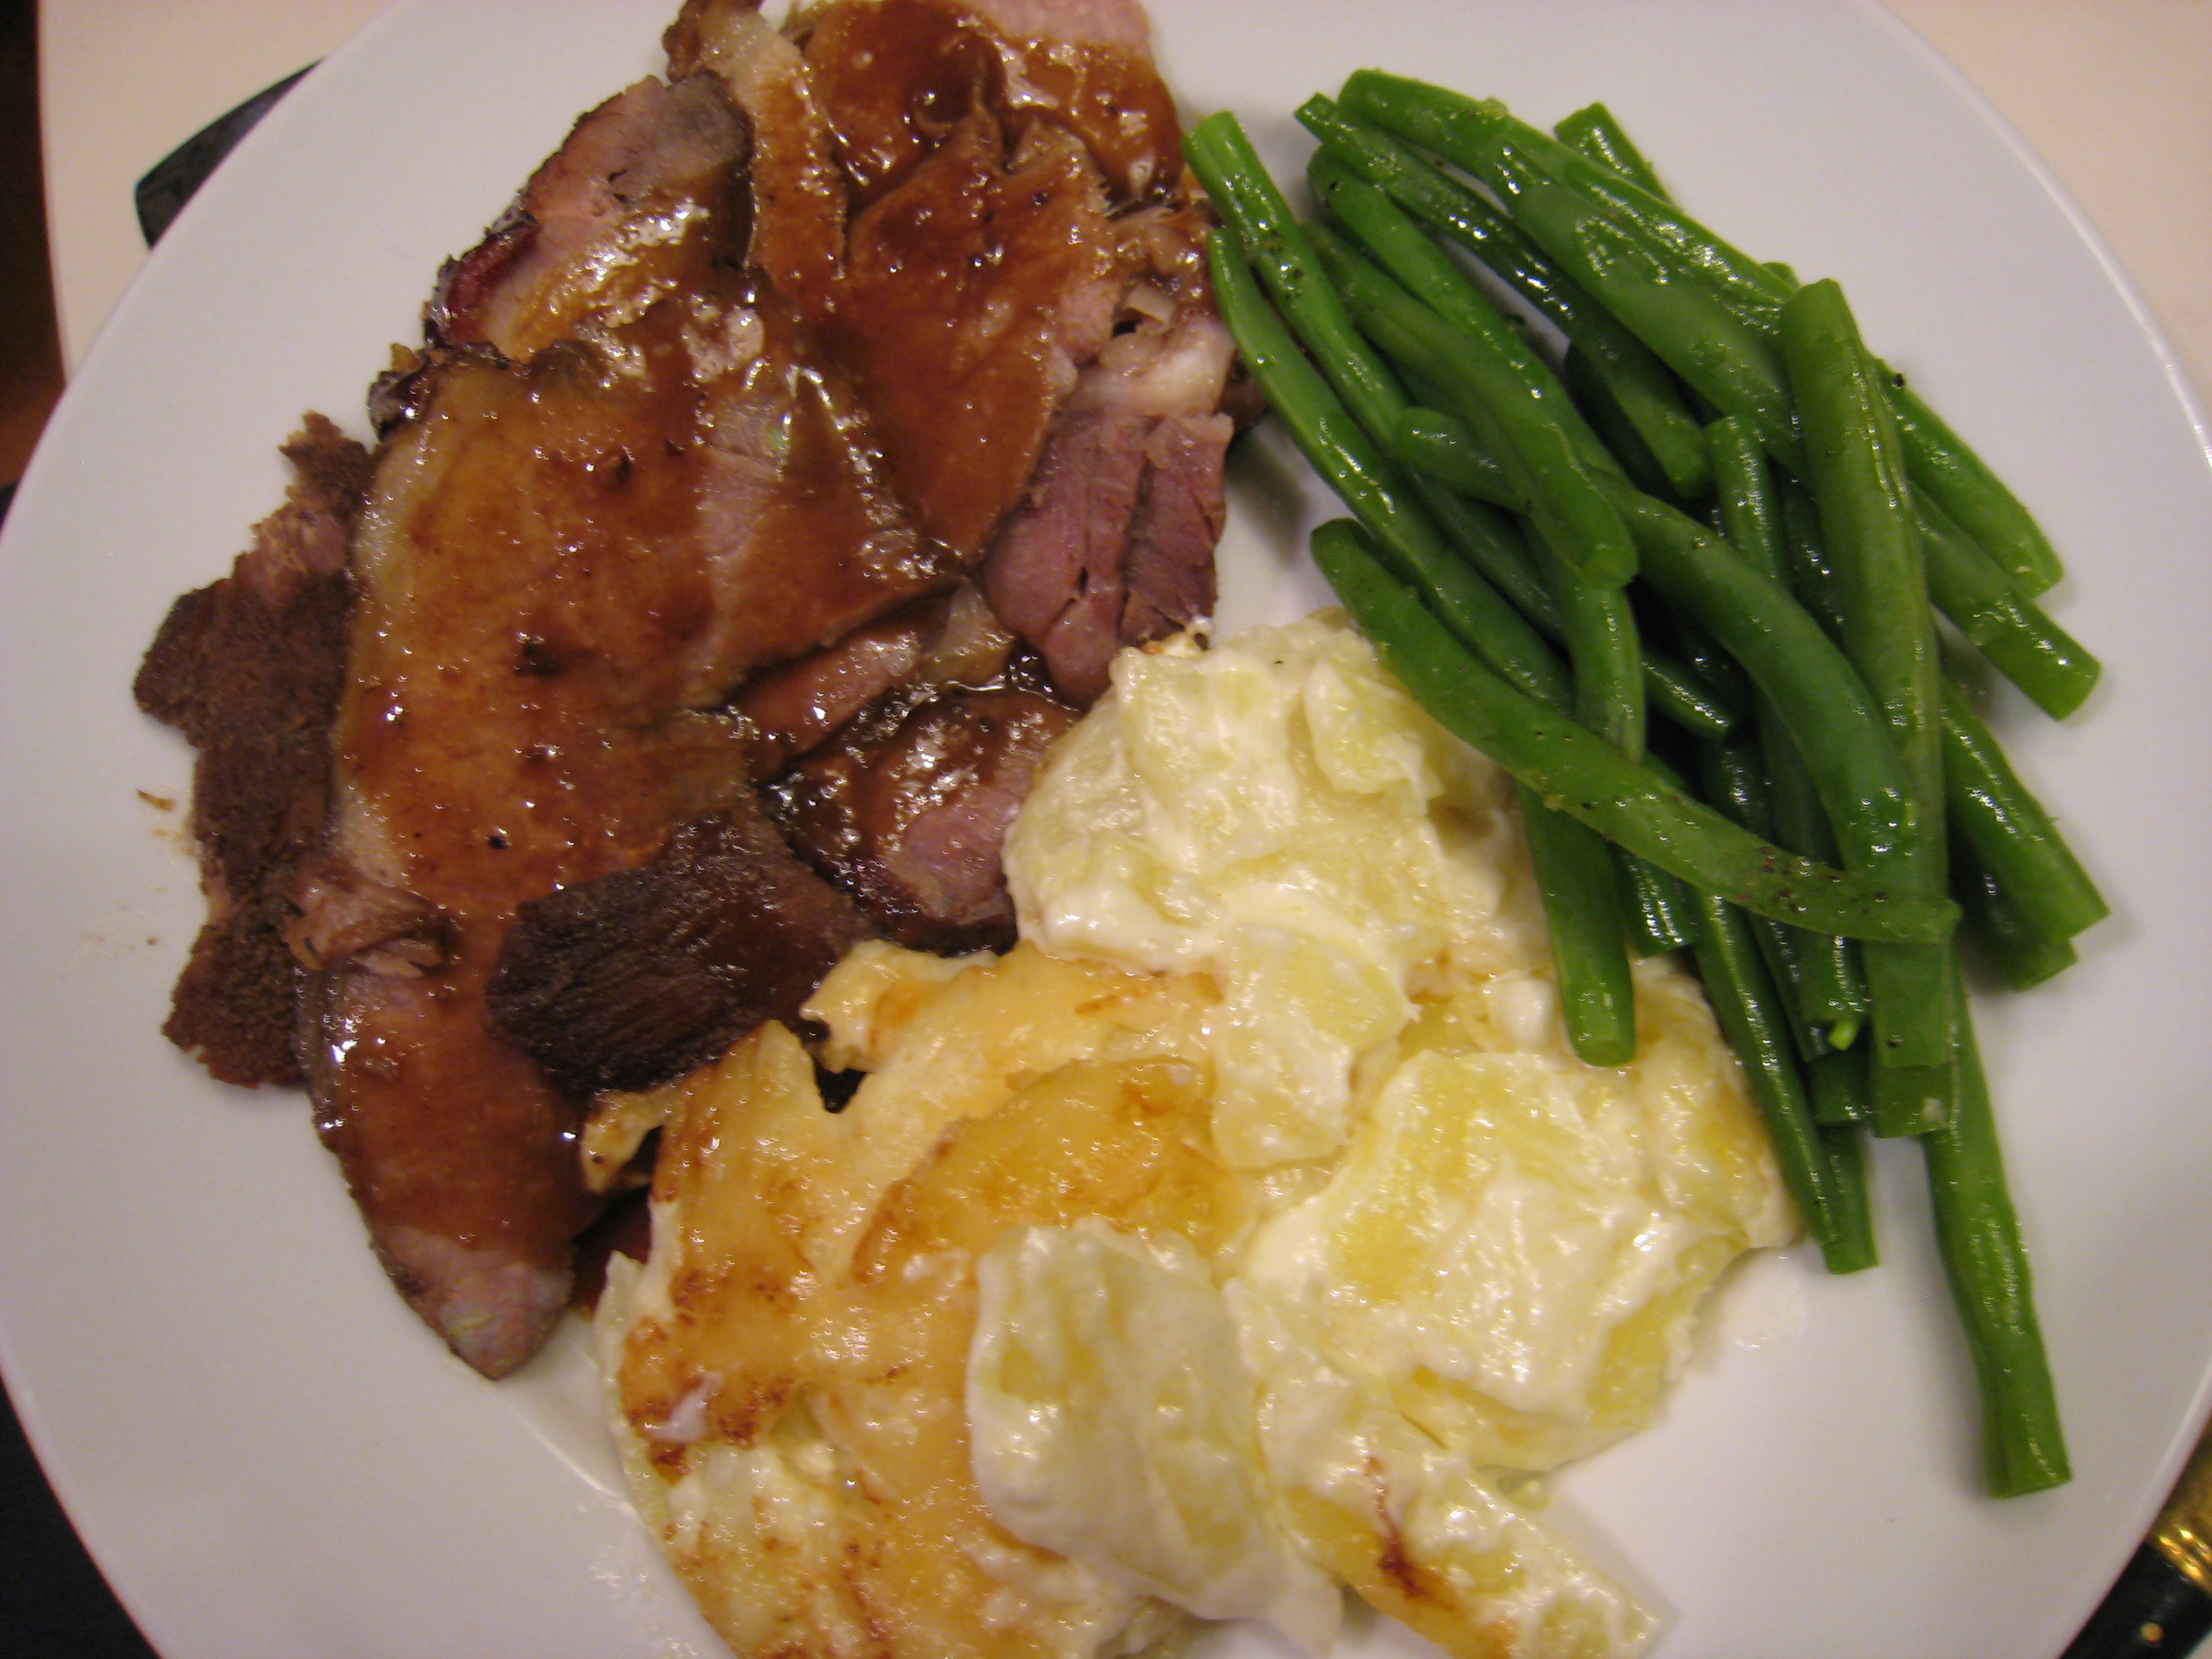
The glaze is spectacular. So interesting, it is tart, tangy, sweet and smoky all at once. Don’t skip reducing whatever remains into a quick pan sauce and drizzling it with abandon on top of your pearly pink slices of ham. We served it with a golden potato gratin and some blanched green beans.

Ingredients:

1 bone-in ham roast, about 3 lbs.

3/4 cups of pomegranate molasses*

1/4 cup of Dijon mustard

2 tablespoons of bourbon

1 tablespoon of freshly ground whole black pepper

1 teaspoon of ground allspice (optional)

1 teaspoon of kosher salt

How to prepare:

1. Let the ham come up to room temperature. Plan on about an hour before cooking.

2. Preheat the oven to 325 F.

3. To make the glaze, combine the pomegranate molasses, Dijon mustard, bourbon, pepper, allspice and salt in a bowl and whisk until well-blended.

4. Place the ham, fat side up, in a roasting pan. Score the fat in a cross-hatch pattern without incising the meat. Generously baste the ham with the glaze. Bake it in the oven, basting occasionally, until the internal temperature of the ham is 120°. The ham should be a deep golden brown and crusty at this time. If not, increase the heat to 450° and continue to bake for a few minutes longer, keeping an eye on it so it doesn’t burn. Remove the ham from the oven and transfer it to a cutting board. Let it rest 20 minutes before carving.

5. Transfer the remaining basting sauce to a small saucepan along with the skimmed pan juices. Simmer everything briefly to thicken it and burn off the alcohol. Slice the ham and serve with the sauce drizzled on top.

Note:

To make you own pomegranate molasses, combine 4 cups of 100% pomegranate juice (it can be from concentrate, just be sure to look at the label closely to make sure that the juice is not a blend), 1/2 a cup of sugar, and the juice of one lemon in a saucepan. Stir the mixture to dissolve the sugar and bring it to a boil. Lower the heat to medium-low and cook until everything has reduced to about a cup of liquid. You don’t really need to stir it at all. This should take about 60-70 minutes and you should end up with a thick syrup. Let the molasses rest for about 30 minutes. It should thicken a little more as it cools. Transfer the molasses to a covered container. It should keep in the fridge for about 6 months.

Maple Syrup Sweet Potatoes Topped with Tiny Marshmallows


The first time that I ever saw Gary Vaynerchuck was on Conan O’Brien. Brought on the show to teach Conan how to taste wine, he gagged his way through a routine as slap-stick as it was slap-shtick. As I watched him swallow glugs of Sauvignon followed by mouthfuls of fresh grass, I thought to myself, “Is this guy for real?”

Vaynerchuck has since built himself a sizable empire of influence. I read somewhere that he is the most followed wine critic after Robert Parker. I can’t speak to whether or not those following him are doing it for the wine or the antics, but I can say that this recipe, adapted from one in Food and Wine’s feature on him last month, is the best that I have for the holidays. The dark maple syrup rounds out the nuttiness of the roasted sweet potatoes, and the kick of cayenne is divine.

Ingredients:

9 sweet potatoes, about 12 ounces each

1 tablespoon of vegetable oil

1 stick of butter

1/3 of a cup of dark maple syrup

3/4 teaspoon of ground cinnamon

Salt to taste

Cayenne pepper to taste

1 1/2 – 2 cups of mini marshmallows.

How to prepare:

1. Preheat the oven to 350°. Set a sheet of aluminum foil on top of the middle rack. Rub the sweet potatoes all over with oil. Prick each one evenly on all sides with a fork. Roast the potatoes directly on top of the foil for about an hour, or until easily pierced with a paring knife. Remove the potatoes from the oven, and let them rest until they are cool enough to handle.

2. Split each potato lengthwise and peel the skin off of each half. Put the peeled potatoes in a large saucepan that can accommodate them all. Using a potato masher, mash the potatoes over gentle heat. With a wooden spoon, stir in the butter, maple syrup, cinnamon, salt and cayenne to taste. Continue stirring until the potatoes are smooth and hot.

3. Spoon the potatoes into a 9 x 9 dish.* Top with the mini marshmallows. Bake the potatoes in the oven for about 10-15 minutes, or until the topping is nice and browned. Alternatively, you could also place the dish under the broiler and broil the top until the marshmallows are toasted.

Note:

You can make the dish ahead too. Bring the mashed sweet potatoes up to room temperature before topping it with the mini-marshmallows. Reheat the dish in the oven until the potatoes are hot and the marshmallows are browned, about 20 minutes at 350°.

Pumpkin Cheesecake with Brown-Butter Pears


This recipe is from this month’s issue of Food and Wine magazine.

Though it seems like a lot of work, the cheesecake comes together quite quickly and has a incredibly light and refined texture. Browning the pears in butter took longer than the recipe specified (maybe I should have not been so lazy and divided up the pears into batches), but they were still a delicious topping to have.

In the future, I might experiment with some kind of Concord grape topping instead. Purple and orange can look so nice together, and the punchier grapes might be the tangy hit of acid that can turn a great dessert into something sublime.

Ingredients:

For the cheesecake:

8 ounces of gingersnap cookies

2/3 of a cup, plus 2 tablespoons of sugar

Salt

2 tablespoons of unsalted butter, softened

12 ounces of cream cheese, softened

1 cup of canned pumpkin puree

1/2 teaspoon of pure vanilla extract

2 large eggs

1/4 cup of all-purpose flour

1/8 teaspoon of ground cinnamon

A pinch of freshly grated nutmeg

For the brown-butter pears:

4 tablespoons of unsalted butter

3 large, ripe Bartlett pears, peeled and cored*

1 teaspoon of sugar

How to prepare:

1. Preheat the oven to 350°. In a food processor, pulse the gingersnaps with 2 tablespoons of the sugar and a pinch of salt until fine crumbs form. Add the softened butter and process until moistened. Using your fingers, press the gingersnap crumbs into the bottom of a buttered 9-inch springform pan in an even layer. Bake the crust for about 10 minutes, until it is lightly browned. Let the crust cool slightly, then wrap the the bottom of the pan tightly in aluminum foil so it’s watertight. You might need to overlap several sheets to make sure that you have everything covered and sealed. Set the pan in a large, deep skillet or a small roasting pan.

2. Using a paper towel, wipe out the food processor bowl. Add the softened cream cheese, pumpkin puree, vanilla extract and the remaining 2/3 cup of sugar to the food processor bowl and process for about 30 seconds until smooth. Add the eggs and pulse to blend. Add the flour, cinnamon, nutmeg and 1/2 teaspoon of salt and process for about 30 seconds, or until smooth.

3. Carefully pour the pumpkin filling over the gingersnap crust. Set the skillet in the oven and carefully pour in enough hot water to reach halfway up the side of the springform pan. Bake the cheesecake for about 50-55 minutes, until the filling is barely jiggly in the center. Carefully transfer the skillet to a rack and let the cheesecake cool. Remove the aluminum foil. Run a sharp knife around the edge of the cheesecake and refrigerate the cheesecake until it is firm, at least 4 hours or overnight.

4. Cut the peeled and cored pears into thin wedges with a sharp knife. In a large skillet, cook the butter over moderately high heat until it is lightly browned and nutty-smelling, about 3 minutes. Add the pear wedges and cook, turning until they are softened and lightly browned. Add the sugar and cook, turning until the pears are more browned and glazed, about 1 minute longer.

5. To serve, remove the springform ring. Cut the pumpkin cheesecake into wedges and serve with the warm pears.

Tips:

To easily core a pear, cut the pear in half and use a melon baller to remover the core.

This cheesecake can be refrigerated for up to 3 days. Warm the pears up on the stove before serving.

Cranberry Sauce with Grand Marnier and Candied Orange Peel


Cranberry sauce from scratch is so easy to make, and tastes so much better, that I have always wondered why anyone bothers with the sauce out of a can.

People do love the canned stuff though.

Shopping for Thanksgiving dinner with my boyfriend became an exercise in Abbott & Costello-esque absurdity as he kept putting a can of jellied cranberry sauce in the cart, and I kept removing it and putting it back.

“But it has rings that show you where to slice it!” he whined as I removed the can one last time.

Now, I must admit a fondness for tubular food: sausages, Boston Brown Bread, cannolis. Even the occasional Twinkie finds its way down my gullet about once a year.

But if you have ever had whole berry, home-made cranberry sauce, you know how really wonderful this condiment can be. No longer an afterthought plopped out of metal cylinder, real cranberry sauce can bring just the right hit of acid to the richness of the assembled dinner plate. Done right, it smells like the holidays: candied citrus, cloves, cinnamon. All warmth, sugar, spice, and everything nice.

The very basic recipe involves just three ingredients: cranberries, water, and sugar. It is essentially jam, which sounds intimidating to make but really isn’t.

To that, there are nearly endless variations. Feel free to play with it. No Grand Marnier? How about some rum? Or brandy? Try O.J. No orange peel? Got a lemon? Nope? No problems. Apples? Why not! Raisins? Throw in a handful for fun. Just feel your way through it. It will taste marvelous, I assure you.

And the other beauty? It can be made days before dinner, leaving you free to worry about something else. Even better, as the flavors meld together, it will be much yummier on day 3 than day 1.

Ingredients:

12 ounces of fresh cranberries

1 cup of water

1 cup of sugar

The zest from 1 untreated, organic orange*

1/4 cup of Grand Marnier or Cointreau, plus 1 tablespoon

3-4 whole cloves

1 cinnamon stick

A pinch of salt

Special equipment:

A citrus zester

How to prepare:

1. In a medium saucepan over medium-high heat, combine all the ingredients. Bring everything to a boil, stirring continuously to dissolve the sugar. Once the mixture begins to boil, reduce the heat so that it is at a slow, constant simmer. Continue to stir so that it doesn’t burn. As the sauce comes together, you might notice some foam or scum that appears on the surface. Don’t worry about skimming it off as it will dissipate as the sauce thickens.

2. Continue to simmer and stir until the mixture begins to jell. If you are slightly unsure what this means, you can put a small plate in the fridge and periodically test the thickness of your sauce by putting a dime-sized drop on the cold plate. If you drag your finger through it and the sauce doesn’t run back into the void you have created, it has nicely jelled and you are done. This whole process can take up to ten minutes or so.

3. Pour the sauce into a container, cover, and place it in the fridge. It will become more solid as it cools. Before serving, stir in 1 tablespoon of whatever alcohol you used if you would like extra boozy sauce — and who doesn’t?

Note:

Most citrus fruits (oranges, tangerines, grapefruit, lemons) are coated in a food-grade wax to preserve and protect the fruit. It also makes them really shiny. If you are cooking with the rind or peel of any citrus, try to look for fruit that has not be spray-treated with wax. Most fruit labeled “organic” should be untreated. How can you tell for sure?  Just scratch the surface of the fruit. If you see some clear wax on your finger nail, move on.

Homemade Hamburger Helper, Cheeseburger Macaroni


Feeding my brothers and myself must have been a challenge for my mother. Raised in Hong Kong, she grew up with a keen taste for fried dace and chicken feet — something that she failed to pass on to her Americanized kids. Consequently, she found convenience foods to be, well, really convenient!

One of those was Hamburger Helper. You remember it: the prepackaged sodium-bomb, like macaroni and powdered cheese mix but with meat that you had to add. When I started cooking for myself, it was foods like this that I rebelled against, forsaking as well store-bought salad dressings and mayonnaise in favor of making them from scratch like a good little French bonne femme.

Over time, I’ve found that hard feelings against certain foods does soften, and when contemplating what to do with a lone pound of CSA ground beef, I decided to recreate that fresh-from-the-box flavor without the box.

This recipe is a variation on one that appeared on Eating Well’s site called “Hamburger Buddy.” Clearly, that recipe was designed to surreptitiously feed fussy children vegetables by processing their suggested daily servings into indistinguishable purée.

While this might fool kids, it did not fool my boyfriend (“What is this? CARROTS?!).

I actually didn’t mind the carrots, but as adults feeding adults, I don’t think that you need to be so sneaky. Upon reflection, the dish would probably taste closer to the “real” thing if the carrots were omitted. It is quite tasty nevertheless. Betty Crocker be damned!

Ingredients:

3 cloves of garlic, peeled

2 medium carrots, cut into 2-inch pieces (optional, see post above)

10 ounces of white mushrooms, sliced

1 large onion, cut into 2-inch pieces

1 pound of very lean ground beef

2 teaspoons of dried thyme

Salt and freshly ground pepper to taste

1 1/2 cups of water

2 cups of chicken stock

8 ounces of elbow macaroni

2 tablespoons of Worcestershire sauce

8 ounces of sour cream

1 cup of shredded sharp Cheddar cheese

1 tablespoon chopped fresh parsley or chives

How to prepare:

1. Fit a food processor with the steel blade attachment. With the motor running, drop in the garlic cloves through the feed tube and process until minced. Add the carrots to the minced garlic and process until finely chopped. Add the onion and pulse until it is roughly chopped.

2. Cook the beef in a large straight-sided skillet or Dutch oven over medium-high heat, breaking it up with a wooden spoon until it is no longer pink. This should take about 3 to 5 minutes. Stir in the mushrooms, chopped vegetables, and thyme. Stirring often, cook until the vegetables begin to soften and the mushrooms release their juices, about 5 to 7 minutes.

3. Stir in the water, chicken stock, macaroni and Worcestershire sauce. Bring everything to a boil. Reduce heat to medium and continue to cook, stirring occasionally, until the pasta is tender, about 8 to 10 minutes.

4. Stir in the sour cream and the shredded cheese. Adjust seasoning. Simmer, stirring often, until the sauce has thickened, about 2 minutes. Toss in the parsley or chives right before serving, stirring in order to distribute the fresh herbs evenly throughout the pasta.

New Amsterdam Market Update: Grass-Fed Beef Sliders with Pickled Onions and Ronnybrook Horseradish Crème Fraîche

A great day at the New Amsterdam Market yesterday as Alexis and Amanda from Jimmy’s 43 slung sliders and I talked up High Point Farms upcoming Harvest CSA!

Thanks to everyone who made it out and dropped by to say “hi”! It was great to see you all and give you a chance to try some amazing meat.

The sliders were super easy to put together, but unfortunately I don’t have the recipes for either the onions or the horseradish crème fraîche. If you end up giving it a go, please do let me know how it turns out!

Thanksgiving 2010 Menu

Thanksgiving is my favorite holiday. It’s my gastronomic Superbowl. Completely secular, it is a holiday all about good food, in Pantagruel-esque quantities, with good drink and good friends.

Though it falls on a Thursday, Thanksgiving weekend really begins on Wednesday, which is when every weekend should start!

For years now I have been happily hosting dinner for 8+ in tiny apartments all over. There is nothing I love more that warmly welcoming stretchy-panted, hungry friends and feeding them till they pass out in tryptophan comas on the floor.

Over the years, I’ve developed a Thanksgiving game-plan that has served me well. A week before, I start doing a general clean-up and throw-out of things that have been lying around for the past year. Like spring-cleaning, but in the fall. The menu gets put together, the fridge gets emptied of furry pickles, food orders and deliveries get coordinated. The days get closer, the menu gets formalized, and the anxiously anticipated prep work begins…

Thanksgiving Menu, New York City 2010

Champagne Cocktails

Roasted Turkey with Rosemary Gravy
Fresh Sage and Onion Stuffing
Cranberry Sauce with Grand Marnier and Candied Orange Peel
Mashed Potatoes with Aged White Cheddar Cheese and Sage
Three-Cheese Mac & Cheese
Kale Caesar Salad
Green Beans with Caramelized Shallots
Maple Syrup Sweet Potatoes topped with Tiny Marshmallows
Pumpkin Cheesecake with Brown-Butter Pears and Gingersnap Crust

New Amsterdam Market Event: Join a Meat CSA this weekend and eat better!

Photo courtesy of High Point Farms.

With all the news lately about salmonella in eggs, turkey recalls, and the adverse effects of antibiotics in meat, consciousness about what we put in our bodies and how we treat the environment is growing. Vegetarianism is always one option, but another way to ensure that you are responsibly feeding you and your loved ones the safest and best food that you can is to join a local meat CSA.

CSA stands for Community Supported Agriculture. Far from the Midwestern industrial farms and feedlots that supply most East Coast supermarkets, CSA’s grow our local economy. They improve the quality of our food supply while also supporting the environmentally-friendly practices, sustainability, and humane animal husbandry.

As many of you know, I joined with my first CSA last spring. A CSA was something that I had always wanted to do, but was always hesitant because I had only heard of vegetable CSA’s. Also, I wasn’t sure if signing up for several pounds of perishable leafy greens a week would work with my schedule and lifestyle. When I heard about High Point Farm’s meat CSA, immediately I knew that this was something that would work with me. It has been a great experience, and the meat is so good and so addictive that I had to get more involved to spread the word!

Each CSA membership to High Point Farms, in Trumansburg, NY, gives you the opportunity to join the food revolution and voice your support for local agriculture and humanely-raised animals. Shares of their Harvest Meat CSA Memberships are still available.

Each share is a mix of Beef, Pastured Pork, and Free-Range Chicken.  The cows graze on grass in the summer, hay in the winter, and are not fed any grain. The pigs are pasture-raised, and the chickens freely roam the farm, feeding on bugs and whatever else nature provides. All animals raised in humane manner, without the use of any growth hormones or antibiotics. Owners Tina and Robert MacCheyne lovingly care for all of their animals. You can taste their efforts in every delicious bite.

Choose to be a part of the Manhattan, East Village distribution starting in December through February 2011. The distributions are every other Wednesday at Jimmy’s 43 on 7th Street.

High Point is also offering cheese shares from a neighboring farm, and an egg share from their own pasture-raised chickens. The eggs are a dream! The yolks are almost cartoonishly yellow, such a rich flavor and color that I find it really hard to go back to supermarket eggs.

For more information go to the CSA Page at www.highpointfarms.net or http://highpointfarmsnyc.wordpress.com/

This weekend, I’m going to be at the New Amsterdam Market, volunteering to talk up the CSA and give you the chance to have some awesome sliders made with their meat. Come and say, “hi,” on November 21st! I’ll be at the Jimmy’s 43 stand (they’re cooking, I’m talking) from 11AM to 4PM. See you there!

Smoked Ribs


Like spies, every cook has a special touch that they add to each recipe, the divulgence of which might require them to kill you.

Not even blood seems to carry any guarantee of full, honest disclosure — a lesson I learned one Thanksgiving after trying to reproduce my mom’s famous apple cake. I remember faithfully transcribing the recipe over the phone (“3 and 1/2 cups of vegetable oil? Really, Mom? 3 and a 1/2 CUPS?”), and then watching horrified as my cake separated into one layer of oily apple slurry, and another of just oil.

Later, recounting my disaster to my mother, she interjected by saying, “3 and 1/2 cups? That’s crazy! You were supposed to only put in 3 and 1/2 tablespoons!”

Did I mishear my mother the first time? I don’t think so. Do I think she did it on purpose? Yes, I do.

A recent boomerang trip to Texas for my boyfriend’s niece’s baptism yielded a great opportunity for some excellent home-cooked, home-smoked grub. His brother-in-law loaded up the truck with the smoker, and the smoker with mesquite and several pounds of pork and beef ribs.

After four and a half hours of smoking, they emerged toothsome and succulent. The ribs were full of meaty chew and savory smoke. Absolutely delicious.

When asked what the recipe was, he and his wife threw out a nonchalant, “Oh, a little bit of this, and a little bit of that.” From the bits of scant information, it seems like a marinade and a rub was involved. Apple cider vinegar, brown sugar, thyme.

Any more information than that, and they would have to kill you.

Ingredients:

A mix of pork and beef ribs

Special secret marinade

Special secret rub

Special Equipment:

One smoker

Mesquite

One boyfriend’s brother-in-law

One boyfriend’s sister

How to prepare:

1. Get a round-trip ticket to Texas.

2. Persuade boyfriend’s family to smoke some meat.

3. Put on stretchy pants.

4. Pass out in a happy food coma.

Finnish Ruis Bread with Sliced Cheddar and Cucumber


Last week’s trip the the New Amsterdam Market yielded all kinds of goodies. A smoked duck breast here, a bushel of Winesap apples there, and a couple rounds of Finnish Ruis bread from Nordic Breads rounded out our market basket.

Chewy and deliciously dense, these Finnish rye breads are perfect for all kinds of tasty toppers. Following the example of Nordic Breads’ bakers, we smeared lightly toasted halves of bread with good unsalted butter, topping this with thin slices of cloth-bound cheddar cheese and cucumber. Each round is reasonably thin, so it is a good idea to cut each round in halves or quarters before splitting them. In a pinch, I would imagine that a good, dark, heavy rye bread would do. Once assembled and finished with a little Maldon salt, these sandwiches make a very wonderful snack or light supper.